Mission-by-mission player guide · Imperial capital prologue
Sith Warrior: Vengeance — Dromund Kaas
Find your way through the Dromund Kaas Sith Warrior story as a Juggernaut with Vengeance discipline: Cargo Port B7, Commander Pritch, Grathan's Central Compound second floor, the Ravager, and your private ship hangar.
7 missions and stagesKaas City, Grathan Estate and Dark TempleFloor and entrance directionsVengeance Juggernaut
LOST OR STUCK? · MAP AND FLOOR CHECK
Before chasing the quest marker, check the route
Choose the active story mission.Press L to open the mission log and track the named Sith Warrior objective. A purple mission symbol marks important story content, but not necessarily YOUR class mission. Follow the exact title and task shown in this walkthrough.
Open the full map.Default M opens the main map. Alt + M toggles the overlay map and minimap. If your shortcuts differ, check your assigned keybinds. Start with the WORLD region, then switch to the current AREA or interior floor map.
A marker behind a wall is not a doorway.On the world map find the correct district or zone; on the local map look for the named cave, station, building entrance, lift, security door or staircase. When the target is on another floor, find a connecting passage before heading toward its map symbol.
Know which travel option is available.Quick Travel opens a world map with available travel-point filters. Choose an unlocked destination on your current planet and pay attention to any restrictions or costs shown in-game. For a new planet, use your Fury's Galaxy Map and the orbital station surface shuttle instead.
If the marker does not advance, check the VERB.Talk, use, loot, disable, exit and return to your ship are separate mandatory interactions. Read the mission's “If you are stuck” note below before fighting more unrelated enemies.
Find the entrance, finish the objective, know where to return
Start at the Dromund Kaas spaceport and enter Kaas City, where Darth Baras assigns the rest of these missions. Each route names the correct exterior destination and the interior building, door or floor confirmed by mission records. A world-map image helps identify regions, but is not a precise second-floor corridor plan.
Story choices matter. In Laying Waste, Cellvanta may offer an alternate outcome. That optional follow-up is included directly between the main story missions and clearly marked conditional. All seven entries are immediately readable.
Real game maps and sourced images
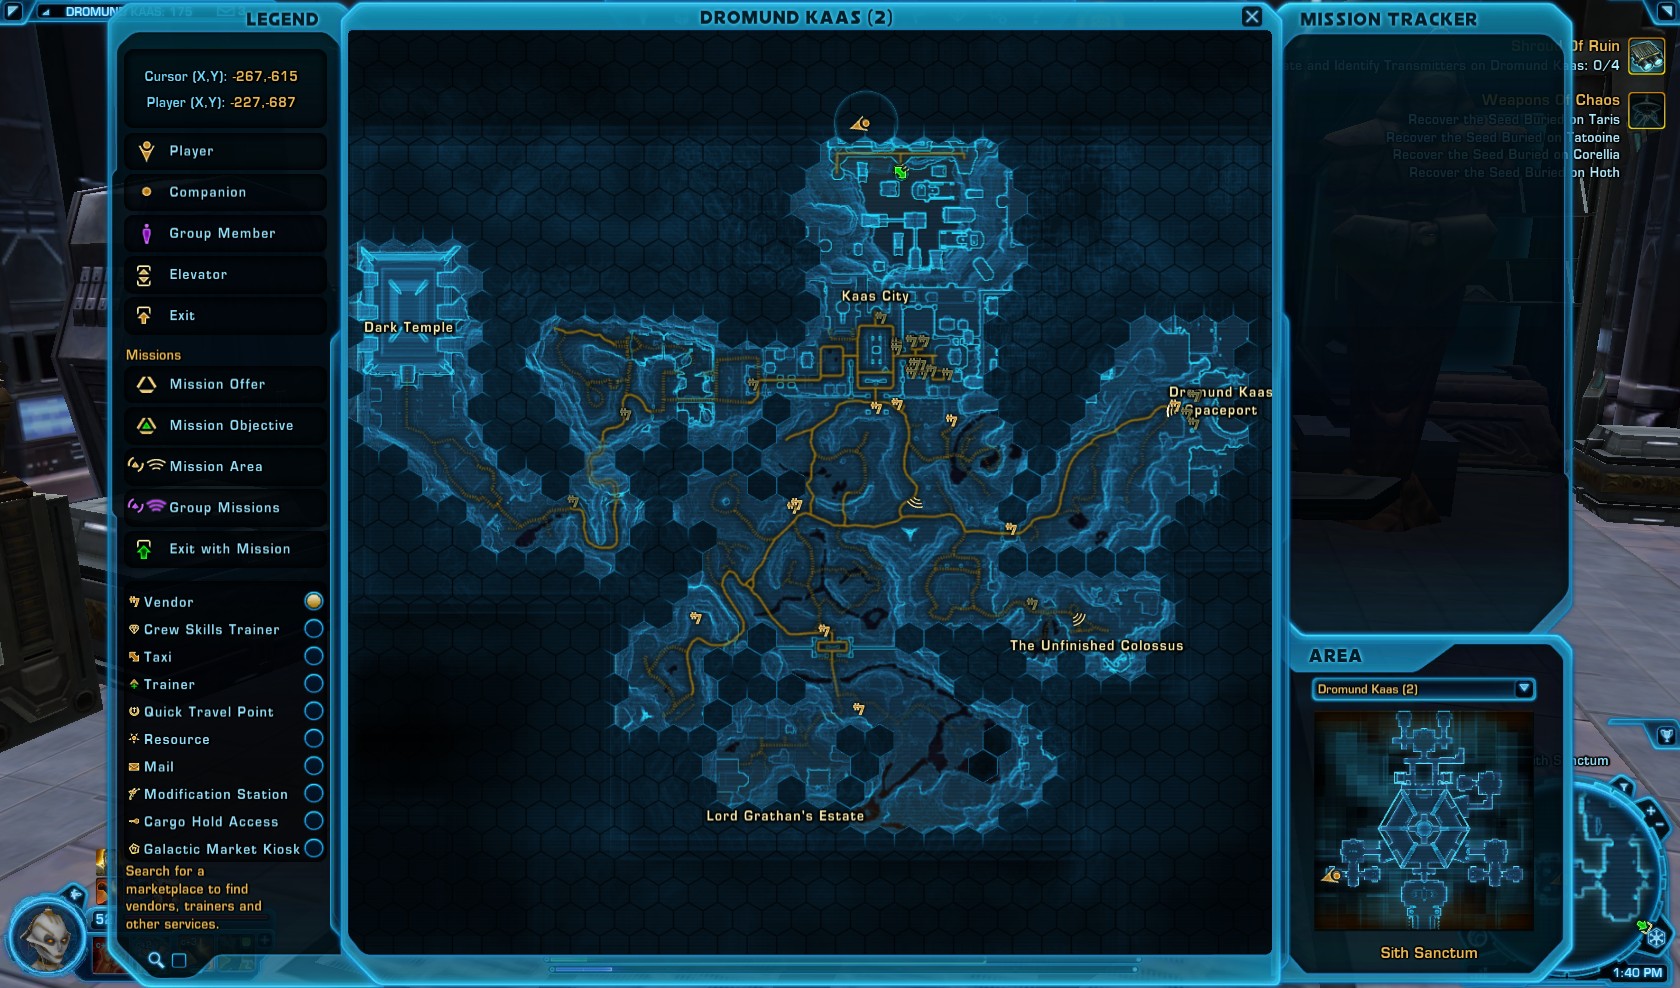
Dromund Kaas regional maps
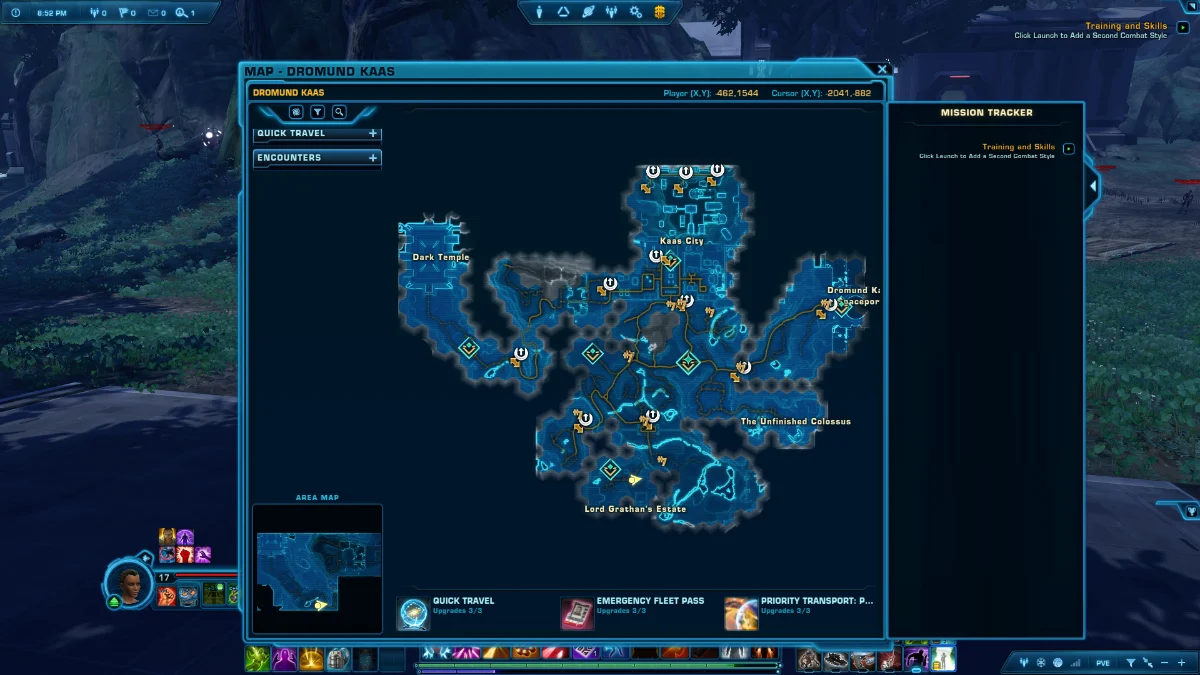
These images are published player or forum references, not newly generated maps. Use them to recognize the area names and relative locations. An external world map cannot replace the mission-specific floor map once inside a building.
Dromund Kaas 2025 World Map
2025 official SWTOR forum screenshot of the revised World Map. Identifies Kaas City, Dark Temple, Grathan's Estate, Unfinished Colossus and the spaceport; not a screenshot of each interior hallway.
Keep Vette set to Healing if you prefer easier quest fights. Charge into reachable enemies with Force Charge where available, prioritize dangerous ranged or elite enemies, and use your defensive cooldowns when the Dark Temple or Grathan compounds put several enemies around you at once.
Vengeance abilities
Equip your best appropriate one-handed lightsaber and check your Ability Tree for the skills you have unlocked at your current level. Vengeance is the Juggernaut damage discipline, so prioritize its offensive abilities rather than following Immortal tank gear recommendations. Understand each stat →
MISSION 01 / 07 · Main story · Arrival
The Flight to Dromund Kaas
Before you can take assignments from Darth Baras, finish the arrival sequence. The story explicitly requires the spaceport arrivals console and travel into Kaas City.
On the Imperial Fleet, follow the Dromund Kaas shuttle objective and board the correct planetary transport. This is travel for The Flight to Dromund Kaas, not a combat mission on the Fleet.
Check in at the spaceport arrivals console
After landing at Dromund Kaas Spaceport, do not immediately try to find Baras outside. Your mission's next interaction is the Arrivals Console inside the arrival facility. Use the marker for that console and complete the check-in.
Meet the arrival contact in Docking Bay O-17
Baras's servant Sunder Ghettz has been sent to greet you at docking bay O-17. Check the room or corridor marker after using the arrivals console and finish the conversation if shown.
Travel from the spaceport toward Kaas City
Open the Dromund Kaas World Map and identify Kaas City, northwest of the eastern spaceport. Follow the main transport/road connection into the city instead of running toward a distant indoor marker across the jungle.
Enter the Citadel and locate the Sith Sanctum
In Kaas City, go into the Citadel and take its interior access to the Sith Sanctum. Baras is inside his chambers. Reopen the local map after entering the building, then speak to him to complete The Flight to Dromund Kaas.
Cannot find the objective?
The objective can seem to point directly to Baras while your current area is still the spaceport. The mission specifically inserts the arrivals console and travel to Kaas City before the Sith Sanctum conversation.
Other activities: The Black Talon flashpoint is another Fleet activity but is not mandatory for this class-story transfer.
Arrival console, spaceport contact and Kaas City sequence verified in TORCommunity mission data; specific city corridor turns still require in-game screenshot confirmation.
Baras sends you to oversee the arrival of a Republic prisoner in Cargo Port B7. The cargo port is a distinct city destination, not the general Dromund Kaas spaceport where you first landed.
Start
Darth Baras in the Sith Sanctum
Finish
Darth Baras in the Sith Sanctum
The route to follow
Sith Sanctum→Kaas City map→Cargo Port B7→Commander Lanklyn→Ambush / escort→Sith Sanctum
Leave the Sith Sanctum and locate Cargo Port B7
After taking the assignment from Baras, exit the Sith Sanctum into Kaas City. Open the city map and find the area transition or tracked marker for Cargo Port B7. Do not travel back to the planetary arrival shuttle.
Go through the Cargo Port B7 entrance
Follow the local Kaas City route until you reach the cargo facility. Enter Cargo Port B7 before trying to approach Commander Lanklyn; the objective is tied to this separate port area.
Speak to Commander Lanklyn
Find Lanklyn supervising the transfer. Start his dialogue, then follow the changing objective within the port. The transfer can lead to an attack by Slestack's or TuMarr's people.
Defeat the attackers according to your conversation branch
One mission branch lists Slestack and his thugs, another TuMarr and his thugs. Defeat the enemies your active objective names and speak to Commander Lanklyn again when the log updates.
Return to Baras in the Citadel
Leave Cargo Port B7 by its marked exit, return to the Sith Sanctum and speak to Darth Baras. Your next story mission begins in the same chambers.
Cannot find the objective?
If you only see a faraway mission circle, first find the Cargo Port B7 area entrance. It is not the Dromund Kaas arrival spaceport, and the encounter occurs after you enter the port.
Other activities: The opponents change with dialogue branching, so a guide should not force every player to fight both named groups.
Cargo Port B7, Lanklyn, branching attacker names and final return are explicitly recorded in the quest database.
Commander Pritch operates from an Imperial post near the Unfinished Colossus, outside Kaas City. You must reach the outpost before pursuing rebel slave captains.
Follow the regional path from Kaas City to the Unfinished Colossus
Open the Dromund Kaas World Map and find the Unfinished Colossus area southeast of central Kaas City. Leave the city by its connected road and follow the region transition. The blue city map and outdoor jungle paths are separate views.
Find Commander Pritch at the Imperial post
Once in the Unfinished Colossus region, use the local map to identify the Imperial post. Speak to Pritch before hunting captains. He explains the slaves' blackmail and the records you need.
Handle the three rebel slave captains
The mission can ask you to defeat three Rebel Slave Captains. Search the marked slave camps in the same region, defeat only the captains required for the objective and watch the count reach three of three.
Retrieve or retain the captains' logs
On the branch where the objective becomes Find the Captains' Logs, interact with the indicated logs as the mission marker updates. The records document the captains' dealings and are the evidence Pritch needs.
Return to Pritch before leaving the region
Do not travel back to Baras immediately after completing the captain fights or finding logs. Return to the Imperial post to speak with Commander Pritch and finish his part of the mission.
Return to the Sith Sanctum in Kaas City
Travel back through the connected road or an unlocked travel point to Kaas City. Enter the Citadel and Sith Sanctum, then finish the mission with Darth Baras.
Cannot find the objective?
The red slave enemies spread across the Unfinished Colossus, but the key objective is the captains and their logs. If the log says Return to Commander Pritch, return to the nearby Imperial post first.
Other activities: Quashing the Rebellion (Bonus) asks for 20 rebel slave defeats. It is not required to complete the main mission.
Pritch's outpost, three captains, branch-dependent logs and return to Baras verified in TORCommunity; individual slave camp turns are not claimed without a map capture.
This is the main navigation trap on Dromund Kaas. The contacts are in the Warehouse Offices, but the later security targets and Beelzlit's room are inside the Central Compound on its second level.
Open the Dromund Kaas World Map and locate the estate south of Kaas City. Follow the connected southern roads into Lord Grathan's Estate rather than treating the objective marker as a direct path through the jungle.
Enter the Warehouse Offices to meet Dri'kill Ba'al
Look for the Warehouse Offices inside the estate. Enter that building and speak to Baras's undercover agent, Dri'kill Ba'al. The story objective updates after you accept his plan.
Move to the estate's Central Compound
Leave the Warehouse Offices and find the main Central Compound entrance. The sabotage targets are not in the warehouse where Ba'al first spoke to you. Inside the Central Compound, check which interior level your marker uses.
Destroy three separate monitoring stations
Find and interact with the Elevator Monitoring Station, the Main Room Monitoring Station and the Hallway Monitoring Station. These are distinct objects. Check your Mission Log until all three are shown as complete.
Unlock the security door before seeking Beelzlit
After the surveillance stations are disabled, go to the security door and unlock it. Continuing toward a second-floor mission marker before doing this leaves the actual room inaccessible.
Reach Beelzlit and Cellvanta on Level 2
The quest text explicitly places Beelzlit's chambers on the second level of the Central Compound. Take the internal lift or staircase connecting to that floor, enter the chamber and speak with Beelzlit and Cellvanta Grathan.
Follow the outcome of your conversation
Your choice may lead to fighting Cellvanta and Beelzlit or helping Cellvanta remove Lord Grathan. On the replacement branch, Cellvanta supplies a passcard to the private chamber, also on the second level.
If helping Cellvanta, open Grathan's private chamber
Use the supplied passcard on the secret second-level door, confront Lord Grathan, defeat him and take his mask. Return to Cellvanta and Beelzlit in their chamber to complete their part of the outcome.
Return to Dri'kill and then to Darth Baras
Revisit Dri'kill Ba'al at the estate. Depending on the dialogue, you may fight Ba'al and Grathan's guards before you leave. Once his part is resolved, travel back to Kaas City and report to Baras in the Sith Sanctum.
Cannot find the objective?
If your marker sits inside the Central Compound but a door will not open, first verify all THREE surveillance targets are destroyed. If Beelzlit remains unreachable, confirm you are on Level 2 rather than the warehouse or ground-floor map.
Other activities: Cellvanta's Gratitude is a conditional story follow-up when you take the branch that removes Lord Grathan; players who choose another outcome may not see it.
Warehouse Offices, three exact monitoring station names, security door, second-floor Beelzlit chamber, Grathan passcard and branch consequences are in TORCommunity. Specific hallway turns still await game capture.
This short stage appears when you choose to kill Lord Grathan and leave Beelzlit in charge. It happens inside the same compound and does not require a return to Kaas City.
Start
Cellvanta in Beelzlit's chambers after the Grathan replacement branch
Finish
Cellvanta in the same room
The route to follow
Central Compound Level 2→Lord Grathan's private chamber→Beelzlit's chamber→Speak to Cellvanta
Complete the Lord Grathan branch inside the compound
During Laying Waste, take Cellvanta's proposal, use the access pass and defeat Lord Grathan in his second-level private chamber. Other conversation outcomes do not necessarily unlock this stage.
Return to Cellvanta and Beelzlit on Level 2
Stay on the Central Compound's second floor. Backtrack from the private chamber to the nearby Beelzlit chamber; do not exit the estate or search for a mission giver in Kaas City.
Speak with Cellvanta and complete the reward conversation
Tell Cellvanta Lord Grathan is gone, finish the gratitude exchange and accept the reward or dialogue consequence offered in your branch. Resume the active main Laying Waste handoff afterward.
Cannot find the objective?
If Cellvanta's Gratitude does not appear, check which outcome you chose in Laying Waste. It is branch-dependent, so missing it does not block the main Sith Warrior campaign.
Other activities: This is a story branch within Laying Waste and is not mandatory for players who select other outcomes.
The conditional dialogue, location and reward stage are confirmed by the mission database; not a mandatory global story step.
The Ravager is in a secret chamber deep inside the Dark Temple. Finding the machine is only the beginning: you must collect four components, confront Lord Vacuus and repair it before returning.
Leave the Sith Sanctum and go to the Dark Temple region
Open the Dromund Kaas World Map and identify the Dark Temple on the western side of the region. Follow the road connections through the jungle to the Dark Temple grounds. This is not the Sith Sanctum you just left.
Enter the Dark Temple and follow the interior mission marker
Cross the temple threshold and switch to its interior map. The objective is a Ravager chamber within the temple, so do not circle the exterior walls when the marker appears nearby.
Find the Ravager and check the updated objective
Locate the machine bearing the Ravager inscription. Interact with it when prompted; the next step reveals that four components are missing.
Recover all four Ravager components
Search the marked Dark Temple rooms for the required components. Confirm the counter reaches four of four before returning to the machine. Do not return to Baras with a partial counter.
Return to the Ravager, then confront Lord Vacuus
Go back to the Ravager chamber after collecting the components. Speak to Lord Vacuus when he appears. Defeat Vacuus and the Deranged Excavators according to your current objective.
Repair the Ravager using the collected pieces
Return to the machine and interact with it to repair the Ravager. Wait until the mission advances to Return to Darth Baras before leaving the temple.
Leave the Dark Temple and return to the Sith Sanctum
Retrace the interior route to the exterior temple grounds and follow the road or unlocked travel method back to Kaas City. Enter the Citadel, then the Sith Sanctum, and report to Darth Baras.
Cannot find the objective?
A marker at the Ravager chamber does not finish the mission: the repair step appears AFTER four component pickups and the Lord Vacuus encounter. Watch the exact Mission Log line before leaving the Dark Temple.
Other activities: Additional Dark Temple lore, enemies and exploration missions are not part of the four-component Ravager sequence.
Seven exact phases—Ravager, four parts, Vacuus, excavators, repair and Baras return—verified in TORCommunity. Individual component coordinates were not published in the sources inspected.
Baras gives you your own starship at a private hangar in Dromund Kaas Spaceport. The ship cannot be accessed until you finish the encounter with Ralesk.
Leave the Sith Sanctum after Baras gives the ship assignment
Finish An Ancient Answer and speak with Baras to start Leaving Dromund Kaas. Your next destination is the private Sith Warrior hangar at the Dromund Kaas spaceport, not an ordinary taxi stop in Kaas City.
Return to the spaceport and locate the Sith Warrior Hangar
Travel from Kaas City to the Dromund Kaas Spaceport. Within the facility, follow the dedicated Sith Warrior Hangar destination or interior exit breadcrumb. A generic shared hangar may be the wrong door.
Speak to Ralesk in the hangar
Before entering the ship, Ralesk confronts you. Complete the dialogue, then defeat Ralesk as instructed by the Mission Log. He is the obstacle between you and the starship.
Board the Fury-class interceptor and use its bridge holoterminal
Enter your ship after the hangar is safe. Go to its bridge and interact with the holoterminal to contact Darth Baras. Using the holoterminal—not simply boarding the vessel—finishes the current story stage.
Check the next Sith Warrior mission on the Galaxy Map
Once the holoterminal conversation completes, inspect the next Origin Story mission and its travel destination. The following chapter opens beyond Dromund Kaas.
Cannot find the objective?
If the ship door is inactive, check whether Ralesk still has an outstanding dialogue or combat objective. If you are inside the ship but the story won't advance, use the BRIDGE HOLOTERMINAL.
Other activities: Other spaceport activities are not required to finish this class-story handoff.
Private hangar, Ralesk dialogue and fight, and bridge holoterminal all appear verbatim in the quest database.