Follow all Sith Warrior story missions on Korriban with a Vengeance Juggernaut. Includes the Ajunta Pall armory, Academy prison, Lower Wilds taxi, three Tulak Hord shards, four Naga Sadow switches, and the Imperial Fleet transfer.
Korriban prologue9 story missions and stagesDoors, floors and return routesSith Juggernaut · Vengeance
LOST OR STUCK? · MAP AND FLOOR CHECK
Before chasing the quest marker, check the route
Choose the active story mission.Press L to open the mission log and track the named Sith Warrior objective. A purple mission symbol marks important story content, but not necessarily YOUR class mission. Follow the exact title and task shown in this walkthrough.
Open the full map.Default M opens the main map. Alt + M toggles the overlay map and minimap. If your shortcuts differ, check your assigned keybinds. Start with the WORLD region, then switch to the current AREA or interior floor map.
A marker behind a wall is not a doorway.On the world map find the correct district or zone; on the local map look for the named cave, station, building entrance, lift, security door or staircase. When the target is on another floor, find a connecting passage before heading toward its map symbol.
Know which travel option is available.Quick Travel opens a world map with available travel-point filters. Choose an unlocked destination on your current planet and pay attention to any restrictions or costs shown in-game. For a new planet, use your Fury's Galaxy Map and the orbital station surface shuttle instead.
If the marker does not advance, check the VERB.Talk, use, loot, disable, exit and return to your ship are separate mandatory interactions. Read the mission's “If you are stuck” note below before fighting more unrelated enemies.
Before your first mission: build, gear and credits
Work through the Sith Academy trials before reporting to Darth Baras. Your starting quests do not change if you fight as a Marauder, Assassin or Sorcerer.
Story ≠ Combat Style: This is a Force-user Origin Story. You can use several eligible Combat Styles without changing the quests, companions or faction. Your Combat Style determines weapons, attack skills and role. Your Discipline determines whether you tank, heal or deal damage.
Choose how you actually fight
Match this to your character sheet before following the rotation advice.
Juggernaut · Vengeance · Damage
Close rangeSingle lightsaberDamage
Sith mirror of Guardian: imposing melee attacks and the option to tank.
Opposite-faction Force Combat Styles require the appropriate Light V / Dark V Legacy unlock or another eligible alignment path. Tech styles are not faction-locked. Do not select a style you have not unlocked in-game.
HOW TO FIGHT / BEGINNER ABILITY PRIORITY
Vengeance combat basics
Main attacks to recognize:Charge into range · Apply Shatter when learned · Use Impale
Charge into range → Apply Shatter when learned → Use Impale → Follow Force Scream and Ravage openings → Build Rage to repeat
Charge into range
Apply Shatter when learned
Use Impale
Follow Force Scream and Ravage openings
Build Rage to repeat
How to handle your role:Start with the strongest learned attacks, maintain any applicable damage-over-time effects, hit procs or glowing priority abilities when available, and avoid exhausting your combat resource.
Stay alive:Use Saber Ward and Enraged Defense at appropriate levels, rather than spamming every defensive on weak enemies.
This is a learning priority, not a fixed maximum-level parse rotation. Use only abilities actually unlocked in your Ability Tree (press K). A tank or healing discipline follows a different priority from DPS.
By Imperial Dark Sector
01 / Stats and gearing
While leveling, keep your actual weapon/offhand and armor item ratings current; Mastery and Power help damage. At high-level PvE boss play, aim for 110% Accuracy, then your discipline's Alacrity breakpoint, then place remaining tertiary rating into Critical. Shield/Absorb are not DPS priorities.
What equipment fits this story: A compatible lightsaber for your selected Force style; the correct focus, shield or offhand where applicable.
Put companions on Healing for forgiving solo leveling and compare the actual weapon and offhand slots before you equip a random purple-quality item. Try Fleet Supplies → Adaptive Gear and level-appropriate modification vendors before overspending on the GTN.
02 / Galactic Trade Network shopping
A reasonably priced compatible weapon and a low-level color crystal if you care about appearance. Check the weapon's modifications and equip level before buying.
Search by an item name, item level and slot, check the credit cost against the same-level Fleet modification vendors, and compare the result with your current equipped gear. Look first for missing earpiece, implants or relics and a usable weapon/offhand. Avoid expensive endgame augments and gear you will outlevel in two missions.
Planetary quest rewards and ordinary vendors are often a better first purchase than the auction house.
Alternative: Synthweaving + Archaeology + Underworld Trading for Sith outfits and Critical augments.
These are economic and crafting preferences, not requirements of the story or Combat Style. Buy occasional materials on the GTN instead of dedicating every slot to missions if you have spare credits. For credits during leveling, a gathering skill such as Scavenging, Archaeology or Slicing can be more practical than crafting.
While subscribed you get three Crew Skill slots rather than the normal one free-to-play or two preferred slots, more flexible credit use for GTN purchases, and broader access to expansion content and subscription-restricted group activities.
After meeting the relevant original-story and account requirements, a subscriber can choose a second Combat Style and use loadouts to switch equipment and builds. This does not grant a ninth class story or change your existing Origin Story. A second Combat Style selection is not a temporary respec.
Subscribers can also queue more companion crafting tasks. Availability of some content and perks depends on your current account state.
05 / The endgame in one minute
At level 80, obtain your starter endgame set, then research a discipline-appropriate Tactical and Legendary Implants. Optimize the full set, not each item in isolation. Check whether any special discipline passives change the usual Alacrity target.
At level 80, start with the appropriate gear vendors, ordinary level-80 activities and Flashpoints or Conquest. Harder Operations and PvP demand stronger role mastery, a coherent full gear set and sensible use of defensives. Buying a high-item-rating weapon from the GTN does not replace understanding your discipline.
These five-step priorities cover all 48 disciplines for 7.9-era beginner play; they are not a fixed global-cooldown parse and unlocks vary by level. Exact skills, tree choices, stat breakpoints, endgame item ratings and availability can change. Cross-check your current in-game Ability Tree, item tooltips and group content requirements.
Equip the story weapon and offhand you can actually use. Check item level and compatibility before paying GTN prices; mission rewards usually do the job.
Levels 21–40
Compare quest gear, cheap adaptive modifications and Flashpoint rewards. Replace genuinely outdated weapons, not an entire outfit every few levels.
Levels 41–60
Keep the combat role in mind: DPS and healers do not benefit from tank shielding pieces. Check empty earpiece, implant and relic slots.
Levels 61–79
Save credits for your level-80 build. Avoid costly temporary augments, buy only if drops and vendor items leave a real weakness.
Level 80 · current cap
Progress through Conquest and appropriate group content. Learn the role-specific Tactical and Legendary Implant recommendations before investing heavily in augments.
GTN checklist: correct weapon type, current item rating, allowed level, actual role benefit, price per item, and a better-priced Fleet or story alternative. Sell spare crafting materials only after checking their use in your own Crew Skills.
THE NEXT MISSION, WITHOUT GUESSWORK
Find the quest you are playing
Enter a mission title or NPC name. The search opens the combined story, side, planetary and Heroic index.
Open the Mission Log (L), select the correct purple class mission and read the active objective, not the last completed step.
Open the map (M) and switch to the correct region and floor when inside a building or underground phase.
If the objective marker seems to sit through a wall, search for the actual phase doorway, elevator, transport or nearby stairway.
After a planet finale, inspect the ship holoterminal, intercom and companion conversation prompts before flying elsewhere.
Check for parallel planet leads or mutually exclusive choices before assuming you must complete every similarly named entry.
If the guide does not have a verified entrance screenshot yet, follow the current in-game mission marker rather than a guessed coordinate.
Game version: The combat and gearing guidance above is for the 7.9-era game, level cap 80. Update 8.0, Masters of the Force, is under development with a level-85 cap, new abilities and gearing changes. The official September 30, 2026 developer letter said no launch date had been announced. Check the official 8.0 update →
FOLLOW THESE MISSIONS IN ORDER
Open the mission you are on, then follow every step
The route chains below show which area, tomb or floor comes next. They are schematic directions, not a reproduction of the game map. Where a corridor turn was documented, we name it. Where it was not, we give the verified room, objective and area transitions rather than pretending to know which door is on the left.
Every story event is described directly on the page. All mission instructions are visible, with no step or chapter requiring a reveal button.
Real game maps and sourced images
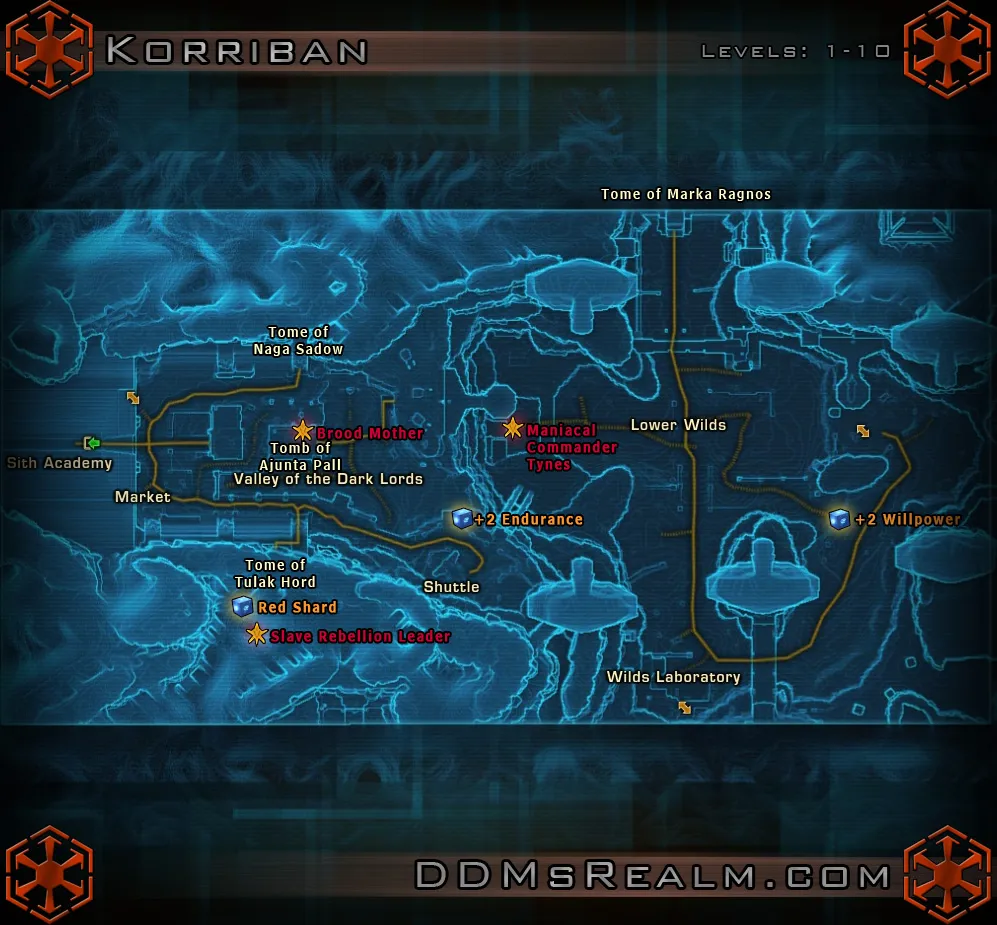
Korriban map: Academy, tombs and Lower Wilds
These images are published player or forum references, not newly generated maps. Use them to recognize the area names and relative locations. An external world map cannot replace the mission-specific floor map once inside a building.
Korriban mission-area map
Original annotated SWTOR Korriban overview (early release). Identifies the Sith Academy, Ajunta Pall, Tulak Hord, Naga Sadow, Lower Wilds, shuttle, and Marka Ragnos. Old datacron statistics and other annotations may no longer reflect current mechanics.
Map image unavailable. Use the linked original source and the landmark list below.
Locations to recognize
Sith Academy — far west, initial class mission hub
Tomb of Ajunta Pall — west-central; early warblade route
Tomb of Tulak Hord — south of the main valley path
Tomb of Naga Sadow — northwest of Ajunta Pall
Lower Wilds — farther east, connected to the Marka Ragnos region
Shuttle / skyhopper — by the Academy and lower-path junction
Arrival and early mission example
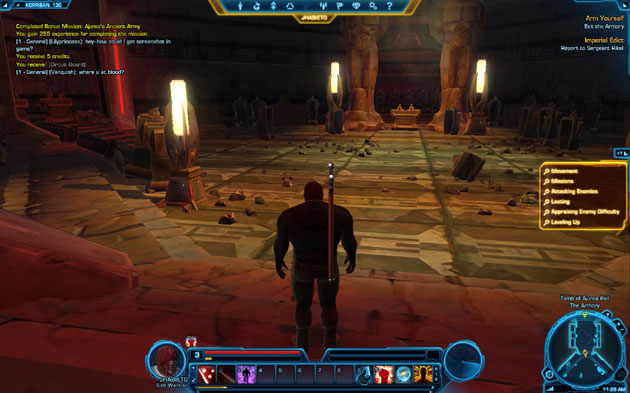
Original Sith Warrior Arm Yourself gameplay screenshot. Use this only to recognize the area/objective, not as a substitute for a marked interior-floor map.
Example: playing Juggernaut · Vengeance specifically
Sith Warrior is your Origin Story. Juggernaut is your Combat Style, using a single lightsaber and heavy armor. Vengeance is the melee damage discipline, rather than Immortal tanking. All nine Korriban objectives remain the same whatever discipline you use.
On the starter planet
Use whatever skills your current level has actually unlocked. Build Rage with the available builder attacks and spend it on your stronger attacks. Do not copy a max-level rotation that includes abilities your character cannot yet use. The warblade obtained in Arm Yourself replaces your early practice weapon; equip the lightsaber after The Final Trial.
As Vengeance develops
Vengeance eventually builds pressure through damage-over-time effects and single-target attacks. Shatter is an early discipline-defining ability around level 15. At higher levels, abilities such as Impale and Vengeful Slam broaden the rotation and help with multiple enemies. Review the Ability Tree with K and change choices as new levels unlock them.
Movement and survival
Force Charge helps close distance to reachable enemies. It will not bypass an unentered story phase or a different floor. Use defensive cooldowns available at your current level and bring Vette once the story awards her; set her companion role to Healing for a forgiving solo run.
Stats while leveling
Mastery and Power support damage, Endurance improves survivability, and Critical and Alacrity become important as gearing advances. Shield and Absorb are tank-oriented ratings; this Vengeance walkthrough does not assume Immortal tank equipment. See the stat meanings →
The sources below provide quest-level evidence and examples of the Korriban areas. An image of the armory is not a navigational map. I have not labeled a third-party map as newly verified or drawn an invented floor plan.
Ability milestone and solo leveling discussion, check version context
Each new mission route should ultimately include an actual in-game map and annotated entrance screenshot once those visuals can be accurately sourced or captured. The route text above is usable without an image.
MISSION 01 / 09 · Main story
Arm Yourself
Tremel sends you into Ajunta Pall's tomb to recover a stronger Sith warblade. This first mission also provides the route from the Arrival Port to the Academy itself: you pass through the tomb, not directly across the outside valley.
Start
Overseer Tremel at Korriban Arrival Port
Finish
Overseer Tremel in the Sith Academy
The route to follow
Arrival Port→West exit→Valley of the Dark Lords→Tomb of Ajunta Pall→Southern Armory→Upper tomb exit→Sith Academy
Speak to Tremel at the Arrival Port
After character creation you begin at Korriban Arrival Port. Complete the introduction with Overseer Tremel and accept Arm Yourself. You are looking for the ancient armory in the Tomb of Ajunta Pall, not the Sith Academy yet.
Find the west exit to the Valley of the Dark Lords
Open the local map and locate the west-side exit from the arrival area. Leave the building and enter the Valley of the Dark Lords. Keep moving west along the accessible outdoor route until you reach the entrance named Tomb of Ajunta Pall.
Enter the Tomb of Ajunta Pall, then move south
Once inside, change to the tomb's local map. Head south through its corridors toward the armory. Do not confuse this tomb with Tulak Hord or Marka Ragnos; those are used in later missions.
Take the ancient blade from the armory pedestal
Reach the armory and interact with the blade/pedestal. Equip the Sith warblade in your character's weapon slot when the mission awards it. The mission progresses as you leave the room.
Find the tomb's upper route to the Academy
Do not run back to the Arrival Port. Continue south inside Ajunta Pall's tomb and go up to the upper level, following the exit leading to the Academy. The original route guide specifically describes this upper-level exit.
Enter the Academy and go to the southeast chambers
When you emerge outside the Academy, enter the building. Vemrin confronts you on the approach. On the Academy map, head to the southeast section for Tremel's relocated chambers, speak to him and finish the mission.
Cannot find the objective?
If your map shows Tremel on the other side of a wall, you are probably still on the wrong tomb level. Follow the internal corridor toward the upper exit to Sith Academy, then reopen the map.
Other activities: K'lor'slug and ancient-droid bonus missions can trigger as you travel. They are not required to complete the Sith Warrior story.
Documented turn and level directions from an original quest walkthrough, cross-checked with SWTOR's mission record.
Tremel tests your judgment by sending you to Jailer Knash to decide what should happen to three prisoners: Solentz, Devotek and Brehg. All objectives are within the Sith Academy.
Open the Academy interior map. The jail is in the northwest corner, while Tremel's office is in the southeast section. Take the Academy corridors toward the northwest prison wing rather than exiting the building.
Speak to Jailer Knash
Enter the jail room, find Jailer Knash and initiate the prisoner examination. Each prisoner is handled through the jail sequence; you do not need to travel to a separate world zone.
Complete Solentz's hearing
Deal with Solentz's case through the conversation choices. Depending on the action, you may fight her. Speak with Knash again whenever the task changes to return to him.
Complete Devotek's hearing
Speak to Devotek, the veteran soldier. If you accept his request for combat, defeat him and then report back to Jailer Knash for the next prisoner.
Complete Brehg's hearing and report
Decide Brehg's fate. Once all three prisoners have been handled, exit the jail and cross the Academy back toward Tremel's southeast chambers. Speak to him to complete the second trial.
Cannot find the objective?
If the objective shows a prisoner but you cannot interact with the next one, return to Jailer Knash first. The mission database repeatedly lists Knash between prisoner interactions.
Other activities: Each case offers different conversation outcomes; all approved paths let you continue with the class story.
Jail location and prisoner sequence documented by an original mission walkthrough and the mission database.
The beast lives deep in Marka Ragnos's tomb. The crucial shortcut is to use the shuttle/taxi from the Academy to the Lower Wilds instead of running blindly across the entire planet.
Start
Overseer Tremel after the prisoner judgment
Finish
Overseer Tremel in the Sith Academy
The route to follow
Academy shuttle droid→Taxi to Lower Wilds→Tomb of Marka Ragnos→Antechamber carving→Academy return
Leave the Academy and find its shuttle droid
Outside the Sith Academy, locate the shuttle/taxi droid. The mission specifically tells you to speak to this droid and travel to the Lower Wilds.
Take the taxi to the Lower Wilds
Select the Lower Wilds destination. This is the correct arrival area for Marka Ragnos, rather than the Tomb of Ajunta Pall that you visited earlier.
Follow the Lower Wilds route to Marka Ragnos's tomb
From the taxi stop, follow the marked accessible route through the Lower Wilds to the Tomb of Marka Ragnos. Enter the tomb and switch to its interior map. Nearby crazed soldiers and acolyte deserters are enemies, not quest givers.
Locate the antechamber's ancient Sith carving
Move into the tomb until the objective reads to meditate at the ancient Sith carving. The carving is the interaction point; simply standing in the marked room does not summon the beast.
Meditate, defeat the beast and return to Tremel
Interact with the carving, fight the Beast of Marka Ragnos, then backtrack to the tomb entrance. Travel back toward the Academy, where Dolgis confronts you outside Tremel's chambers. Resolve the encounter and report to Tremel.
Cannot find the objective?
If you have reached the tomb but nothing happens, look for the ancient carving inside the antechamber and interact with it. The boss does not appear merely because you walked into the area.
Other activities: You can complete the local 'Clearing the Camps' and 'Destroying the Deserters' bonus objectives while passing enemies, but you do not need them for story progression.
Taxi destination, tomb, interactive carving, boss and return are recorded in mission data.
Darth Baras calls you to his second-floor chambers. The Academy has different levels, so the mission marker can appear close even when you are on the wrong floor.
Start
Overseer Tremel after defeating the beast
Finish
Darth Baras, second-floor chambers
The route to follow
Academy second floor→Baras's chambers→Phyne and Teeno→Tremel's chambers→Baras's chambers
Reach the Academy's second-floor route
Stay inside the Sith Academy and look for the route to the second floor. Darth Baras's room is on that level; if the marker appears above you, change floors before trying to reach the door.
Speak to Baras and handle the acolytes
Approach Baras's quarters and speak to him. On this sequence Phyne, Teeno and two additional acolytes approach you. Follow the conversation; if combat starts, defeat them and speak with Phyne as the objective requires.
Return to Baras for your assignment
Re-enter Baras's chamber after the acolyte encounter. He orders you to confront Overseer Tremel. Use the Academy's interior connections rather than leaving for the valley.
Return to Tremel, then go back upstairs
Find Tremel in his Academy chambers, fight him when required and finish the conversation. The mission supports different choices at this encounter. Return to Baras's second-floor chambers to conclude the mission.
Cannot find the objective?
If Baras's icon is on the map but no doorway is nearby, check the Academy floor selector and locate the stair or interior transition leading up to his level.
Other activities: You do not need to leave the Academy for this entire quest. Combat and dialogue branches occur inside the same building.
Academy floor, Baras handoffs and Phyne fight are explicitly named in mission data.
Baras orders you to collect three ancient inscription shards within the Tomb of Tulak Hord. The important point is that these are three separate rooms in the same tomb; your mission is not complete after collecting just one.
Start
Darth Baras's second-floor chambers
Finish
Darth Baras in the Sith Academy
The route to follow
Baras's chambers→Valley of the Dark Lords→Tomb of Tulak Hord→Antechamber→Machine Vault→Archives→Baras's chambers
Leave the Academy for the Tomb of Tulak Hord
Travel back into the Valley of the Dark Lords, then find the entrance marked Tomb of Tulak Hord. This is not Ajunta Pall, where you found your warblade, and not Marka Ragnos, where you fought the beast.
Recover the shard in the Antechamber
Enter Tulak Hord's tomb and check the interior map for the Antechamber. Find and interact with its ancient inscription/shard. Confirm that the Antechamber objective is complete before leaving.
Find the Machine Vault and collect its shard
Continue through the tomb's internal corridors toward the room identified as the Machine Vault. Use the local map and exit arrows between sections; recover the second shard from its inscription.
Go to the Archives for the third shard
Navigate to the Archives inside the same tomb. Interact with the last inscription. In your Mission Log, all three collection objectives—Antechamber, Machine Vault and Archives—should now be complete.
Handle Klemral on the route out
Head back toward the tomb exit. Acolyte Klemral and other acolytes stop you. Resolve the confrontation, defeating enemies if the mission requires, and finish the conversation.
Return to Baras on Academy floor two
Leave Tulak Hord, return to the Sith Academy and go to Darth Baras's chambers on the second floor. Speak to him to finish the trial and receive the next assignment.
Cannot find the objective?
A quest marker can show only one shard at a time depending on your map and tracked objectives. Check the list of three room names and switch between the tomb's interior areas; do not return to Baras with only one or two shards.
Other activities: A nearby Heroic named Armed and Dangerous also uses Tulak Hord. It is separate from the three shards and does not need to be completed.
Three shard names and the Academy return are preserved in the original SWTOR mission database.
Baras sends you after an ancient lightsaber hidden in the Tomb of Naga Sadow. You must bring Vette, activate four disguised switches, open the secret cavern and reach the sarcophagus. This is the most navigation-heavy mission on Korriban.
Start
Darth Baras, second-floor Academy
Finish
Darth Baras, second-floor Academy
The route to follow
Baras's chambers→Academy northwest jail→Vette and Knash→Tomb of Naga Sadow→Four hidden switches→Forbidden Cavern→Reliquary→Baras's chambers
Return to the Academy jail and recruit Vette
From Baras's chambers, head to the Academy's northwest jail—the same area you used during Judge and Executioner. Speak with Jailer Knash and Vette, then leave with Vette as your companion.
Go to the Tomb of Naga Sadow
Exit the Academy and travel through the Valley of the Dark Lords to the entrance named Tomb of Naga Sadow. Check the tomb name; other Korriban tombs are not the correct destination. Enter and reopen the interior map.
Activate the four hidden switches with Vette
Search the interior for four specific pieces of Sith carving or furnishings: a statue, a broken urn, a ruined sarcophagus/coffin and an armor rack. Interact with each for Vette to trigger its hidden mechanism. Check your task counter until it shows four of four.
Use the newly opened route toward the Forbidden Cavern
After the switch sequence, return to the master statue/marked secret entrance. Activate the entrance mechanism and go into the Forbidden Cavern deeper in the tomb. If it remains closed, recheck the four switches.
Fight Vemrin at the secret chamber
Vemrin confronts you on the approach to the reliquary. Finish the conversation, defeat him and complete the follow-up dialogue.
Enter the Reliquary and inspect the ancient sarcophagus
Proceed through the newly accessible doorway to the Reliquary. Interact with the ancient sarcophagus containing the weapon. The quest has a short sub-stage known as A Fitting Weapon during the lightsaber acquisition.
Leave the cavern and return to Darth Baras
Follow the cavern path back toward the Tomb of Naga Sadow's main areas, then return to the Academy. Go upstairs to Baras's chambers and report what happened.
Defeat Eskella's group and finish the handoff
After the initial report, Eskella and accompanying acolytes confront you. Complete that battle and return to Baras again to finish the Korriban trials.
Cannot find the objective?
If you cannot enter the hidden chamber, the common blocker is not a missing map arrow: one of the four concealed objects has not been activated. Check statue, urn, sarcophagus and armor rack, then revisit the master statue.
Other activities: Vette joins as a companion during this sequence. Keep her available when the mission asks her to trigger the hidden mechanisms.
Quest database verifies the companion pickup, four named switches, cavern, Vemrin, sarcophagus, return and final fight.
This short stage occurs at the ancient sarcophagus during The Final Trial. It is listed separately in the quest index but should be followed as part of the same trip through Naga Sadow's tomb.
After defeating Vemrin, enter the Reliquary and interact with the Ancient Sarcophagus. The separate A Fitting Weapon entry begins at this interaction.
Claim and equip the lightsaber
Complete the sarcophagus interaction and accept the weapon reward. Open your equipment panel and equip the lightsaber in the main-hand slot when available.
Resume the main trial
Return through the Forbidden Cavern exit and continue the active The Final Trial objective toward Baras in the Academy. There is no need to search for a second tomb.
Cannot find the objective?
If the lightsaber is not in your inventory, check the mission state and any reward-acceptance window at the sarcophagus before leaving the reliquary.
Other activities: No extra collection detour is required for this named sub-stage.
Listed as a dependent named mission by the SWTOR quest index.
Your training on Korriban is over. Baras instructs you to leave aboard the shuttle to the Imperial Fleet. You no longer need any of the tomb entrances.
Return to Baras after the Eskella confrontation to complete the Korriban campaign. Confirm that Leaving Korriban is your active story objective.
Go to the Academy's planetary departure route
Leave the Academy and follow your tracked departure marker to the Korriban shuttle. The departure shuttle is a transport object, not an objective inside another Sith tomb.
Board the shuttle and travel to the Imperial Fleet
Interact with the shuttle door, confirm the travel destination and arrive aboard the Imperial Fleet. Check the mission log for the next destination.
Cannot find the objective?
If you are still being directed toward Baras, a previous conversation or Eskella fight may not be finished. Complete that objective before attempting to travel.
Other activities: Optional exploration missions can remain in your log; they are not required for the class story to leave Korriban.
Departure objective and prior mission verified by the quest index.
Read the destination on your fleet mission objective
Once on the Imperial Fleet, track The Flight to Dromund Kaas. Find the transport to Dromund Kaas using the Fleet map and the mission's area-change marker. Do not confuse it with departures to unrelated flashpoints.
Travel to Dromund Kaas
Use the appropriate planetary shuttle/transport, arrive at the Dromund Kaas spaceport and reopen the map after the transition.
Follow the next mission toward Baras
After travelling to Dromund Kaas, complete its Spaceport ARRIVALS CONSOLE check-in and the Docking Bay O-17 conversation. The next walkthrough already exists: click the large CONTINUE TO DROMUND KAAS button immediately below these final mission steps. It opens the Dromund Kaas page at The Flight to Dromund Kaas, with exact arrival and Darth Baras directions.
Cannot find the objective?
A directional objective may point through a Fleet transport area rather than directly at Dromund Kaas. Follow the planet-specific shuttle mission exit and update your map after landing.
Other activities: You may receive other Fleet activities, but you can prioritize the purple Sith Warrior story without completing every Fleet side activity.
Departure/arrival chain and next-planet mission recorded in SWTOR quest index.