SWTOR Sith Warrior Vengeance Juggernaut complete Taris walkthrough: reach Moff Hurdenn at Toxic Lake Garrison, collect Frellka's three walker transponders, use Minst's reactor vault twice, destroy Durant's three laser-gate controls and defeat Faraire's bodyguards on the bottom floor.
5 story missions51 numbered route steps2 authentic Taris region mapsJuggernaut · Vengeance
LOST OR STUCK? · MAP AND FLOOR CHECK
Before chasing the quest marker, check the route
Choose the active story mission.Press L to open the mission log and track the named Sith Warrior objective. A purple mission symbol marks important story content, but not necessarily YOUR class mission. Follow the exact title and task shown in this walkthrough.
Open the full map.Default M opens the main map. Alt + M toggles the overlay map and minimap. If your shortcuts differ, check your assigned keybinds. Start with the WORLD region, then switch to the current AREA or interior floor map.
A marker behind a wall is not a doorway.On the world map find the correct district or zone; on the local map look for the named cave, station, building entrance, lift, security door or staircase. When the target is on another floor, find a connecting passage before heading toward its map symbol.
Know which travel option is available.Quick Travel opens a world map with available travel-point filters. Choose an unlocked destination on your current planet and pay attention to any restrictions or costs shown in-game. For a new planet, use your Fury's Galaxy Map and the orbital station surface shuttle instead.
If the marker does not advance, check the VERB.Talk, use, loot, disable, exit and return to your ship are separate mandatory interactions. Read the mission's “If you are stuck” note below before fighting more unrelated enemies.
Follow the correct zone, floor and mandatory interaction
Taris has multiple disconnected interiors and terrain zones. A story marker may look close even when a cave entrance, station door, elevator or lower floor separates you from the target. This guide names the documented entrance or building and the full objective sequence. We do not invent left or right turns where the quest databases establish only named areas.
Pay particular attention to THREE walker transponders for Frellka, TWO interactions with Minst's reactor vault interface, THREE laser gate controls for Durant, and Faraire's BOTTOM FLOOR bodyguards. All details are visible, without story reveal controls.
Where to go for each mission
Check In: Fury → Taris Orbital Station → surface shuttle → Toxic Lake Garrison → Hurdenn and Pierce.
General Frellka: The Brell Sediment → three Republic walker transponders → Lower Brell Abandoned Pirate Cave entrance (about -766, 1192) → far-end elevator DOWN → Republic Mines.
General Minst: Tularan Marsh → Transport Station 5 → Reactor Core Hideout → reactor vault interface (twice).
General Durant: The Sinking City → General Durant's compound → three laser gate controls → Pierce and Durant.
General Faraire: Crater Command Base → Republic Resettlement Zone → Olaris Reclamation Base → base bottom floor → Siantide droids → Fury.
Taxi availability depends on routes unlocked for your character. Use the world map for the region, then the LOCAL map for the building and floor. An achievement marker is not the class mission route.
Real game maps and sourced images
Taris: original Imperial region and Tularan Marsh maps
These images are published player or forum references, not newly generated maps. Use them to recognize the area names and relative locations. An external world map cannot replace the mission-specific floor map once inside a building.
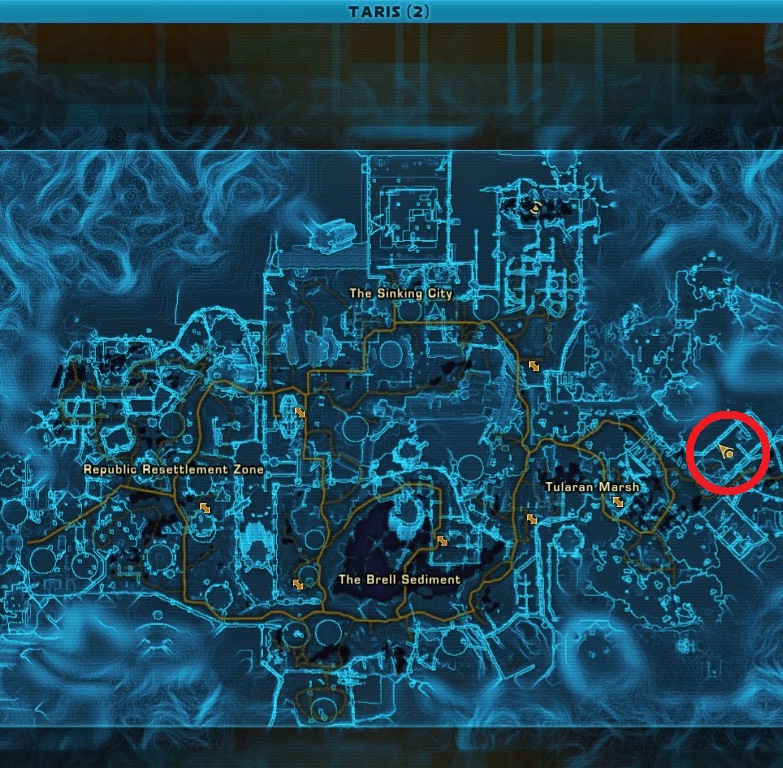
Taris Empire: original regional world map
Genuine in-game map showing The Brell Sediment, Tularan Marsh, The Sinking City and Republic Resettlement Zone. The source's red circle identifies an MCR-99 DROID, not a Sith Warrior quest objective.
Map image unavailable. Use the linked original source and the landmark list below.
Locations to recognize
Abandoned Pirate Cave: Lower Brell area, around X -766, Y 1192; elevator down at the far end to Republic Mines
Toxic Lake Garrison and The Brell Sediment: Frellka and first briefing
Tularan Marsh and Transport Station 5: Minst
The Sinking City: Durant and laser-gate controls
Republic Resettlement Zone: Faraire and Olaris Reclamation Base
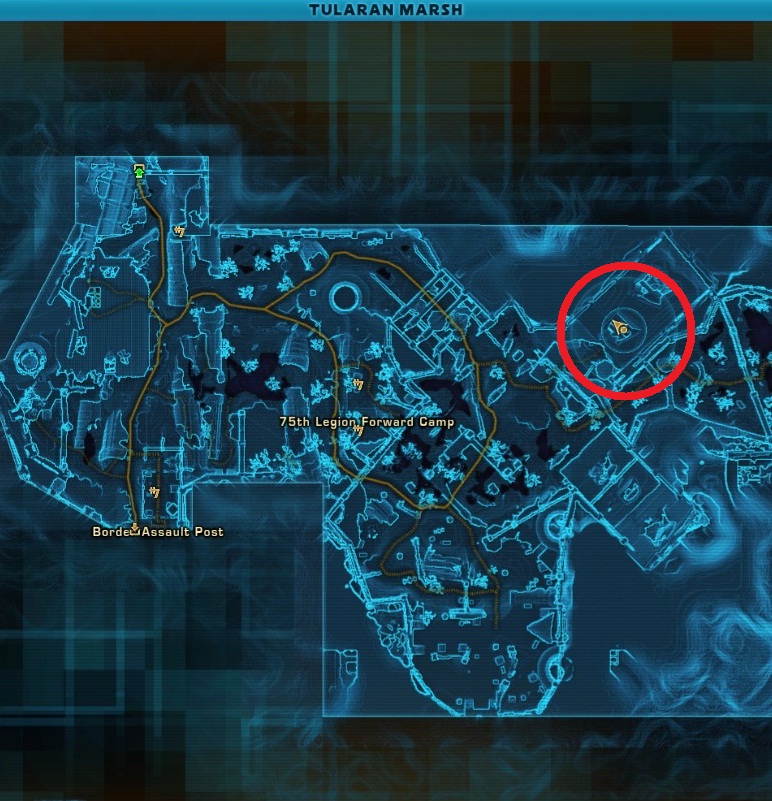
Tularan Marsh: original local road map
Tularan Marsh orientation with 75th Legion Forward Camp and Border Assault Post. The source's red circle is a separate achievement marker, not the entrance to Minst's Reactor Core Hideout.
The Sith Warrior Origin Story determines these five missions; your Juggernaut Vengeance discipline changes combat, not the destination. Take a companion set to Healing if desired, use damage abilities and defensive cooldowns available at your current level, and prioritize mandatory controls over extra enemy groups. Completing unrelated planetary side missions will not open a class-phase door.
By Imperial Dark Sector
MISSION 01 / 05 · Chapter 2 · Plan Zero · Main story
Check In
Your ship docks in orbit. Take the shuttle to the Imperial planet surface and reach Toxic Lake Garrison to begin the Republic War Trust hunt.
Start
Fury ship after completing Set the Table
Finish
Moff Hurdenn and Lieutenant Pierce at Toxic Lake Garrison
The route to follow
Fury Galaxy Map→Taris Orbital Station→Fury ship holoterminal→Orbital station surface shuttle→Toxic Lake Garrison→Moff Hurdenn→Lieutenant Pierce
Select Taris using the Galaxy Map
After reporting the Nar Shaddaa mission to Darth Baras, open the Fury Galaxy Map and select Taris as the next original Sith Warrior destination.
Use the ship holoterminal in orbit
The Fury initially docks at Taris Orbital Station. Remain on your ship long enough to use its holoterminal and receive the full Plan Zero briefing.
Take the shuttle down to Taris
Leave your private ship hangar into Taris Orbital Station. Find the planet-surface shuttle and travel to the Empire's Taris area below.
Find Toxic Lake Garrison on your map
Once on the surface, open the Imperial-side Taris region map and follow the mission marker to Toxic Lake Garrison, near the Brell Sediment.
Speak with Moff Hurdenn
Inside Toxic Lake Garrison, locate Moff Hurdenn using the class-story marker and complete his briefing about the Republic War Trust generals.
Speak with Lieutenant Pierce
After Moff Hurdenn, locate Lieutenant Pierce and finish the required dialogue. Pierce then helps you investigate General Frellka, the first target.
Cannot find the objective?
If the objective reads Use Your Ship's Holoterminal, return to the Fury on the orbital station. If it says Locate Moff Hurdenn, take the surface shuttle to Toxic Lake Garrison, not another orbital room.
Other activities: The Imperial Taris planetary story and heroics are separate and unnecessary for beginning the Sith Warrior's Republic War Trust mission.
The mission task order and named entrances are documented in the cited game quest databases. Street-level turns and exact map coordinates are not asserted without evidence.
MISSION 02 / 05 · Chapter 2 · Plan Zero · Main story
General Frellka
Find three separate Republic walker transponders in the Brell Sediment; their data reveals an abandoned pirate cave concealing Frellka's Republic mine.
Start
Lieutenant Pierce at Toxic Lake Garrison
Finish
Mine computer and personal holocom after defeating Frellka
The route to follow
The Brell Sediment→Walker 1 transponder→Walker 2 transponder→Walker 3 transponder→Personal holocom→Lower Brell (south then west from garrison)→Abandoned Pirate Cave entrance (~ -766, 1192)→Cave's far-end ELEVATOR down→Republic Mines (lower floor)→Foreman Varl→Frellka and guards→Search Frellka's body→Mine computer→Mines ELEVATOR up, then exit cave→Personal holocom
Go to The Brell Sediment
Leave Toxic Lake Garrison for The Brell Sediment and follow the active class marker. This is the first regional search, not Transport Station 5.
Remove the first walker transponder
Find the first Republic walker identified by the mission marker. Approach the interactable transponder and remove it rather than only fighting its escort.
Remove the second walker transponder
Travel to the second separately marked walker in The Brell Sediment and interact with its transponder. Each walker has its own objective.
Remove the third walker transponder
Find the third walker before leaving the region. The next stage remains locked until you have interacted with all three walker transponders.
Use your personal holocom
After recovering the three transponders, activate your personal holocom. Lieutenant Pierce uses the signals to find the hidden general's location.
Locate the abandoned pirate cave
After calling Pierce about all three transponders, start at Toxic Lake Garrison and travel SOUTH, then WEST into Lower Brell in The Brell Sediment. Look for the Abandoned Pirate Cave entrance at approximately X -766, Y 1192 on the Taris world map. Bomber Command Post is a nearby unlocked quick-travel option; Lower Brell may be closer if already discovered. The coordinate identifies the CAVE ENTRANCE, not Frellka's room.
Find Foreman Varl inside the mine
Enter the Abandoned Pirate Cave and follow the main accessible passage toward its FAR END. Find the ELEVATOR there and ride DOWN to the separate REPUBLIC MINES lower level. In the mine, follow the Sith Warrior class-phase objective to Foreman Varl and speak with him. Staying on the cave's upper floor will not reach Varl.
Defeat Frellka's guards and the general
Follow the class phase deeper, defeat Frellka's captain and Republic guards, then defeat General Frellka as the mission battle requires.
Search the general after the fight
Do not exit immediately. Interact with General Frellka's body to recover his mainframe access card; looting him is part of the tracked objective.
Use the mine computer
Find and operate the mine computer with the recovered access card. It identifies the next War Trust target, General Minst.
Leave the mine and call Pierce
After searching Frellka's body and using the mine computer, leave through the REPUBLIC MINES elevator back to the Abandoned Pirate Cave, then exit the cave to the Brell Sediment. Only then activate your PERSONAL holocom for Lieutenant Pierce when prompted.
Cannot find the objective?
Can't find the cave? From Toxic Lake Garrison head SOUTH then WEST into LOWER BRELL. The Abandoned Pirate Cave entrance is about X -766, Y 1192; the nearest useful quick-travel options are Bomber Command Post or Lower Brell if discovered. Once inside, ride the FAR-END ELEVATOR DOWN to the REPUBLIC MINES. After the fight, search Frellka, use the mine computer, take the ELEVATOR UP, EXIT the cave and only then call Pierce.
Other activities: Mining Massacre is a bonus objective. Killing extra mine guards is not required beyond the combat specified by your main quest.
The main mission tasks are documented by TORCommunity. The cave entrance coordinate, Lower Brell travel, and elevator down to Republic Mines are independently documented by SWTOR-Spy and VULKK. Coordinates are approximate game-map references, not door-level GPS instructions.
MISSION 03 / 05 · Chapter 2 · Plan Zero · Main story
General Minst
Reach Transport Station 5 in Tularan Marsh and its reactor core. The General Minst you first meet is an impostor, and the vault interface is required twice.
Start
Pierce holocom at end of General Frellka
Finish
Reactor Vault Interface, then personal holocom
The route to follow
Tularan Marsh→Transport Station 5→Reactor Core Hideout→Force field controls→Confront apparent Minst→Fight guards→Reactor Vault Interface first use→Trooper ambush→Reactor Vault Interface second use→Personal holocom
Change regions to Tularan Marsh
Travel from the Brell Sediment toward Tularan Marsh on the Imperial Taris map. General Minst is not inside Frellka's mine.
Find Transport Station 5
Locate the named Transport Station 5 area and approach its accessible station entrance. The quest's reactor is inside this facility, not outside in the marsh.
Enter the Reactor Core Hideout
Use your local map and the story marker to move toward the reactor core within the transport station. The named hideout is your target.
Disable the force-field controls
The initial general is protected by a force field. Interact with or destroy the marked controls as directed to open the route.
Confront the apparent General Minst
Approach and speak to the apparent General Minst. The story reveals that he is an impostor while the real general hides elsewhere.
Defeat the impostor's guards
Fight the guards when the objective appears, then speak to the impostor again. This dialogue reveals the reactor's planned destruction.
Use the Reactor Vault Interface once
Find the reactor vault terminal and interact with it to start opening the fallout vault. This is not yet the final interaction.
Defeat the Republic trooper ambush
Republic troopers interrupt your first vault access. Clear the attackers in the reactor room before interacting with the same terminal again.
Use the SAME vault interface a second time
Return to the Reactor Vault Interface and activate it a second time after the ambush. This finishes the reactor vault objective.
Use your personal holocom for Durant
When the reactor sequence completes, use your personal holocom to report to Pierce and obtain the next target, General Durant.
Cannot find the objective?
If Minst's quest seems stalled, verify that you disabled the force-field controls, spoke to the impostor after his guards, and used the Reactor Vault Interface TWICE, separated by the Republic trooper ambush.
Other activities: Reactionary is a bonus mission and should not be confused with the mandatory reactor vault interaction.
The mission task order and named entrances are documented in the cited game quest databases. Street-level turns and exact map coordinates are not asserted without evidence.
MISSION 04 / 05 · Chapter 2 · Plan Zero · Main story
General Durant
Fight through General Durant's Sinking City compound, disabling three different laser-gate controls. The first two gate demolitions require holocom conversations between them.
Start
Pierce holocom after General Minst
Finish
Pierce personal holocom after Durant encounter
The route to follow
The Sinking City→Durant compound→Laser gate 1→Personal holocom→Laser gate 2→Personal holocom→Laser gate 3→Lieutenant Pierce→General Durant→Durant's guards→Postfight Durant dialogue→Personal holocom
Go to the Sinking City region
After the Minst mission, use the Taris map to reach The Sinking City. Do not continue exploring Transport Station 5.
Enter Durant's fortified compound
Find the class-story approach to General Durant's compound and cross into its accessible area. The blocking laser gates are inside.
Destroy the first laser-gate control
Locate and interact with the first of three marked control stations. Removing it opens the route farther into the compound.
Call Lieutenant Pierce after gate one
Use your personal holocom when the quest changes after the first control. Pierce reports progress and the next blocking gate.
Destroy the second laser-gate control
Follow the next phase marker to the second control station and destroy it. This is a different device from the first.
Use your holocom after gate two
Complete the second required holocom update with Pierce, who is fighting ahead. Continue only after the active objective changes.
Destroy the final laser-gate control
Reach and destroy the third gate control station. Count the controls separately because completing only two will not expose Durant.
Locate and speak with Lieutenant Pierce
After the third gate falls, use the active marker to find Pierce inside the compound and speak with him.
Confront General Durant
Proceed into Durant's accessible room, speak to the general, and trigger the battle over his experimental Siantide weapon.
Defeat Durant and accompanying guards
Use your Vengeance abilities, defensive cooldowns and a healing companion when appropriate to defeat Durant and the Republic guards who support him.
Talk to Durant after the fight
Interact with the injured general after the encounter. The mandatory post-battle dialogue must be completed before the mission passes to Pierce.
Use your personal holocom
Call Lieutenant Pierce with the holocom when prompted. The campaign then identifies General Faraire as the last Republic War Trust target.
Cannot find the objective?
Destroy gate one, use the HOLOCOM, destroy gate two, use the HOLOCOM, and destroy gate three. After confronting Durant, finish his dialogue and contact Pierce; leaving after the kill can strand the objective.
Other activities: Optional Sinking City kill bonuses, rakghoul side quests and datacron routes do not open the compound's class-story gates.
The mission task order and named entrances are documented in the cited game quest databases. Street-level turns and exact map coordinates are not asserted without evidence.
MISSION 05 / 05 · Chapter 2 · Plan Zero · Main story
General Faraire
Meet Baras at Crater Command Base before attacking Faraire's compound near Olaris Reclamation Base. Faraire's bodyguards are on the BOTTOM FLOOR.
Start
Holocom after General Durant
Finish
Fury ship holoterminal after Faraire and the Siantide droids
The route to follow
Crater Command Base→Imperial taxi via Bomber Command Post / Tower Command Station→Base holoterminal→Republic Resettlement Zone→Olaris Reclamation Base→Major Khourlet→Defenders→Door into Faraire's base→Bottom-floor bodyguards→General Faraire→Siantide droids→Speak to Faraire again→Fury holoterminal
Report to Crater Command Base first
Your first destination is CRATER COMMAND BASE on the edge of the Republic Resettlement Zone, NOT General Faraire's compound. If you are at Toxic Lake Garrison, its Imperial taxi connects to BOMBER COMMAND POST, which in turn connects to Crater Command Base. TOWER COMMAND STATION is another taxi connection to Crater Command Base if unlocked.
Use the base holoterminal to contact Baras
Find the holoterminal inside Crater Command Base and speak to Darth Baras. This is NOT the Fury ship holoterminal.
Approach Olaris Reclamation Base
After the Crater Command Base briefing, leave the base and use the Republic Resettlement Zone local map to travel toward OLARIS RECLAMATION BASE and Faraire's compound. The compound is in the Gates of Olaris/Olaris Reclamation Base area; do not taxi back to Toxic Lake Garrison and search The Brell Sediment.
Infiltrate the compound and meet Khourlet
Cross the compound entrance and speak with Major Khourlet when prompted. His response determines some of the enemies you must fight.
Defeat the indicated Imperial assault defenders
Eliminate Khourlet and his elite guards; the alternative branch may also require Captain Grummalt and his conscripts. Follow the active objective list.
Open the door into Faraire's base
After completing the relevant defender objectives, interact with the marked door into Faraire's base. Do not continue circling the courtyard.
Reach the lowest floor inside the base
Proceed through the interior toward the BOTTOM FLOOR, not the upper levels. Faraire will remain inaccessible until his bodyguards there are defeated.
Defeat Faraire's bodyguards
Clear the required bottom-floor bodyguards, then follow the newly updated quest marker to General Faraire. They are mandatory for advancing the encounter.
Speak with General Faraire
Approach Faraire and complete his dialogue. His experimental Project Siantide droids become the central threat during this confrontation.
Destroy the Siantide droids
Defeat the Siantide droids when they activate. Use available defensive abilities and a healing companion to handle multiple attackers in the confined room.
Speak to Faraire again
After the droids are destroyed, interact with Faraire once more to complete the story dialogue and the War Trust resolution.
Return to the Fury ship holoterminal
Exit the compound, use your unlocked Imperial transport routes to the Taris orbital station, and board the Fury to report by ship holoterminal.
Cannot find the objective?
FIRST use the Imperial taxi network to reach CRATER COMMAND BASE (from Toxic Lake Garrison via Bomber Command Post, or from Tower Command Station). After Baras's briefing follow the Republic Resettlement Zone route toward OLARIS RECLAMATION BASE, then open the marked DOOR into Faraire's base. Find his BODYGUARDS on the BOTTOM FLOOR before Faraire. Finish by using your Fury ship holoterminal.
Other activities: Khourlet dialogue can introduce Captain Grummalt and conscripts as extra combat requirements. The class-story final fight and Siantide droids are mandatory.
The mission task order and named entrances are documented in the cited game quest databases. Street-level turns and exact map coordinates are not asserted without evidence.
After General Faraire, return to your Fury and use its ship holoterminal. Follow the next main story mission, Ambush!, rather than returning to any of the defeated generals' bases.