Sith Warrior: Vengeance — The Padawan's Fall finale
Sith Warrior Juggernaut Vengeance mission-by-mission Chapter 1 finale and Chapter 2 Plan Zero opening. Find Jaesa's ship in the Distant Outer Rim; Nomen Karr's Hutta safe house in The Bog; Lord Avorr on Vaiken Spacedock; and the Republic Safe House elevator in Nar Shaddaa Upper Industrial Sector.
4 connected story missions39 navigation stepsReal Hutta and Nar Shaddaa mapsJuggernaut · Vengeance
LOST OR STUCK? · MAP AND FLOOR CHECK
Before chasing the quest marker, check the route
Choose the active story mission.Press L to open the mission log and track the named Sith Warrior objective. A purple mission symbol marks important story content, but not necessarily YOUR class mission. Follow the exact title and task shown in this walkthrough.
Open the full map.Default M opens the main map. Alt + M toggles the overlay map and minimap. If your shortcuts differ, check your assigned keybinds. Start with the WORLD region, then switch to the current AREA or interior floor map.
A marker behind a wall is not a doorway.On the world map find the correct district or zone; on the local map look for the named cave, station, building entrance, lift, security door or staircase. When the target is on another floor, find a connecting passage before heading toward its map symbol.
Know which travel option is available.Quick Travel opens a world map with available travel-point filters. Choose an unlocked destination on your current planet and pay attention to any restrictions or costs shown in-game. For a new planet, use your Fury's Galaxy Map and the orbital station surface shuttle instead.
If the marker does not advance, check the VERB.Talk, use, loot, disable, exit and return to your ship are separate mandatory interactions. Read the mission's “If you are stuck” note below before fighting more unrelated enemies.
Different planets, ship interiors, a Fleet reward, then Nar Shaddaa
These missions send the Warrior between special ship destinations, Hutta swamps, Vaiken Spacedock, and industrial elevators on Nar Shaddaa. Do not rely on a single quest-circle line across a world map. Each mission below states which Galaxy Map region, local map area, building or elevator is required and which interaction completes the mission.
The Chapter 1 finale has three separate Nomen Karr fights. After Jaesa, the mission A Sith Lord's Rise requires a Fleet reward turn-in before the Chapter 2 quest Set the Table. All story steps and choice-specific branches are immediately visible.
The full travel order, without side missions
1. The Plan is Working! Fury → Distant Outer Rim, upper-right station icon → docked Jaesa's ship → Jedi Knights → Fury.
2. The Padawan Exposed: Fury → Hutta/Jiguuna → Evocii Swamp → The Bog → Nomen Karr safe house → Fury.
3. A Sith Lord's Rise: Fury → Imperial Fleet → Vaiken Spacedock → Lord Avorr → Fury.
4. Set the Table: Fury → Nar Shaddaa → Upper Promenade → Upper Industrial Sector → Republic Power Generation → Republic Safe House elevator → Dromund Kaas.
Every route names documented destinations. Where the available sources do not confirm a door's exact coordinates or a corridor turn, follow the in-game phase marker and named area, not an invented arrow.
Real game maps and sourced images
Original in-game regional maps: Hutta and Nar Shaddaa
These images are published player or forum references, not newly generated maps. Use them to recognize the area names and relative locations. An external world map cannot replace the mission-specific floor map once inside a building.
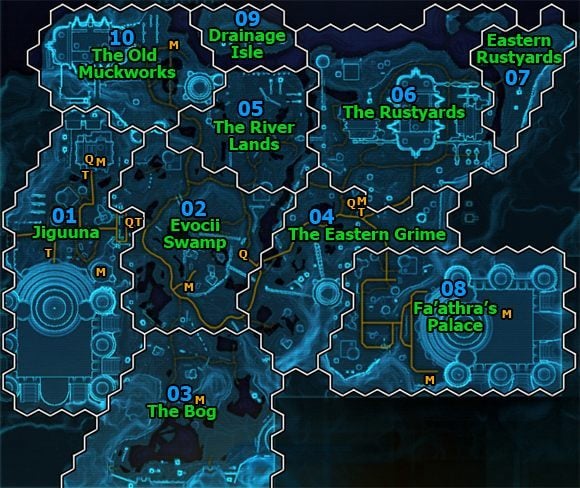
Hutta: Jiguuna, Evocii Swamp and The Bog
Regional game map identifies Jiguuna (01), Evocii Swamp (02), and The Bog (03). This shows the region of Nomen Karr's safe house, NOT its exact phase door; follow the current class-story marker within The Bog.
Map image unavailable. Use the linked original source and the landmark list below.
Locations to recognize
Jiguuna: first Hutta landing settlement (01)
Evocii Swamp: area between Jiguuna and The Bog (02)
The Bog: Nomen Karr safe house region (03)
Fa'athra's Palace (08) is a different region
Safe House name alone does not distinguish Bounty Hunter and Sith Warrior phases
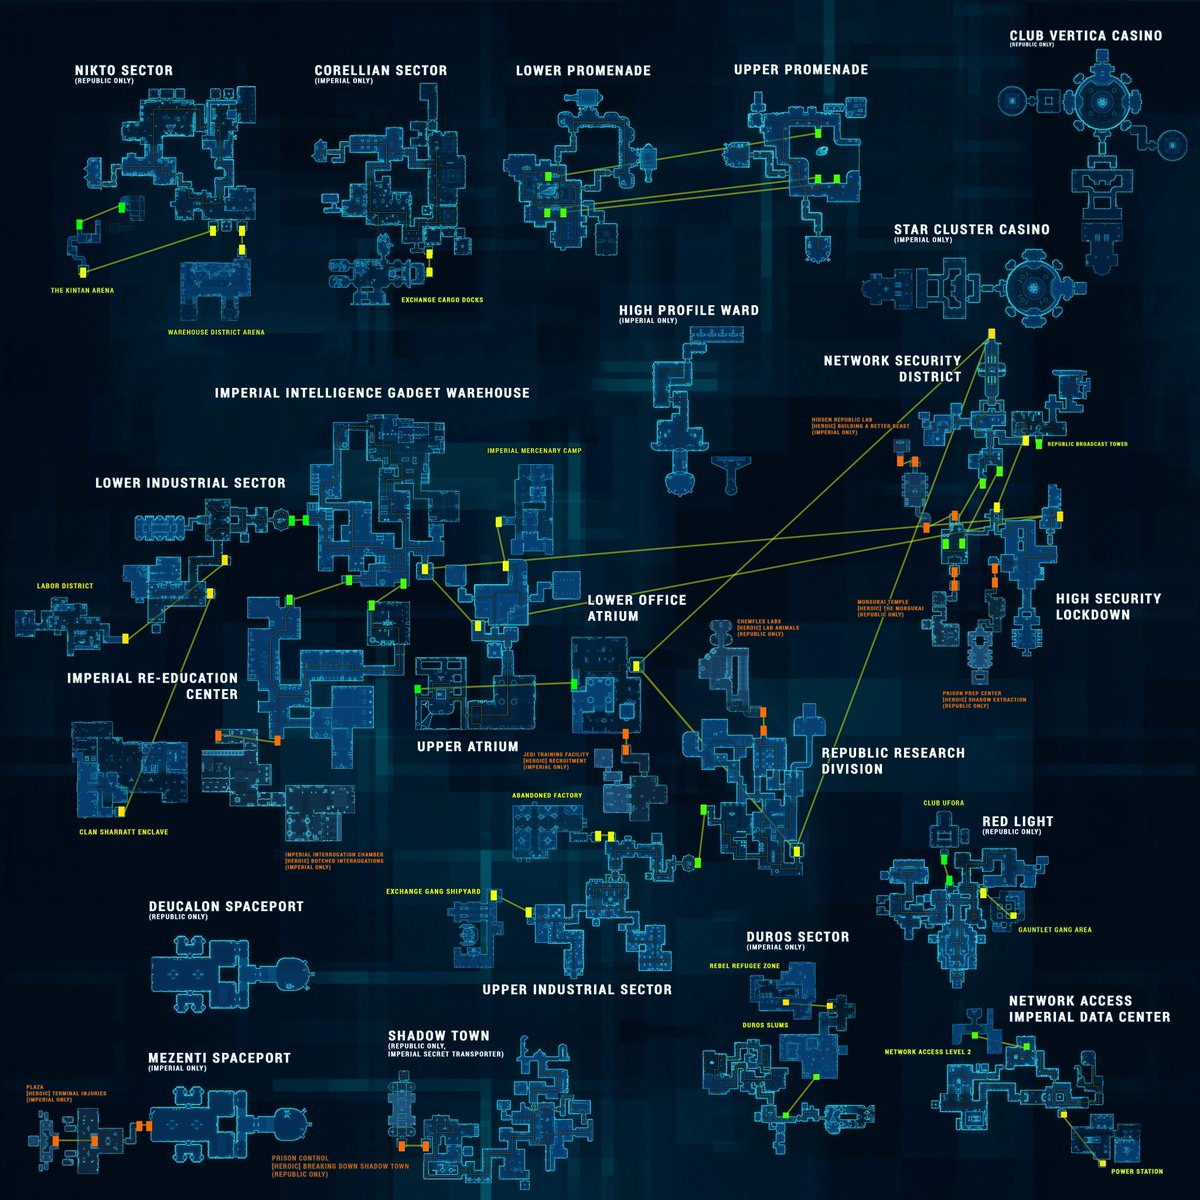
Nar Shaddaa: sector overview for Republic Power Generation
Use this real region overview only to identify Upper Industrial Sector and taxi separation. It is not a floor map of the Republic Safe House. The actual entrance is the safe-house elevator in Republic Power Generation.
Vengeance Juggernaut: preparation for Karr and the meeting
Set a companion to Healing for the multi-phase Nomen Karr battle. The three combat phases are separated by required dialogue, so there is time to recover between encounters. Use the abilities unlocked at your current level, build and spend Rage, and activate defensives when taking focused damage. In Set the Table, clear the Republic Sentinels first if General Gonn cannot be damaged. Fights do not allow Force Charge to bypass closed phase entrances.
By Imperial Dark Sector
MISSION 01 / 04 · Chapter 1 finale · Main story
The Plan is Working!
Jaesa sends you a rendezvous request. Do not fly to a planet: the destination is a ship icon in the upper-right portion of the Distant Outer Rim Galaxy Map. Two Jedi Knights wait in Jaesa's ship.
Start
Fury holoterminal after Deal with Kendoh on Alderaan
Finish
Fury holoterminal after encountering Jedi Knights Zylixx and Ulldin
The route to follow
Fury holoterminal→Galaxy Map: Distant Outer Rim→Jaesa's Ship (station icon at upper right)→Docked ship-to-ship passage→Far room and bulkhead→Speak to Zylixx→Fight Ulldin and Zylixx→Resolve surviving Jedi dialogue→Return to Fury holoterminal
Finish the Alderaan holoterminal report
After Deal with Kendoh, remain aboard the Fury and finish any ship conversation needed to receive Jaesa's request. The journal should update to Travel to Jaesa's Ship.
Open the Galaxy Map in the Distant Outer Rim
Do not search Nar Shaddaa or the planetary taxi network. Switch the Fury's Galaxy Map to the Distant Outer Rim region. The meeting destination is marked as a station/ship symbol in the upper-right portion of that region.
Select the Jaesa's Ship special destination
Activate the available Jaesa's Ship entry directly from the Galaxy Map. When you arrive, the two vessels dock together and the next objective changes to Investigate Jaesa's Ship.
Cross directly into Jaesa's docked ship
Leave the Fury through the accessible passage to the adjacent vessel. You are entering a story instance, not taking another taxi or leaving through a planet spaceport.
Follow Jaesa's vessel to the far room
Move through the ship interior and pass the intervening bulkhead toward the last room. The encounter triggers after you enter that area. There is no planetary map or separate base to explore.
Confront Zylixx
Use the conversation prompt when the quest reads Speak to Zylixx. He and Ulldin are the Jedi Knights who arrived instead of Jaesa, and the scene leads into a fight.
Defeat the Jedi Knights as the quest advances
Fight Zylixx and Ulldin according to the combat objectives shown. One dialogue branch may require killing only Zylixx and speaking with the subdued Ulldin afterward; follow the exact mission tracker.
Speak with whichever Knight remains as requested
After the fight, check whether the journal reads Speak to Ulldin or Speak to Zylixx before leaving the room. A second interaction is part of the quest in different outcomes.
Return to the Fury ship holoterminal
Retrace the docked passage back to your Fury and activate YOUR ship's holoterminal. The resulting report to Darth Baras initiates the next mission, The Padawan Exposed.
Cannot find the objective?
If the Galaxy Map shows only planets, select Distant Outer Rim first and locate Jaesa's Ship at its upper-right special station icon. If the encounter seems finished but nothing happens, check the quest log for a surviving Jedi conversation, then return to the Fury holoterminal.
Other activities: Zylixx and Ulldin have dialogue-dependent fight and conversation branches. Do not assume all players kill both or see the same aftermath. No optional planetary quest is required.
Galaxy Map sector, special destination and ship-to-ship passage are recorded; ship-interior corner turns are not supplied by the sources.
Return to Hutta for the final confrontation. Karr's safe house is located in The Bog, not in Jiguuna or the Fa'athra Palace complex. Nomen Karr fights THREE times, with dialogue separating the bouts.
Start
Fury holoterminal after The Plan is Working!
Finish
Fury holoterminal after three Nomen Karr fights and Jaesa Willsaam encounter
After Baras issues the Hutta assignment, use your Fury Galaxy Map and select Hutta. The target is not the Distant Outer Rim ship rendezvous from the previous mission.
Arrive in Jiguuna and identify The Bog
Leave your hangar into Jiguuna, then open Hutta's large map. The Bog is the distinct area south of the Evocii Swamp, so do not search for Nomen Karr in the arrival town.
Travel toward Evocii Swamp and south into The Bog
Follow the traversable southern region approach via the Evocii Swamp toward The Bog. Use the real regional map to recognize the transition; the direct quest-marker line is not a path through walls.
Look for Nomen Karr's class-story safe-house entrance
Within The Bog, locate the named story-phase entrance using your active Locate Nomen Karr's Safe House marker. Other buildings also called safe houses may belong to the Bounty Hunter class story; do not enter the wrong phase.
Enter and speak with Nomen Karr
Walk into the safe house and approach Karr for his opening conversation. The scripted encounter is not just a boss that can be defeated once and looted.
Defeat Nomen Karr in the first combat phase
Use your currently unlocked Vengeance Juggernaut damage abilities, and keep a companion in Healing mode if needed. When combat stops, interact with Karr again rather than leaving.
Speak to Karr and finish his second combat phase
Complete Karr's dialogue after the first fight. The quest explicitly requires defeating him a second time after he resumes combat; remain in the safe house.
Speak with Karr before the third phase
Talk to Karr when the second health-bar encounter ends. His growing desperation is part of the scene, and the quest requires this dialogue before another battle.
Defeat Nomen Karr for the third time
Finish the third fight against Nomen Karr, then speak to him again for the post-battle dialogue. Do not leave as soon as his health drops, because Jaesa's scene follows.
Defeat Jaesa Willsaam when she arrives
After the Karr confrontation, Jaesa Willsaam enters the safe-house sequence. Follow the quest objective to fight her, using the companion and defensive abilities you currently have available.
Speak to Jaesa and make your choice
After the fight, interact with Jaesa for the full recruitment conversation. Jaesa's Light Side or Dark Side direction depends on your dialogue; this guide does not force a particular choice.
Return to the Fury and contact Darth Baras
Leave the phase, retrace your route through The Bog to the nearest available return transport, then board the Fury and use the SHIP holoterminal to close The Padawan Exposed.
Cannot find the objective?
If a mission marker appears in south Hutta, check The Bog instead of wandering Jiguuna. The repeated Nomen Karr battles are deliberate: three Defeat Karr objectives alternate with Speak to Karr. Fight Jaesa and SPEAK to her before leaving the instance.
Other activities: No optional Hutta Bounty Hunter objectives, heroic swamps, datacrons, or bonus kills are required. Choosing Jaesa's alignment is a story decision, not a navigation shortcut.
Three separate fights with Karr, Jaesa dialogue, final holoterminal and The Bog location are source-grounded; exact coordinates of the class phase are not claimed.
This short interlude is easy to miss. Before beginning Set the Table, visit the Imperial Fleet and speak to Lord Avorr for the Chapter 1 reward following promotion to Sith Lord.
Start
Fury after Hutta holoterminal scene
Finish
Lord Avorr, Imperial Fleet (Chapter 1 reward)
The route to follow
Hutta Fury holoterminal complete→Galaxy Map: Imperial Fleet→Vaiken Spacedock→Open local Fleet map→Class mission objective: Lord Avorr→Speak to Lord Avorr→Return to Fury
Confirm the promotion and reward quest
After completing The Padawan Exposed, finish the Fury holoterminal conversation. Your Warrior is promoted to Sith Lord, and the follow-up should direct you to Imperial Fleet for the Chapter 1 reward.
Fly or travel to the Imperial Fleet
Use the Fury Galaxy Map or available Fleet travel option to reach the Imperial Fleet. Do not look for Avorr in the Hutta safe house or the Nar Shaddaa spaceport.
Enter Vaiken Spacedock
Disembark into Vaiken Spacedock, the Imperial Fleet's main station. It is not the Republic Fleet's Carrick Station, so select the Imperial arrival route.
Use the mission marker to locate Lord Avorr
Open your local Vaiken Spacedock map and track A Sith Lord's Rise. Follow the mission icon toward Lord Avorr; the original records identify the station and NPC, but do not justify a made-up hallway coordinate.
Speak to Lord Avorr to receive the reward
Interact with Lord Avorr to claim the Chapter 1 completion reward. If the quest still says Speak to Lord Avorr, this is a Fleet encounter, not another ship holoterminal objective.
Return to the Fury when ready for Chapter 2
After the reward dialogue, travel back to your ship. The next operation is Set the Table, beginning with Darth Baras on the Fury holoterminal.
Cannot find the objective?
If your journal still shows Travel to Imperial Fleet to Claim Your Chapter 1 Reward, you have not completed the Lord Avorr turn-in. Fleet Pass or Quick Travel can reduce walking, but the objective is still to speak to Avorr on Vaiken Spacedock.
Other activities: This is the Chapter 1 handoff, not an optional detour to a Flashpoint or PvP mission. Other Fleet services can wait until the reward is claimed.
The precise station and the reward NPC are documented. We do not assert unverified coordinates on the Fleet map.
IMPORTANT: the journal's Lower Office Atrium wording is misleading for travel. The Republic Safe House story elevator is reached through Republic Power Generation in the Upper Industrial Sector. This is General Karastace Gonn's meeting site.
Start
Fury holoterminal after A Sith Lord's Rise
Finish
Darth Baras on Dromund Kaas, then follow the updated mission
The route to follow
Fury holoterminal→Galaxy Map: Nar Shaddaa→Mezenti Spaceport→Upper Promenade taxi hub→Upper Industrial Sector→Republic Power Generation→Republic Safe House elevator→Watchmen → secret meeting→Republic Sentinels → General Gonn→Fawste branch→Dromund Kaas: report to Darth Baras
Call Darth Baras from the Fury before departing
After claiming the chapter reward, interact with the Fury's holoterminal to receive Plan Zero. Baras sends you to assassinate General Karastace Gonn and confront Imperial traitors on Nar Shaddaa.
Fly to Nar Shaddaa and enter the Imperial taxi system
Select Nar Shaddaa on the Fury Galaxy Map and arrive through Mezenti Spaceport. Move toward the Upper Promenade hub; Nar Shaddaa's sector maps are connected by taxis rather than direct streets.
Travel to the Upper Industrial Sector
Use the taxi connections visible to your character to get to Upper Industrial Sector. If a direct route does not appear, use the unlocked Upper Promenade connections. Do NOT navigate to the Lower Office Atrium first.
Find Republic Power Generation on your local area map
After reaching Upper Industrial Sector, open the local map and move toward the Republic Power Generation subzone. The named safe-house elevator is in this area, even though the mission's text mentions a lower office atrium.
Find the Republic Safe House elevator
Within Republic Power Generation, identify the story-phase elevator leading to Republic Safe House and enter it. The elevator is the crucial navigation step; searching generic Lower Office Atrium elevators is the wrong approach.
Defeat the Republic Watchmen
Inside Republic Safe House, clear the Republic Watchmen guarding the meeting. This is required before the meeting interruption proceeds; unrelated enemies outside the phase do not count.
Interrupt the secret meeting
Proceed to the objective inside the safe house and trigger the conversation involving General Gonn and Imperial defector Fawste. Choose the dialogue options you want, then follow the updated tracker.
Defeat the Republic Sentinels and General Gonn
When combat begins, target the Republic Sentinels first if Gonn appears shielded or immune. Mission records indicate Gonn may not become vulnerable until his supporting Sentinels are defeated.
Talk to Fawste after Gonn's defeat
After the Republic fight, interact with Fawste. Your decisions can produce another fight against him and Imperial defectors. Do not leave before the traitor branch is fully resolved.
Resolve any fight with Fawste and the Imperial defectors
If you selected the hostile dialogue outcome, defeat Fawste and his fellow Imperial defectors. If the game does not assign that combat objective, proceed with your chosen branch instead.
Return to Dromund Kaas to report in person
Leave the Republic Safe House by its elevator, return through Upper Industrial and Imperial taxis to Mezenti Spaceport, board the Fury, and fly to Dromund Kaas. The mission directs you to report to Darth Baras there.
Reach Darth Baras and finish the current turn-in
From the Dromund Kaas spaceport travel to Kaas City and the Sith Sanctum or other currently marked Baras location. Speak with him as your tracker requests, and complete any subsequent ship holoterminal stage before moving to Taris.
Cannot find the objective?
The Republic Safe House is entered through the UPPER INDUSTRIAL SECTOR'S Republic Power Generation elevator, regardless of Lower Office Atrium wording. If General Gonn appears immune, defeat his Sentinels first. After the encounter, your required report is on Dromund Kaas, not the Nar Shaddaa ship terminal.
Other activities: The Imperial traitor confrontation changes with dialogue. Killing every Fawste associate is required only when that branch appears in the tracker. Industrial Sector bonus quests and datacrons are unrelated.
Exact named route and task order are source-grounded. Individual taxi stop unlocks and floor hallway turns are not invented.
After Set the Table and your report to Darth Baras, the next mission is Check In. It sends the Warrior to Taris and begins the hunt for the Republic generals. Follow your next mission from the Fury holoterminal; do not return to the Nar Shaddaa safe house.