SWTOR Sith Warrior Juggernaut Vengeance Corellia class-story walkthrough. Protect Darth Vowrawn against assassins on three different rooftops, deactivate three numbered consoles for Colonel Senks, find Shadow and the Jedi spy bunker, then confront Lord Draahg in Baras's secret lair.
4 missions49 numbered navigation stepsAuthentic district mapOriginal levels 47–50
LOST OR STUCK? · MAP AND FLOOR CHECK
Before chasing the quest marker, check the route
Choose the active story mission.Press L to open the mission log and track the named Sith Warrior objective. A purple mission symbol marks important story content, but not necessarily YOUR class mission. Follow the exact title and task shown in this walkthrough.
Open the full map.Default M opens the main map. Alt + M toggles the overlay map and minimap. If your shortcuts differ, check your assigned keybinds. Start with the WORLD region, then switch to the current AREA or interior floor map.
A marker behind a wall is not a doorway.On the world map find the correct district or zone; on the local map look for the named cave, station, building entrance, lift, security door or staircase. When the target is on another floor, find a connecting passage before heading toward its map symbol.
Know which travel option is available.Quick Travel opens a world map with available travel-point filters. Choose an unlocked destination on your current planet and pay attention to any restrictions or costs shown in-game. For a new planet, use your Fury's Galaxy Map and the orbital station surface shuttle instead.
If the marker does not advance, check the VERB.Talk, use, loot, disable, exit and return to your ship are separate mandatory interactions. Read the mission's “If you are stuck” note below before fighting more unrelated enemies.
Take Imperial trams between districts, then use each building's actual entrance
Four required class missions visit Incorporation Islands, Labor Valley, Axial Park and Government District. These locations are separated by the tram network: a quest circle on the next district map is not a walkable straight line. Follow the local district map and the named rooftops or story entrances.
Original level guidance: 47–50. Modern experience rewards often put the character higher. The Sith Warrior Origin Story determines these locations; Juggernaut Vengeance determines the combat style.
Four districts in the correct story order
Protect Vowrawn: Incorporation Islands → Industrial Monitoring Station ROOF → Gannir Executive Suites ROOF → Skyrise Service Entrance → occupied corporate tower taxi → NORTHERN and SOUTHERN shield generators → Captain Garrett and Sith Lord Haresh → PENTHOUSE elevator → Darth Vowrawn.
Squeeze the Spy: Labor Valley → Resistance Stronghold → Security Console 148, 325, 684 → Colonel Senks → EXIT stronghold → personal holocom.
Jedi Spy: Axial Park → Imperial commando outpost → Shadow → secret Republic bunker → Masters Injaye and Joce → EXIT bunker → personal holocom → Darth Vowrawn's Safe House.
Baras's Lair: Government District → bound Entity → DEACTIVATE force field → defeat and FINISH Lord Draahg → Fury ship holoterminal → Retribution.
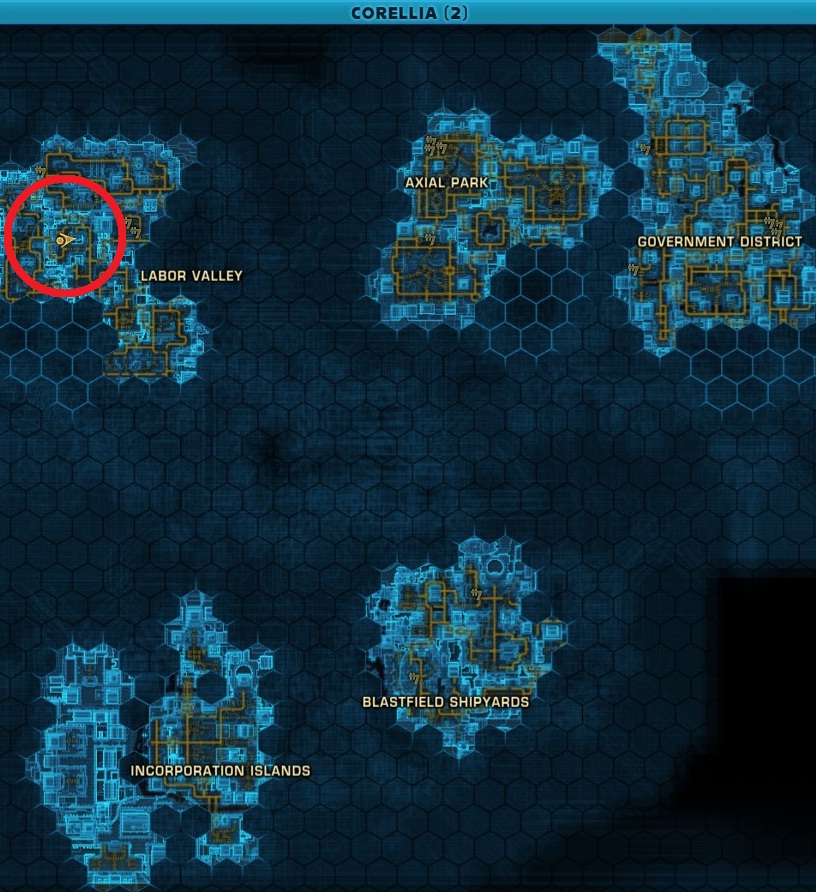
Use the Imperial TRAM network to change districts. The source map's red circle is an unrelated reconnaissance droid target, not a Warrior mission marker.
Which Imperial Rocket Tram do I take?
Corellia has a Rocket Tram network, rather than ordinary city taxi travel. Use these original Imperial tram links when the Sith Warrior mission changes districts.
Next mission
Board at
Select
Arrive in
Protect Vowrawn
Coronet Spaceport
No tram needed
Already Incorporation Islands
Squeeze the Spy
Incorporation Islands Tram Station
Imperial War Camp
Labor Valley
Jedi Spy
Imperial War Camp
Axial Park South
Axial Park, Imperial side
Baras's Lair
Axial Park South
Business Sector
Government District
Return to the Fury
Business Sector
Axial Park South, then transfer to Incorporation Islands
Coronet Spaceport
Do not choose Republic-side Axial Park North or Uptown. If the next station is not listed, check which Imperial stop you are at, and whether you have an unlocked quick-travel point. You can use Coronet Spaceport quick travel instead of the return tram transfers when available.
These images are published player or forum references, not newly generated maps. Use them to recognize the area names and relative locations. An external world map cannot replace the mission-specific floor map once inside a building.
Corellia: original game map for all four Warrior mission districts
The original map separates Incorporation Islands, Labor Valley, Axial Park and Government District. The red circle identifies an unrelated reconnaissance DROID achievement, NOT Colonel Senks or the class quest. The Imperial tram network connects districts.
For the assassins, Jedi masters, and Lord Draahg, use a companion set to Healing if needed. Use your unlocked Rage-building attacks, Vengeance damage abilities and defensive skills. Several barriers require actual controls or access codes and cannot be passed by killing extra enemies.
By Imperial Dark Sector
MISSION 01 / 04 · Chapter 3 · Original Sith Warrior class story
Protect Vowrawn
Three different roofs precede the corporate tower. The tower needs both outdoor shield generators, guarded access codes and a penthouse elevator.
Start
Fury holoterminal on Corellia
Finish
Darth Vowrawn in the occupied corporate tower penthouse
The route to follow
Galaxy Map: Corellia→Fury ship holoterminal→Incorporation Islands district→Industrial Monitoring Station roof→Destroy the Droid Assassin→Gannir Executive Suites roof→Speak to the SIS Assassin→Defeat the SIS Assassin→Skyrise service entrance→Personal holocom→Taxi to Occupied Corporate Tower→Northern Shield Generator→Southern Shield Generator→Tower lobby: Captain Garrett→Garrett's Access Codes, if hostile→Sith Lord Haresh→Penthouse elevator→Lord Qet→Bounty Hunter Assassin and Vowrawn
Galaxy Map: Corellia
After completing The Transponder Station, fly the Fury to Corellia. The story assignment is to protect Darth Vowrawn before Baras's assassins kill him.
Fury ship holoterminal
Use your ship holoterminal when you arrive in Corellia orbit. The Emperor's Hand directs you toward the first assassin in the Incorporation Islands.
Incorporation Islands district
Coronet Spaceport is ALREADY in Incorporation Islands. Leave the Imperial spaceport into this district, then use its local map to find the Industrial Monitoring Station. Do not take a tram to Labor Valley or Axial Park yet.
Industrial Monitoring Station roof
Find the Industrial Monitoring Station and locate its roof access through the in-game marker. The first assassin is above street level, not outside the building.
Destroy the Droid Assassin
At the rooftop objective, catch and destroy the Droid Assassin. Make sure the mission tracker advances before leaving for the next separately marked tower.
Gannir Executive Suites roof
Travel across Incorporation Islands toward the Gannir Executive Suites. Follow the phase or roof-access marker, not the previous Industrial Monitoring Station stairs.
Speak to the SIS Assassin
Approach the SIS Assassin on the Gannir roof and complete the required dialogue interaction before fighting. The mission includes an explicit conversation stage.
Defeat the SIS Assassin
Fight the SIS Assassin as directed by the new objective. When combat is over, your story marker points to a third skyscraper rooftop.
Skyrise service entrance
The third assassin's roof is accessed through the SKYRISE SERVICE ENTRANCE in Incorporation Islands. Find this named passage instead of returning to Gannir.
Personal holocom
When the third assassin escapes and the Hand contacts you, answer with your PERSONAL holocom. Do not go back to your Fury yet.
Taxi to Occupied Corporate Tower
Follow the new objective to a taxi or transport route leading toward the Occupied Corporate Tower. The target is Vowrawn's disguised headquarters.
Northern Shield Generator
In the courtyard outside the occupied corporate tower, find and destroy the NORTHERN Shield Generator. Fighting the guards alone does not disable this barrier.
Southern Shield Generator
Locate and destroy the separate SOUTHERN Shield Generator as well. Both courtyard controls are needed before you can enter the occupied corporate tower.
Tower lobby: Captain Garrett
Enter the tower and speak with Captain Garrett. Depending on dialogue, he may escort you as a prisoner or direct his guards to attack.
Garrett's Access Codes, if hostile
On the combat branch, defeat the Lobby Guards and TAKE CAPTAIN GARRETT'S ACCESS CODES. Use those codes to deactivate the lobby force field.
Sith Lord Haresh
Reach Sith Lord Haresh farther inside. If combat starts, defeat him, take Lord Haresh's Access Codes, and deactivate the NEXT force-field barrier.
Penthouse elevator
Use the specific elevator to access the penthouse. A lift to the lobby or a corridor on another floor will not lead to Vowrawn.
Lord Qet
Find Lord Qet in the penthouse and finish his conversation. Continue through the marked interior rather than leaving immediately for another rooftop.
Bounty Hunter Assassin and Vowrawn
Defeat the Bounty Hunter Assassin in Vowrawn's chamber, then SPEAK TO DARTH VOWRAWN. The final interaction advances to Squeeze the Spy.
Cannot find the objective?
The order is Industrial Monitoring Station ROOF, Gannir Executive Suites ROOF, SKYRISE SERVICE ENTRANCE, then taxi to the Occupied Corporate Tower. Two COURTYARD generators are mandatory. Garrett and Haresh have different access-code barriers, and the PENTHOUSE ELEVATOR is the final route.
Other activities: Fighting tower guards and obtaining Garrett's codes depends on dialogue. Do not complete unrelated Corellia planetary missions for these rooftop assassins.
Tasks and named locations derive from the original SWTOR mission record. The route names authentic buildings and interactions without asserting unverified hallway turns or coordinates.
MISSION 02 / 04 · Chapter 3 · Original Sith Warrior class story
Squeeze the Spy
Disable Security Console 148, 325 and 684 before confronting Colonel Senks. Destroy his database only when assigned, leave the building, and then use the personal holocom.
Start
Darth Vowrawn after Protect Vowrawn
Finish
Personal holocom OUTSIDE the resistance stronghold
The route to follow
Labor Valley via Imperial tram→Resistance Stronghold entrance→Security Console 148→Security Console 325→Security Console 684→Colonel Senks: first conversation→Colonel Senks: second conversation→Destroy Senks's Database if assigned→LEAVE the Resistance Stronghold→Personal holocom OUTSIDE
Labor Valley via Imperial tram
From the INCORPORATION ISLANDS TRAM STATION, board an Imperial Rocket Tram to IMPERIAL WAR CAMP. Exit there in Labor Valley, then navigate with the Labor Valley local map to the Resistance Stronghold. Do not choose Axial Park South for this mission.
Resistance Stronghold entrance
In Labor Valley locate the mission-marked resistance stronghold. If sector access is blocked, Vowrawn's conversation mentions Darth Charnus as an access contact.
Security Console 148
Inside the resistance stronghold, find security console 148 and deploy or activate the assigned ion pulse disruptor. This is the first of THREE distinct consoles.
Security Console 325
Find and deactivate security console 325 on the active objective map. Using console 148 again will not substitute for this separate mission target.
Security Console 684
Find and deactivate security console 684. Confirm all three numbered consoles are recorded before approaching Colonel Senks, the infiltrator working for Baras.
Colonel Senks: first conversation
Locate Colonel Senks in the resistance stronghold and speak to him about the espionage operation. Follow the dialogue and combat result shown in the tracker.
Colonel Senks: second conversation
After the initial confrontation, the mission can require speaking with Colonel Senks again. Do not leave until the follow-up conversation is complete.
Destroy Senks's Database if assigned
If your story choices leave his sensitive files protected, find and DESTROY COLONEL SENKS'S DATABASE. Other conversation outcomes proceed without this objective.
LEAVE the Resistance Stronghold
The class mission specifically tells you to leave the monitored building before contacting Darth Vowrawn. Exit back into Labor Valley's open area.
Personal holocom OUTSIDE
Use your PERSONAL holocom after the Leave the Resistance Stronghold objective clears. Vowrawn supplies the next lead involving Shadow and the Jedi Spy.
Cannot find the objective?
The console numbers are 148, 325 and 684. Contact Vowrawn only AFTER EXITING the resistance stronghold. Destroy Senks's database only on the branch where the tracker requests it. Travel from Incorporation Islands to Imperial War Camp on the Imperial tram.
Other activities: Normal district transit may require unlocking a tram route. Optional Corellian resistance enemies beyond the tracked console and Senks encounters are unnecessary.
Tasks and named locations derive from the original SWTOR mission record. The route names authentic buildings and interactions without asserting unverified hallway turns or coordinates.
MISSION 03 / 04 · Chapter 3 · Original Sith Warrior class story
Jedi Spy
Find Shadow at the Imperial commando outpost, locate the secret bunker, confront Masters Injaye and Joce, then EXIT before calling Shadow.
Start
Vowrawn holocom after Squeeze the Spy
Finish
Darth Vowrawn at His Safe House
The route to follow
Travel to Axial Park via tram→Imperial commando outpost→Find Shadow→Speak with Shadow→Secret Republic bunker entrance→Talk to Master Injaye→Defeat Master Joce→Defeat Master Injaye if assigned→Speak to Master Injaye after combat→EXIT the secret bunker→Personal holocom outside→Return to Darth Vowrawn's Safe House
Travel to Axial Park via tram
Return to the IMPERIAL WAR CAMP tram stop in Labor Valley and select AXIAL PARK SOUTH. Exit at Axial Park South, then open the local map to find Shadow's Imperial commando outpost. Do not use the Republic-side Axial Park North tram.
Imperial commando outpost
Locate the Imperial commando outpost within Axial Park using the local map. The quest contact is Shadow, not a random Republic soldier.
Find Shadow
Approach the tracked Shadow contact at the Imperial commando outpost. You must reach the meeting point before your mission advances to dialogue.
Speak with Shadow
Talk to Shadow to learn where Baras's false Jedi is hiding. The new destination is a SECRET REPUBLIC BUNKER elsewhere in Axial Park.
Secret Republic bunker entrance
Use the local map and class-phase marker to find and enter the hidden Republic bunker. A generic Republic Safe House is not necessarily the class entrance.
Talk to Master Injaye
Inside the bunker, approach Master Injaye and complete the opening conversation. Master Joce may intervene according to the selected dialogue path.
Defeat Master Joce
If the objective directs you to defeat Master Joce, fight him inside the secret bunker. Do not assume that every dialogue choice requires both masters.
Defeat Master Injaye if assigned
In a separate outcome, the journal requires fighting Master Injaye as well as Master Joce. Follow only the hostile objectives shown for your branch.
Speak to Master Injaye after combat
If Injaye survives and the tracker says Speak to Master Injaye, interact with him again. The story can require information after the fight.
EXIT the secret bunker
After resolving the Jedi Masters, retrace the accessible way OUT of the secret Republic bunker before using your communicator, as the mission instructs.
Personal holocom outside
Contact Shadow using your PERSONAL holocom after the bunker exit registers. Do not return to your ship or try to call inside the bunker.
Return to Darth Vowrawn's Safe House
Follow the updated quest marker back to Darth Vowrawn's safe house and SPEAK TO VOWRAWN. This finishes Jedi Spy and starts Baras's Lair.
Cannot find the objective?
If Shadow's call fails, leave the SECRET REPUBLIC BUNKER first. Fight Master Joce alone or both Masters on the assigned branch, and talk to Injaye again if required. From Labor Valley, take Imperial War Camp → Axial Park South, not the Republic north station.
Other activities: Three Axial Park artillery cannons appear in a BONUS mission. They are not a requirement for finding the Jedi Spy.
Tasks and named locations derive from the original SWTOR mission record. The route names authentic buildings and interactions without asserting unverified hallway turns or coordinates.
MISSION 04 / 04 · Chapter 3 · Original Sith Warrior class story
Baras's Lair
Find the Entity in the Government District lair, deactivate its force field, defeat Lord Draahg and FINISH him to save Vowrawn.
Start
Darth Vowrawn at His Safe House
Finish
Fury ship holoterminal after defeating and finishing Lord Draahg
The route to follow
Government District via Imperial trams→Find Baras's secret lair→Find the Entity→Deactivate the Force Field→Defeat Lord Draahg→FINISH Lord Draahg→Leave the Government District lair→Fury SHIP holoterminal
Government District via Imperial trams
At AXIAL PARK SOUTH Tram Station, select BUSINESS SECTOR using the Imperial Rocket Tram network. Exit at Business Sector, the Imperial transit hub for the Government District, then use the Government District map to find Baras's secret lair.
Find Baras's secret lair
Track Baras's Lair on the Government District local map. Enter the named class-phase lair rather than searching the public government assembly.
Find the Entity
Proceed deeper into Baras's secret lair until the objective says Find the Entity. It has been bound to provide future visions for Baras.
Deactivate the Force Field
Interact with the mission-marked Force Field control around the Entity. This is separate from fighting guards near the chamber entrance.
Defeat Lord Draahg
Confront Lord Draahg after he entraps Darth Vowrawn in a lethal energy field. Defeat Draahg in the lair as the required objective.
FINISH Lord Draahg
After combat, the quest specifically reads Finish Lord Draahg. Speak to or otherwise interact with him as prompted; do not leave until complete.
Leave the Government District lair
Leave the Government District lair after finishing Draahg. For your return to the Fury, take Business Sector tram → AXIAL PARK SOUTH; transfer to INCORPORATION ISLANDS; then return to Coronet Spaceport. If you have unlocked Coronet Spaceport quick travel, you can use that instead.
Fury SHIP holoterminal
Board the Fury and use its SHIP holoterminal to speak with Servant One. This begins Retribution and sends you to the Korriban Dark Council Chambers.
Cannot find the objective?
This is Corellia's GOVERNMENT DISTRICT, not Korriban. Deactivate the Entity's FORCE FIELD, defeat Draahg and FINISH him, then contact Servant One on the Fury SHIP holoterminal. Reach Government District via Axial Park South → Business Sector. Return by Business Sector → Axial Park South → Incorporation Islands.
Other activities: Eliminate Baras's Forces, a 40-enemy bonus objective, is not required to complete this class-story mission.
Tasks and named locations derive from the original SWTOR mission record. The route names authentic buildings and interactions without asserting unverified hallway turns or coordinates.
After defeating Lord Draahg, return to your Fury and use the ship holoterminal. Retribution sends you to the Dark Council Chambers on Korriban for the two fights with Darth Baras.