Hoth · Original levels 37–40 · Power Play level 41
Sith Warrior: Vengeance — Hoth and Chapter 2 finale
SWTOR Sith Warrior Juggernaut Vengeance Hoth walkthrough: rescue Commander Lanklyn from Drift Hills Stronghold, find Broonmark at the Talz Commando Cave, recover Baras's lightsaber in the Glacial Fissure, open the dreadnaught bulkhead to Jedi Knight Xerender, and defeat Darth Vengean in the Power Play Chapter 2 finale.
Choose the active story mission.Press L to open the mission log and track the named Sith Warrior objective. A purple mission symbol marks important story content, but not necessarily YOUR class mission. Follow the exact title and task shown in this walkthrough.
Open the full map.Default M opens the main map. Alt + M toggles the overlay map and minimap. If your shortcuts differ, check your assigned keybinds. Start with the WORLD region, then switch to the current AREA or interior floor map.
A marker behind a wall is not a doorway.On the world map find the correct district or zone; on the local map look for the named cave, station, building entrance, lift, security door or staircase. When the target is on another floor, find a connecting passage before heading toward its map symbol.
Know which travel option is available.Quick Travel opens a world map with available travel-point filters. Choose an unlocked destination on your current planet and pay attention to any restrictions or costs shown in-game. For a new planet, use your Fury's Galaxy Map and the orbital station surface shuttle instead.
If the marker does not advance, check the VERB.Talk, use, loot, disable, exit and return to your ship are separate mandatory interactions. Read the mission's “If you are stuck” note below before fighting more unrelated enemies.
Hoth is a sequence of four different interiors, followed by Dromund Kaas
The first objective is a prisoner in an Icefall Plains pirate base, not the Talz cave. Next, reach the Talz Commando Cave in Highmount Ridge, then the Black Market Compound in the Glacial Fissure. The final Hoth confrontation happens inside a crashed dreadnaught; open its bulkhead to get through.
Levels: the original story used approximately 37–40 for Hoth, with Power Play at level 41. Modern XP gains and planet level sync mean your actual character may be higher. Origin Story determines destinations; Vengeance changes fighting style.
Follow this travel order instead of the straight-line mission marker
Rescue Lanklyn: Dorn Base Command Center → Icefall Plains → Glasswater Run → Drift Hills Stronghold bunker → prison door → Commander Lanklyn.
The Master's Weapon: Glacial Fissure → Black Market Compound → Talz and pirate guards → Baras's lightsaber → Broonmark.
Jedi Master on Ice: tracked crash site → Fetzellen → bulkhead → Xerender → Master Wyellett → Fury ship holoterminal.
Power Play: Fury → Dromund Kaas, Sith Sanctum → rescue Lord Draahg → Ovakar and card 1 → Ganarog and card 2 → Koryst and card 3 → Darth Vengean → report to Darth Baras.
The planet map gives regions, not interior routes. Use the current objective and named local map while approaching a cave, locked room or lower compound level.
Real game maps and sourced images
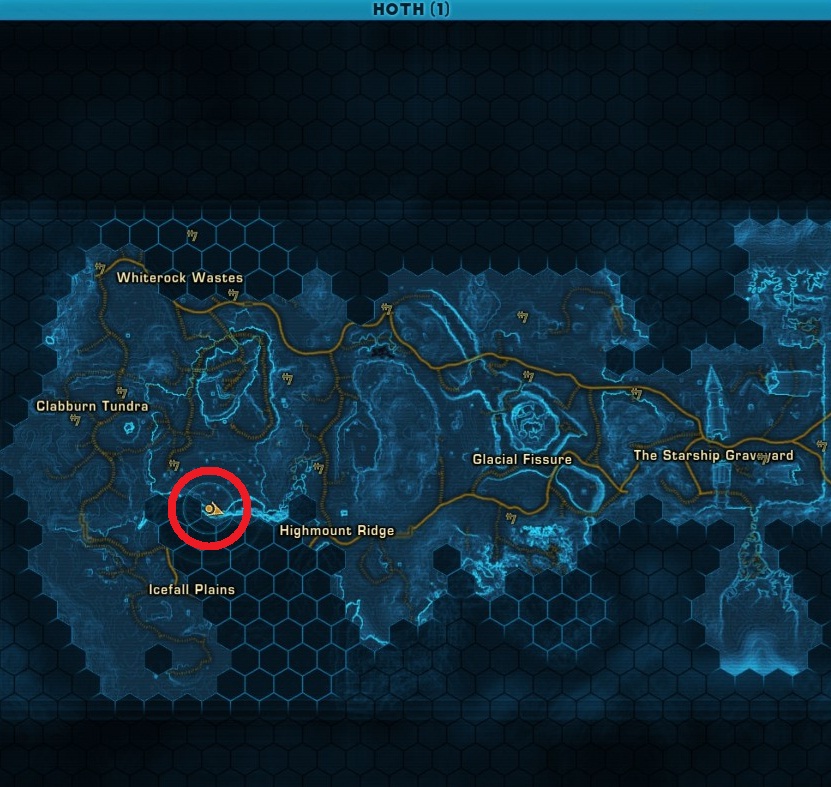
Original Hoth map showing Icefall Plains, Highmount Ridge and Glacial Fissure
These images are published player or forum references, not newly generated maps. Use them to recognize the area names and relative locations. An external world map cannot replace the mission-specific floor map once inside a building.
Hoth original region map: Icefall Plains, Highmount Ridge, Glacial Fissure
Real in-game overview identifying Icefall Plains, Highmount Ridge, Glacial Fissure and the Starship Graveyard. IMPORTANT: the RED CIRCLE is from the separate MCR-99 DROID achievement. It is not the Warrior class-story mission entrance.
Keep a companion in Healing if needed for the multiple enemy fights. Use Rage-generating and Vengeance damage abilities unlocked at your level. Save defensive cooldowns for Xerender, the elite Special Ops enemies and Darth Vengean. Broonmark appears in more than one separate battle, and a dialogue interaction often follows victory. Environmental objectives, including a bulkhead and three access cards, cannot be bypassed by defeating random nearby enemies.
Find Commander Lanklyn, whose tracking beacon is transmitting from a pirate stronghold in Icefall Plains. Reaching his cell is not enough: its locked door has to be opened before the rescue conversation.
Start
Ensign Slinte in Dorn Base Command Center
Finish
Commander Lanklyn after opening his cell
The route to follow
Dorn Base Command Center→Icefall Plains→Glasswater Run→Drift Hills Stronghold→Follow tracking beacon inside→Find Lanklyn's cell→Unlock prison doors→Speak with Lanklyn
Accept the rescue at Dorn Base Command Center
After Debriefing, speak to Ensign Slinte in Dorn Base Command Center. His mission explains that Commander Lanklyn's tracking beacon has stopped moving in hostile territory.
Travel from Dorn Base to Icefall Plains
Open the full Hoth map and move toward Icefall Plains using the Imperial-side travel routes you have unlocked. This story objective is not in the Glacial Fissure.
Locate the Drift Hills Stronghold
Within ICEFALL PLAINS, search the GLASSWATER RUN sub-area for the White Maw pirate bunker named DRIFT HILLS STRONGHOLD. It is not Drift Hills Imperial Outpost, a different Imperial facility. Follow the named stronghold entrance into the class area to reach Lanklyn's prison cell.
Enter the pirate stronghold and follow the beacon
Enter the Drift Hills Stronghold bunker in GLASSWATER RUN and use the interior local map for the locked prison cell. Lanklyn's tracking beacon leads inside the bunker. Search for the cell door and its interaction rather than following an outside Icefall Plains marker through a solid wall.
Find Commander Lanklyn behind the locked doors
Approach the cell where his tracking beacon is located. Finding the prisoner does not immediately finish the quest, because the prison doors are still locked.
Unlock the prison doors with the nearby interaction
Use the marked prison door control or door interaction to free Lanklyn. Clear hostile pirates if they prevent you from interacting safely with the door.
Speak with Commander Lanklyn after he is freed
Talk to the newly freed Commander Lanklyn. He provides the lead on Jedi Knight Xerender and begins the next class-story mission, Interrogate the Talz.
Cannot find the objective?
The target is DRIFT HILLS STRONGHOLD in GLASSWATER RUN, Icefall Plains—not the similarly named Drift Hills Imperial Outpost. Enter the bunker, find Lanklyn's locked cell, and complete UNLOCK THE PRISON DOORS before speaking to him.
Other activities: A White Maw Mistake asks you to defeat 20 captors; that is a bonus, not a prerequisite for opening Lanklyn's cell.
The locked-cell story objectives are confirmed by TORCommunity and Jedipedia. SWTOR Explorer's Guide location indexing identifies Drift Hills Stronghold in Glasswater Run within Icefall Plains. No unverified room-turn instructions are asserted.
Search the Talz Commando Cave in Highmount Ridge for Xerender's military information. Padawan Sewlor and Broonmark require separate conversations and fights, followed by the report at Thesh Outpost.
Start
Commander Lanklyn at Drift Hills Stronghold
Finish
Commander Lanklyn at Thesh Outpost Command Center
The route to follow
Highmount Ridge→Talz Commando Cave→Speak to Padawan Sewlor→Defeat Sewlor→Speak to Sewlor again→Defeat Broonmark→Talk to Broonmark→Return to Thesh Outpost Command Center→Speak to Lanklyn / report to Baras
Take the route into Highmount Ridge
After freeing Commander Lanklyn, travel from the Icefall Plains toward Highmount Ridge. The Talz commando operation is in a different named region from the pirate prison.
Find the Talz Commando Cave entrance
Open the Highmount Ridge local map and follow the active Interrogate the Talz marker to the cave entrance. Enter the cave instead of searching exterior Talz patrols.
Speak with Padawan Sewlor inside the cave
Approach Padawan Sewlor and trigger the required initial conversation. This nervous Jedi is Xerender's subordinate, not the Jedi Knight you are hunting.
Defeat Padawan Sewlor
When Sewlor turns hostile, defeat him. This is a named class-story battle, not an optional objective to kill every Talz wandering outside the cave.
Speak with the defeated Padawan again
Interact with Padawan Sewlor after combat. The mission explicitly requires a second conversation, and Broonmark intervenes before the information can be collected.
Defeat Broonmark after his intervention
Fight Broonmark when the quest directs. This first encounter does not recruit him to your crew; it is the beginning of a continuing Talz storyline.
Speak to Broonmark about Jedi Knight Xerender
Talk to Broonmark after the battle. He reveals that Xerender is seeking the supposedly lost Jedi Master Wyellett, whose trail leads toward a weapon of Baras.
Return to the Thesh Outpost Command Center
Leave the cave and use your available Imperial travel routes toward Thesh Outpost, not the original Dorn Base Command Center. Open the local Thesh Outpost map.
Report to Commander Lanklyn and Darth Baras
Speak to Commander Lanklyn in Thesh Outpost Command Center. Complete the conversation and any Darth Baras holocom segment presented to obtain The Master's Weapon.
Cannot find the objective?
The two Lanklyn meetings are in different places: Rescue Lanklyn ends at Drift Hills Stronghold, while Interrogate the Talz sends you to THESH OUTPOST Command Center. In the cave, speak to Sewlor both before and after combat.
Other activities: Talz commandos outside the specific cave and other Highmount Ridge exploration missions are not required to complete the class-story interrogation.
These named locations and objective stages are documented by the cited original-class quest databases. Local street turns, unverified lift positions and fake GPS coordinates are intentionally omitted.
Travel to the Black Market Compound in the Glacial Fissure and reclaim Darth Baras's lightsaber. You must defeat specific Talz and pirate enemies, pick up the saber, then confront Broonmark again.
Start
Commander Lanklyn at Thesh Outpost
Finish
Broonmark after retrieving Darth Baras's lightsaber
The route to follow
Glacial Fissure→Black Market Compound→Travel to coordinates→Talk to Talz commandos→Defeat Talz elite, 2 commandos, 3 pirates→Pick up Baras's lightsaber→Defeat Broonmark→Speak with Broonmark
Leave Thesh Outpost for the Glacial Fissure
After the Lanklyn briefing, navigate to the Glacial Fissure region of Hoth, rather than going back to the previous Talz Commando Cave in Highmount Ridge.
Find the Black Market Compound
Use the area's road connections and class mission marker to reach the Black Market Compound. The coordinates referenced by the journal identify this compound, not a ship graveyard datacron.
Enter the compound and reach the marked coordinates
Proceed into the pirates' black-market area until Travel to the Coordinates updates. It is a separate mission phase from Commander Lanklyn's Thesh Outpost Command Center.
Speak to the Talz commandos
Confront the Talz commandos involved in the trade and complete the dialogue before combat. The fight targets are then identified explicitly in the tracker.
Defeat the Talz Commando Elite
Kill the Talz Commando Elite required by the mission. A random White Maw patrol does not count as a substitute for the named elite.
Defeat two Talz commandos and three pirate blackmarketeers
Continue fighting the indicated enemies until the tracker registers both of the Talz commandos and all three pirate blackmarketeers. This is the mandatory kill group.
Pick up Darth Baras's lightsaber
After the enemies are defeated, interact with the marked lightsaber in the Black Market Compound. Do not leave because the weapon is a separate pickup objective.
Defeat Broonmark in the second encounter
Broonmark challenges you again for killing Talz associated with his clan. Fight him at the compound when the task appears, using a defensive cooldown if needed.
Talk to Broonmark after the second battle
Speak to Broonmark when he is defeated. The dialogue advances the lead to Xerender and Master Wyellett, preparing the crash-site mission Jedi Master on Ice.
Cannot find the objective?
If the quest has not advanced, confirm you defeated ONE Talz Commando Elite, TWO ordinary Talz commandos and THREE pirate blackmarketeers, then picked up the lightsaber. The required second Broonmark fight happens afterward.
Other activities: Pirate groups and Talz outside the specified counted enemy types may be bypassed when combat allows; optional achievements do not affect the lightsaber pickup.
These named locations and objective stages are documented by the cited original-class quest databases. Local street turns, unverified lift positions and fake GPS coordinates are intentionally omitted.
Follow the crash-site objective, open the fallen dreadnaught bulkhead, defeat Xerender and his Special Ops forces, then resolve your encounter with Jedi Master Wyellett. Multiple endings are recorded.
Start
Broonmark after The Master's Weapon
Finish
Fury ship holoterminal to begin Power Play
The route to follow
Go to crash site→Find Xerender's trail→Speak to Fetzellen→Open dreadnaught bulkhead→Find Xerender beyond bulkhead→Talk to Xerender→Defeat Xerender and Special Ops→Speak to Wyellett→Resolve Wyellett branch→Return to Fury holoterminal
Follow the crash-site marker for Jedi Master on Ice
After the second Broonmark encounter, make this mission active. Use the Hoth local world map to travel to the indicated crashed dreadnaught, rather than returning to the Black Market Compound.
Enter the crash-site area and locate Xerender's route
Look for the mission-marked approach to the wreck interior. A marker behind a ship wall does not mean there is a direct path through the metal.
Speak with Fetzellen at the crash site
Find Fetzellen during the search and complete the required conversation. Broonmark's involvement in this scene leads to a new step inside the wreck.
Find and operate the bulkhead door
After the encounter with Fetzellen, use the mission-marked Bulkhead Door of the crashed dreadnaught. The bulkhead must be opened to continue deeper toward Xerender.
Advance inside to locate Jedi Knight Xerender
Follow the accessible passage beyond the open bulkhead. If the objective still reads Open the Bulkhead Door, return to the door rather than searching for Xerender outside.
Speak to Jedi Knight Xerender
Approach Xerender in the wreck and complete his confrontation dialogue before the encounter changes to combat objectives. He is the mission's Republic officer.
Defeat Xerender and the Elite Special Ops forces
Fight Jedi Knight Xerender and the elite Special Ops reinforcements required by the active tracker. Use an available healing companion and defensive cooldowns if several enemies engage.
Talk to Master Wyellett when the fight ends
After Xerender, approach Jedi Master Wyellett and speak with him. His fate is determined in the subsequent conversation and possible fight, not by simply leaving.
Complete your chosen Wyellett outcome
The records allow different outcomes, including a fight with the Jedi Master, a post-fight dialogue or his defeat. Follow the branch shown in your quest tracker until it requests ship contact.
Return to the Fury and use its ship holoterminal
Leave the wreck through the available route, return to the Imperial orbital station and board your Fury. Activate the SHIP holoterminal to report your Hoth success to Darth Baras.
Cannot find the objective?
If you reached Fetzellen but cannot find Xerender, OPEN THE BULKHEAD DOOR in the crashed dreadnaught. After Xerender's fight, SPEAK to Master Wyellett and resolve your chosen branch. Your final report uses the Fury holoterminal.
Other activities: Remnants of the Commando Unit (defeat fifteen Talz) is a bonus, not a required step for opening the bulkhead or defeating Xerender.
These named locations and objective stages are documented by the cited original-class quest databases. Local street turns, unverified lift positions and fake GPS coordinates are intentionally omitted.
MISSION 05 / 05 · Chapter 2 finale · Dromund Kaas · Original level 41
Power Play
The chapter finale is back on Dromund Kaas beneath the Sith Sanctum. Free Lord Draahg, then defeat and LOOT Ovakar, Ganarog and Koryst for three separate door-access cards before reaching Darth Vengean.
Start
Fury holoterminal after Jedi Master on Ice
Finish
Return to Darth Baras after the Vengean confrontation
The route to follow
Galaxy Map: Dromund Kaas→Darth Baras, Sith Sanctum→Rescue Lord Draahg→Compound outer ring→Defeat and loot Ovakar→Unlock door 1→Central ring→Defeat and loot Ganarog→Unlock door 2→Defeat and loot Koryst→Unlock door 3→Vengean inner chamber→Confront and defeat Vengean→Speak to Lord Draahg→Return to Darth Baras
Fly the Fury back to Dromund Kaas
After Jedi Master on Ice, use the ship's Galaxy Map to return to Dromund Kaas. This finale is NOT on Hoth; the new mission journal specifies meeting Baras in person.
Travel into Kaas City and enter the Sith Sanctum
From the spaceport use the unlocked Kaas City transit to reach the Citadel and its Sith Sanctum. Follow the Power Play class marker toward Darth Baras.
Speak with Darth Baras about his planned coup
Complete Baras's briefing. He reveals that his secret apprentice Lord Draahg is imprisoned by Darth Vengean beneath the Sith Sanctum and must be freed.
Follow the marker beneath the Sith Sanctum to the compound
Enter the mission phase for Darth Vengean's compound beneath the Sith Sanctum, not the general Kaas City street or a different Sith character's training hall.
Rescue Lord Draahg
Locate the marked prisoner phase and complete the Rescue Lord Draahg objective. He becomes part of the attack against Vengean's inner sanctum.
Breach the compound's Outer Ring
Use the indicated access route inside the compound to reach its Outer Ring objective. Defeat enemies necessary to reach the named defending Sith.
Defeat Lord Ovakar AND loot his remains
Fight Lord Ovakar, then interact with his body to recover the security access card. Killing him alone will not open the first locked compound door.
Unlock the first compound door
Use Ovakar's security card on the mission-marked First Compound Door. Move through after the interaction advances, rather than searching for another route around the barrier.
Breach the compound's Central Ring
Travel farther inside to the Central Ring of Darth Vengean's underground compound. The next required champion and security card are deeper than Ovakar's door.
Defeat Lord Ganarog AND loot his remains
Defeat Lord Ganarog, then loot his body for the second security access card. If the second door remains closed, return to his remains first.
Unlock the second compound door
Use Ganarog's recovered card at the Second Compound Door. The next opponent, Lord Koryst, blocks further access to the inner chamber.
Defeat Lord Koryst AND loot her remains
Fight Lord Koryst and interact with her body to take the THIRD security card. Do not leave the area without obtaining the key needed for the final door.
Unlock the third compound door
Use Koryst's security card on the marked Third Compound Door. This grants access to the protected inner chamber of Darth Vengean.
Enter Lord Vengean's inner chamber
Proceed into the inner chamber and complete any planning or companion conversation with Lord Draahg that appears before the main boss confrontation.
Confront Darth Vengean and speak with him
Locate Darth Vengean in the sanctum and complete his initial dialogue. The next step is his required boss fight in the inner chamber.
Defeat Darth Vengean
Fight Darth Vengean using the defensive abilities available to your Vengeance Juggernaut. Handle additional hostile effects or enemies as they appear, and stay in the phase.
Speak to Lord Draahg after the fight
When Vengean is defeated, interact with Lord Draahg for the final compound conversation. Do not immediately exit upon the boss's death.
Return to Darth Baras and complete Power Play
Leave the underground mission phase and return to Darth Baras at the Sith Sanctum. Speak to him in person to finish this Chapter 2 finale.
Cannot find the objective?
The three access locks require three LOOTED cards in order: OVAKAR → first door; GANAROG → second door; KORYST → third door. If the journal says Talk to Darth Baras, leave the underground compound and return to the Sith Sanctum.
Other activities: Show of Force is an associated optional bonus; its enemies are not required beyond the Power Play guards and three champion fights. Completing bonus kills will not substitute for the cards.
These named locations and objective stages are documented by the cited original-class quest databases. Local street turns, unverified lift positions and fake GPS coordinates are intentionally omitted.
After returning to Darth Baras at the end of Power Play, the Sith Warrior story advances into Chapter 3. The next campaign contains Belsavis, Voss and Corellia missions, with the chapter-order handoffs determined by your current journal. We will add similarly detailed directions for that arc.