SWTOR Sith Warrior Juggernaut Vengeance Chapter 3: return to Quesh for Declaration of War, hunt Lord Melicoste on Belsavis, disable the records vault's three power stations, reach Maximum Security Pod J-P9, find Darth Ekkage in the Tomb's Lower Halls, then return to Hoth for Lord Draahg.
6 consecutive story missions63 numbered navigation steps3 source-credited game mapsJuggernaut · Vengeance
LOST OR STUCK? · MAP AND FLOOR CHECK
Before chasing the quest marker, check the route
Choose the active story mission.Press L to open the mission log and track the named Sith Warrior objective. A purple mission symbol marks important story content, but not necessarily YOUR class mission. Follow the exact title and task shown in this walkthrough.
Open the full map.Default M opens the main map. Alt + M toggles the overlay map and minimap. If your shortcuts differ, check your assigned keybinds. Start with the WORLD region, then switch to the current AREA or interior floor map.
A marker behind a wall is not a doorway.On the world map find the correct district or zone; on the local map look for the named cave, station, building entrance, lift, security door or staircase. When the target is on another floor, find a connecting passage before heading toward its map symbol.
Know which travel option is available.Quick Travel opens a world map with available travel-point filters. Choose an unlocked destination on your current planet and pay attention to any restrictions or costs shown in-game. For a new planet, use your Fury's Galaxy Map and the orbital station surface shuttle instead.
If the marker does not advance, check the VERB.Talk, use, loot, disable, exit and return to your ship are separate mandatory interactions. Read the mission's “If you are stuck” note below before fighting more unrelated enemies.
Chapter 3 starts by returning to Quesh, then Belsavis, then Hoth
Do not fly straight to Belsavis after Power Play. Your next assignment, Declaration of War, sends you back to Quesh. Strong Arm then takes you to Belsavis to stop Darth Baras's sister Darth Ekkage from being freed. After the Belsavis prison storyline, Reallocation sends you to Hoth one more time.
Original levels for this sequence: Quesh return 41, Belsavis 42–43, Hoth return 44. Modern experience rewards mean you may be well above these levels. The Sith Warrior Origin Story determines destinations; Juggernaut Vengeance determines how you fight.
Region route: take the correct entrance and return trip
Declaration of War: Dromund Kaas → Fury → Quesh → Commander Ollien → Captain Trey-yen and Corporal Anders → Forward Command Center → Servant One → Fury.
Strong Arm: Belsavis → Imperial Lodgment Command Center → Colonel Trill → Melicoste's Bunker in Minimum Security → Lieutenant Kaid.
Locate the Enemy: High Security Storage → investigate power-locked Records Room → THREE separate power stations → return to the same room.
A Mass of Assassins: Maximum Security Section → Pod J-P9 → Lead Assassin → active dialogue branch → personal holocom.
Thwart the Rescue: northern The Tomb → The Lower Halls → Master Timmns → datapad → Ekkage's cell → Waiting Point → Ekkage → Fury.
Reallocation: Hoth → Dorn Base → Armageddon Battalion post → Captain Phenter → Adamas Space Station airlock → THREE separate Lord Draahg battles → Fury.
A Belsavis world-map circle may be in another security sector. Use the main world map to reach the correct zone, then the local map to find the named door. Only follow routes you have unlocked.
Real game maps and sourced images
Real Belsavis maps: original world regions and security-section roads
These images are published player or forum references, not newly generated maps. Use them to recognize the area names and relative locations. An external world map cannot replace the mission-specific floor map once inside a building.
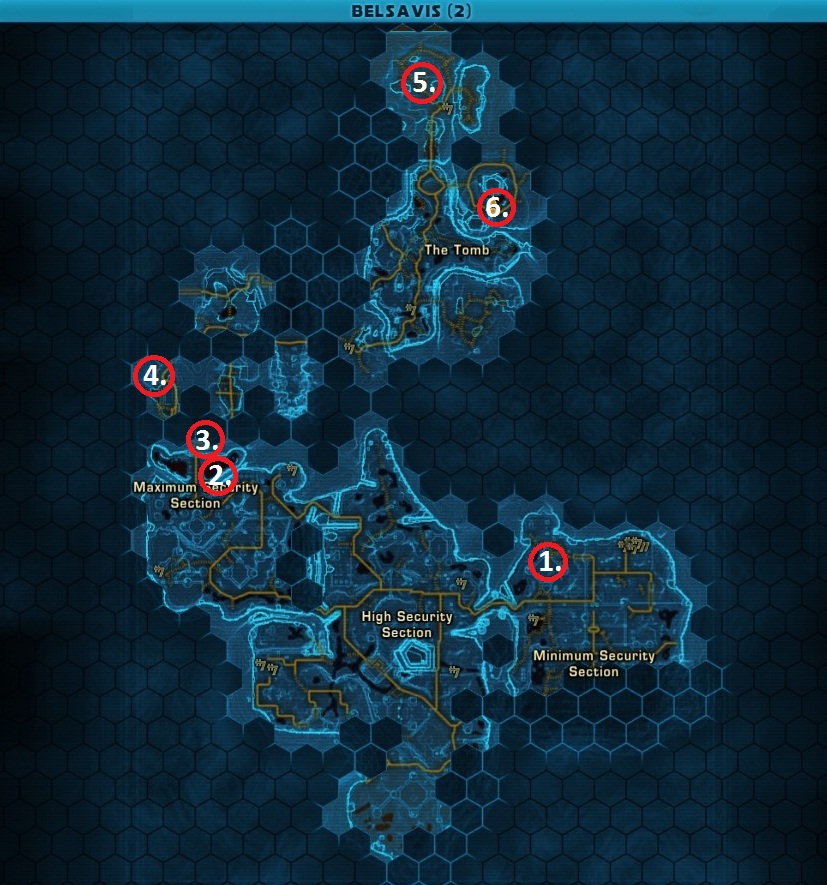
Belsavis in-game overview: Minimum, High, Maximum Security and The Tomb
The zone names and roads are from the real in-game Belsavis map. Red numbered circles show unrelated MCR-99 reconnaissance droids, NOT Sith Warrior story targets. The route moves from southeast Minimum to central High, then northwest Maximum, then north to The Tomb.
Map image unavailable. Use the linked original source and the landmark list below.
Locations to recognize
Minimum Security Section: Imperial Lodgment, Colonel Trill and Melicoste's Bunker
High Security Section: records vault door and THREE security power stations
Maximum Security Section: Pod J-P9, Lead Assassin
The Tomb (north): Lower Halls, Master Timmns and Darth Ekkage
Red numbered MCR-99 markers: unrelated achievement targets
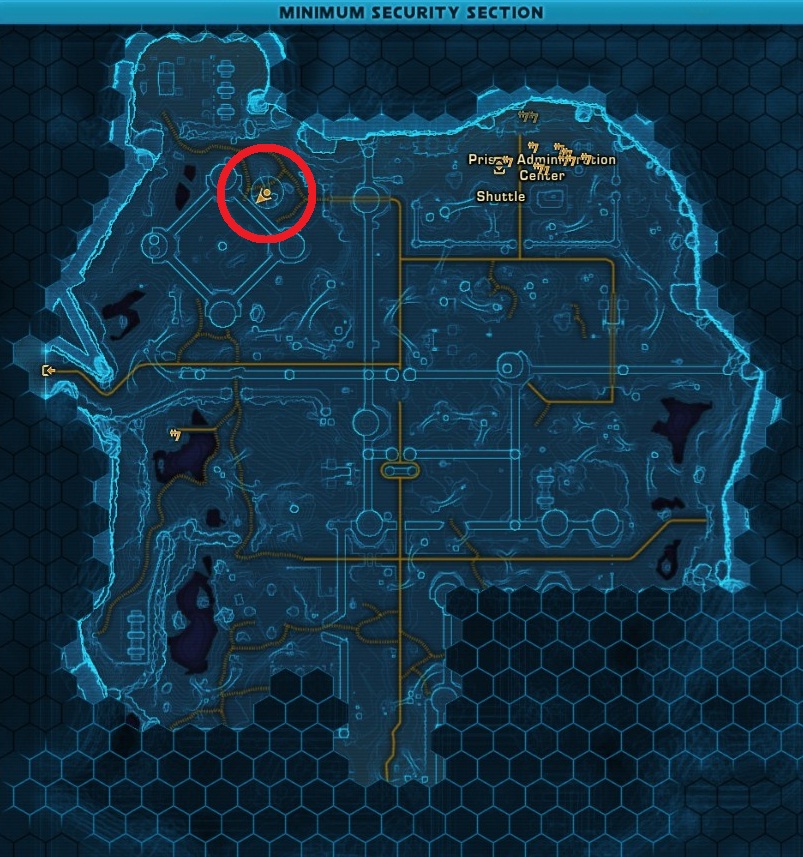
Minimum Security Section: Imperial arrival and Melicoste's bunker region
Shows the northern Prison Administration Center and the planetary shuttle, useful regional landmarks for reaching Colonel Trill and Lieutenant Kaid. Red circle is an unrelated droid achievement target, not Melicoste's bunker.
Map image unavailable. Use the linked original source and the landmark list below.
Locations to recognize
Imperial Lodgment Command Center: Colonel Trill first
Melicoste's Bunker: Lieutenant Kaid after Trill
Prison Administration Center and shuttle are orientation landmarks, not class-phase doors
Use active Strong Arm marker for exact bunker entrance
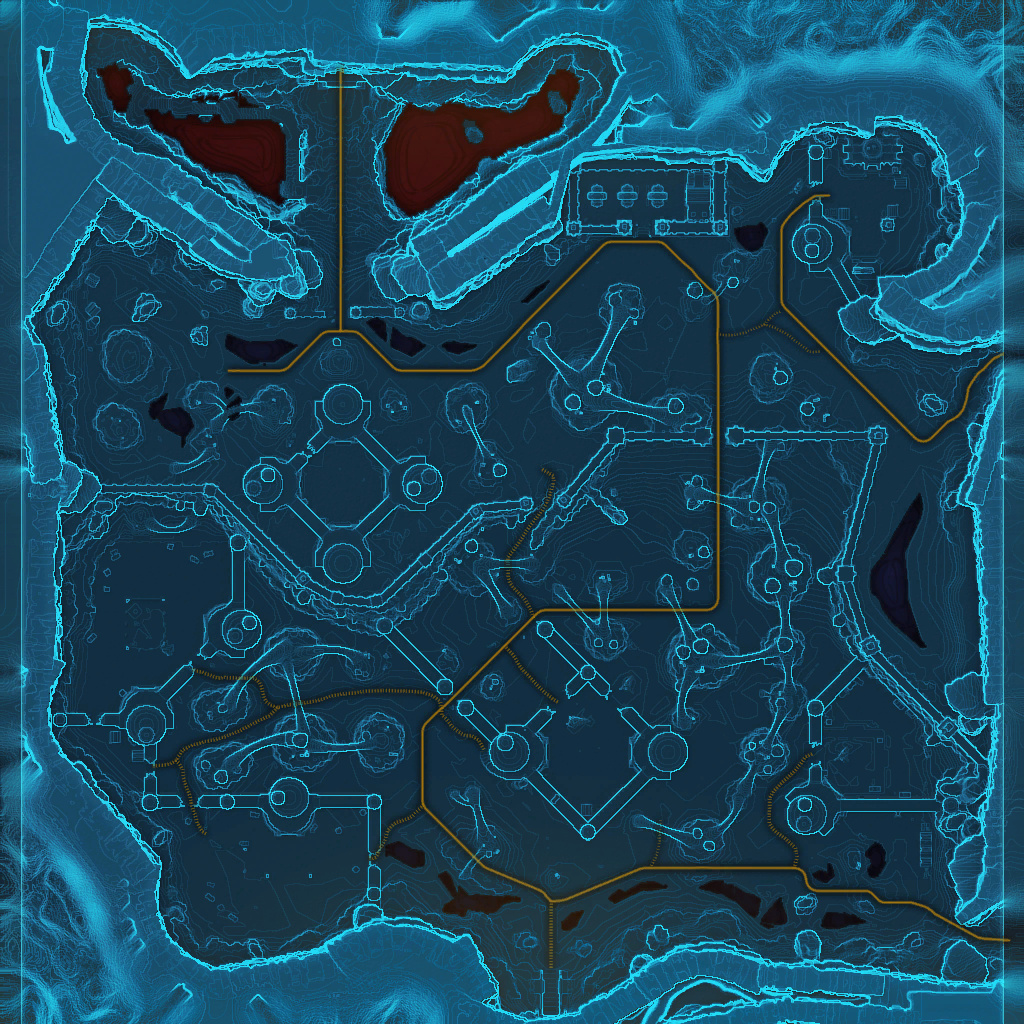
Maximum Security Section: unmarked original road map
This map shows connected roads and facility clusters without fake story arrows. The target is Maximum Security Pod J-P9; the map does not label every individual cell entrance. Use the tracked quest to identify the correct door.
Vengeance Juggernaut: how to survive the longer battles
Equip a companion in Healing if needed. Use your Rage-generation abilities, currently unlocked Vengeance damage rotation and defensive cooldowns for Ekkage, the prisoner assassins and Draahg. The highest-risk navigation errors are forgetting a security generator, using the wrong communicator, missing Ekkage's Waiting Point or leaving Draahg before his second and third combat rounds.
Chapter 3 does not start on Belsavis. Darth Baras sends you back to Quesh, where Republic troops are running a covert operation. The mission includes Captain Trey-yen and Corporal Anders, with a dialogue-dependent fight.
Start
Darth Baras at the Sith Sanctum after Power Play
Finish
Fury holoterminal after Servant One at Quesh Forward Command Center
Receive the new chapter assignment from Darth Baras
After Power Play, complete the personal meeting with Darth Baras in the Sith Sanctum on Dromund Kaas. The next tracked class mission should be Declaration of War.
Return to your Fury and use its holoterminal
Board your own Fury at the Dromund Kaas spaceport and activate the ship holoterminal as required. This is not the personal holocom carried on your character.
Use the Galaxy Map to travel BACK to Quesh
Select Quesh rather than Belsavis. The class story deliberately revisits the toxic industrial world, even though the next long campaign will take place on Belsavis.
Take the Quesh orbital station surface shuttle
If the shuttle asks for an inoculation, speak with the medical officer aboard Quesh Orbital Station. Normally you already obtained this during Ambush!, but confirm before traveling down.
Find Commander Ollien on the surface
Open Quesh's world map and track Declaration of War. Follow the objective labeled Talk to Commander Ollien to the Imperial-side mission contact.
Locate the Republic Task Force
After speaking with Ollien, follow the changed story marker to the Republic Task Force. This is a separate encounter zone; defeating random Republic guards elsewhere will not advance the conversation.
Speak with Captain Trey-yen
Approach Captain Trey-yen in the marked operation and complete his initial dialogue. Corporal Anders and Republic commandos are part of the branching confrontation.
Complete the Anders and task-force battle your choices trigger
The quest database records alternatives, including fighting Corporal Anders and Republic commandos, or Captain Trey-yen alongside them. Defeat the exact tracked opponents shown for your dialogue choice.
Speak with the surviving Republic officer after the fight
When combat ends, check whether the objective reads Talk to Corporal Anders or Talk to Captain Trey-yen. The scene needs its follow-up conversation before you can leave.
Return to the Forward Command Center on Quesh
Once the operation is disrupted, travel back to the mission-marked Forward Command Center. The next handoff is there, not at Fort Phalanx from the earlier Quesh mission.
Speak with Servant One
Find Servant One within the Forward Command Center story objective and finish the discussion. The Emperor's Servants reveal why Baras's interests are now a threat.
Return to your Fury and use the ship holoterminal
Use Imperial return travel to the Quesh shuttle, board your Fury, and activate its holoterminal. This completes Declaration of War and starts Strong Arm.
Cannot find the objective?
If you finished Power Play but the next map marker is on Quesh, that is CORRECT. Talk to Commander Ollien first, then the Republic Task Force, then return to the Forward Command Center and Servant One. Dialogue may alter which Republic officers you fight.
Other activities: Show of Force, which asks for four sentries and two demolitionists, is a bonus. Killing those extra patrols does not replace the required Republic officer dialogue.
The quest order and named objectives come from the linked original SWTOR quest databases. Follow the actual local map and class-phase marker for any interior turn or coordinate that those records do not verify.
Find Darth Baras's operative Lord Melicoste before he can free his sister Darth Ekkage. Start at Colonel Trill's command center, then enter Melicoste's Bunker in the Minimum Security Section.
Start
Fury ship holoterminal after Declaration of War
Finish
Lieutenant Kaid in Melicoste's Bunker, handing off Locate the Enemy
After the Quesh holoterminal contact, set the Fury Galaxy Map to Belsavis. This is the actual start of the planet's class campaign, not a return to the Quesh task force.
Speak with Servant One on the ship holoterminal
While aboard your Fury after arriving, activate the ship holoterminal and hear the Belsavis briefing about Darth Ekkage and Lord Melicoste.
Take the Imperial orbital arrival route to the surface
Disembark through the orbital station and follow the Imperial shuttle route down to Belsavis. Use the Imperial planet map, not a Republic-only base route.
Find the Imperial Lodgment Command Center
On the surface in the Minimum Security Section, locate the Imperial Lodgment Command Center and enter its named interior. It is the opening Imperial contact building.
Speak with Colonel Trill
Approach Colonel Trill inside the command center. His intelligence puts Lord Melicoste's expedition and Lieutenant Kaid inside the Minimum Security Section.
Travel to Melicoste's Bunker in Minimum Security
Exit the Lodgment and follow the updated Strong Arm marker through the accessible Minimum Security roads toward the separate Melicoste's Bunker entrance.
Enter the bunker and confront Lieutenant Kaid
Go inside Melicoste's Bunker rather than searching the open prison yard. Speak to Lieutenant Kaid when the class marker changes to his name.
Defeat Kaid and Melicoste Assault Troopers if hostile
The quest database lists a combat state with Lieutenant Kaid and his assault troopers. If your dialogue triggers it, defeat those enemies inside the bunker.
Speak to Kaid again to obtain the next lead
Finish the post-fight or peaceful conversation with Lieutenant Kaid. This handoff starts Locate the Enemy, sending you from Minimum Security to the records vault in High Security.
Cannot find the objective?
If you cannot locate Kaid, check that you are inside MELICOSTE'S BUNKER, not the Imperial Lodgment. Colonel Trill is the first contact; Lieutenant Kaid is the second. Any Kaid fight must be followed by another dialogue.
Other activities: Strong Arm includes an alternative kill counter for 12 of Melicoste's forces. Follow the current objective, but do not treat the separately labeled Belsavis planetary heroics as mandatory.
The quest order and named objectives come from the linked original SWTOR quest databases. Follow the actual local map and class-phase marker for any interior turn or coordinate that those records do not verify.
MISSION 03 / 06 · Chapter 3 · High Security Section · Original level 42
Locate the Enemy
Your next target is NOT yet Darth Ekkage. The Republic records vault is in High Security Storage, and opening its power-locked door requires destroying THREE separate security power stations across High Security.
Start
Lieutenant Kaid after Strong Arm
Finish
Return to opened records room; A Mass of Assassins begins
The route to follow
High Security Section→High Security Storage→Records Room→Investigate Power-locked Door→Power Station 1→Power Station 2→Power Station 3→Return to Records Room
Leave Minimum Security for High Security Section
After Lieutenant Kaid reveals Melicoste's destination, use the Belsavis world map and available Imperial transport to enter the High Security Section. This is another large zone.
Locate High Security Storage within that section
Open the local High Security map, not the planet overview, and follow the active Locate the Enemy objective toward High Security Storage.
Find the Records Room entrance
Approach the named records vault entrance in the storage area. The immediate goal is to find the door, not to locate Ekkage's cell yet.
Investigate the Power-locked Door
Interact with the locked records-vault door when the tracker says Investigate the Power-locked Door. It reveals that external security power stations keep the vault sealed.
Destroy the FIRST Security Power Station
Follow the next objective marker to the first numbered security power station somewhere in the High Security Section, and destroy its required control.
Destroy the SECOND Security Power Station
Open the local map again and follow the separately marked second power station. Do not retry the first generator, because the journal tracks three distinct stations.
Destroy the THIRD Security Power Station
Find and destroy the last security power station. The vault will not become available merely because you defeated the troops surrounding the other two.
Return to the same Records Room door
Go back to High Security Storage and the previously investigated records-vault entrance. Interact with the now-accessible records room to continue the class story toward the assassins.
Cannot find the objective?
If the vault remains locked, count THREE security power stations. You first INVESTIGATE the power-locked records door, destroy stations 1, 2 and 3 in the wider High Security Section, then RETURN to the original records room. The generators are not all inside the vault.
Other activities: Record Keeping asks for 12 Melicoste enemies as a bonus. You do not need to complete that bonus before returning to the vault.
The quest order and named objectives come from the linked original SWTOR quest databases. Follow the actual local map and class-phase marker for any interior turn or coordinate that those records do not verify.
MISSION 04 / 06 · Chapter 3 · Maximum Security Pod J-P9 · Original level 43
A Mass of Assassins
Move to Maximum Security Pod J-P9 to keep Ekkage's imprisoned assassins from escaping. There is a Lead Assassin conversation and a personal holocom; battle requirements depend on the scene.
Start
Power-locked door at the end of Locate the Enemy
Finish
Personal holocom after interacting with the Lead Assassin and resolving ambush
The route to follow
Maximum Security Section→Maximum Security Pod J-P9→Special Restraint Cells→Locate assassins→Speak to Lead Assassin→Resolve assassin/commando battle (branch)→Personal holocom→Next: Thwart the Rescue
Read the records-room lead and set the new mission active
Finish Locate the Enemy at the records room, and make A Mass of Assassins your tracked class mission. The target changes from High Security to Maximum Security.
Travel to Maximum Security Section
Leave the High Security records vault and travel into Belsavis's MAXIMUM SECURITY SECTION using the world map and whichever Imperial route you have unlocked. Do not remain in High Security Storage; the next destination lies in another prison sector.
Find Maximum Security Pod J-P9
In Maximum Security, find the sub-area named SPECIAL RESTRAINT CELLS. Inside that sub-area, locate MAXIMUM SECURITY POD J-P9, not J-P7 or J-P8. The area map or mission-specific transition arrow can help you identify which interior entrance changes to the pod map.
Enter the pod and locate the assassins
Enter the J-P9 class-story phase from Special Restraint Cells and look for the objective Locate the Assassins. If your marker looks close but is inaccessible, check whether you are on the Special Restraint Cells map or the separate J-P9 interior rather than searching the road outside.
Speak to the Lead Assassin
Approach the Lead Assassin and complete the initial conversation. This dialogue determines which combat objectives you will see before your next call.
Defeat the Sith Assassins and Melicoste Commandos if assigned
One mission branch requires defeating Sith assassins and Melicoste commandos inside the pod. Follow the hostile enemy markers shown after the Lead Assassin conversation.
Check for the counted Assassin and Stalker objectives
The mission database also records a combat stage with 12 Ekkage Assassins and 5 Ekkage Stalkers. Complete those counts only if they actually appear as your story objective.
Use your PERSONAL holocom after clearing the phase
When the tracker says Use Your Personal Holocom, activate the character's communicator. You do not have to fly back to your Fury to make this particular call.
Follow the new lead toward the Tomb
After the holocom dialogue, accept Thwart the Rescue. Its destination is The Tomb and its Lower Halls, not another Maximum Security cellblock.
Cannot find the objective?
Maximum Security Pod J-P9 is INSIDE SPECIAL RESTRAINT CELLS in Belsavis's MAXIMUM Security Section. From the High Security records vault, change regions; do not search J-P7/J-P8 or chase an icon through the prison wall. Use the named J-P9 class-phase entrance. Speak with the Lead Assassin before combat; use your PERSONAL holocom after the branch resolves.
Other activities: Marauding the Melicoste, Parole Denied and Parole Deactivated are bonus missions. They include killing extra forces or locking six stasis pods; those are not universally mandatory for main-story progression.
The quest order and named objectives come from the linked original SWTOR quest databases. Follow the actual local map and class-phase marker for any interior turn or coordinate that those records do not verify.
MISSION 05 / 06 · Chapter 3 · The Tomb · Original level 43
Thwart the Rescue
Rendezvous with Jedi Master Timmns in The Tomb's Lower Halls. Examine his datapad, reach Darth Ekkage's cell, activate the WAITING POINT, then fight Ekkage. The later Timmns encounter depends on your choice.
Start
Personal holocom after A Mass of Assassins
Finish
Fury ship holoterminal with Servant One; Reallocation next
The route to follow
The Tomb→The Lower Halls→Rendezvous with Master Timmns→Examine Timmns's Datapad→Find Darth Ekkage's Cell→Use Waiting Point→Defeat Ekkage→Speak to Ekkage→Possible Timmns fight→Fury ship holoterminal
Travel north through Belsavis toward The Tomb
After A Mass of Assassins, follow the Belsavis world map from Maximum Security toward The Tomb region. This is a separate far-northern map zone.
Find the passage into The Lower Halls
Use the Tomb's local map and tracked story marker to enter The Lower Halls interior. The quest does not end at the outdoor Tomb entrance.
Rendezvous with Jedi Master Timmns
Find the mission-marked rendezvous point inside the Lower Halls and speak to Master Timmns, whose temporary assistance is crucial to locating the prison cell.
Examine Master Timmns's Datapad
After the meeting, interact with the named datapad. Do not depart immediately after Timmns's first conversation; the datapad is a distinct required item.
Find Darth Ekkage's Cell deeper in the Lower Halls
Follow the new local map marker to the cell containing Darth Ekkage. The OotiniMaps zone list names this distinct interior The Lower Halls: Darth Ekkage's Cell.
Activate the WAITING POINT near Ekkage's cell
The journal explicitly directs you to Use the Waiting Point. Stand at the mission-marked spot and interact with its trigger so Master Timmns catches up.
Defeat Darth Ekkage
Once the meeting triggers, confront and fight Darth Ekkage in the Lower Halls. Use a healing companion and available Vengeance defensive cooldowns against her attacks.
Speak to Darth Ekkage after combat
Interact with Ekkage when her fight ends. Do not leave the Tomb just because the boss has been defeated, because the dialogue resolves her fate.
Resolve the Master Timmns branch if hostile
One quest outcome assigns Defeat Jedi Master Timmns after the Ekkage conversation; another goes directly to the Fury holoterminal. Follow only the outcome your dialogue selected.
Travel back to the Fury and use its ship holoterminal
Retrace the available exit from the Tomb, use Imperial fast travel or regional transit to the Belsavis shuttle, board your Fury, and speak to Servant One on its holoterminal.
Cannot find the objective?
After finding the cell, do NOT wait passively: USE THE WAITING POINT to trigger Timmns's arrival. Then defeat and SPEAK to Ekkage. A fight with Master Timmns is choice-dependent, not inevitable. Finish aboard the Fury.
Other activities: Melicoste Massacre is a bonus. The mandatory ending requires the cell, waiting point, Ekkage conversation and the Fury report; optional Belsavis heroic quests are unrelated.
The quest order and named objectives come from the linked original SWTOR quest databases. Follow the actual local map and class-phase marker for any interior turn or coordinate that those records do not verify.
After Belsavis, Chapter 3 returns to Hoth. Redirect Armageddon Battalion, then fight Lord Draahg in your ship airlock aboard the Adamas Space Station. Draahg revives twice: there are THREE required fights.
Start
Fury holoterminal after Thwart the Rescue
Finish
Fury ship holoterminal with Servant One; Voss mission Request An Audience follows
The route to follow
Fury Galaxy Map: Hoth→Dorn Base Command Center→Commander Slinte→Icefall Plains Armageddon Battalion Post→General Greist→Captain Phenter→Return to Hoth orbital station→Your Ship's Airlock / Adamas Space Station→Fight Draahg round 1→Talk to Draahg→Fight Draahg round 2→Talk to Draahg→Fight Draahg round 3→Talk to Draahg→Ship holoterminal
Set the Fury Galaxy Map back to Hoth
After finishing the Belsavis report, Servant One sends you to reinforce Darth Vowrawn's position. Travel back to Hoth instead of going directly to Voss.
Land at Hoth and reach Dorn Base Command Center
Use the orbital shuttle to reach the Imperial surface and follow the local map to Dorn Base Command Center, the same base used earlier in Chapter 2.
Question Commander Slinte
Speak with Commander Slinte at Dorn Base. Do not confuse this contact with Ensign Slinte from the earlier Debriefing sequence.
Find the Armageddon Battalion post in Icefall Plains
The mission tracker directs you to the Battalion post within Icefall Plains. Use the region map to reach this distinct military base, not the pirates' Drift Hills Stronghold.
Locate General Greist
Enter the Armageddon Battalion post and find General Greist for the first military conversation. His refusal leads to Captain Phenter's role in the scene.
Speak to Captain Phenter
Talk to Captain Phenter and complete the orders to transfer Armageddon Battalion to Corellia. The quest depends on this discussion, not merely reaching the military base.
Return toward your own ship's airlock
After redirecting the Battalion, follow the journal's Go to Your Ship's Airlock on Hoth objective. Travel back to the orbital station and your Fury's access corridor.
Confront Lord Draahg in the Adamas Space Station airlock
Draahg has attacked the ship and its crew. Speak to him when the airlock encounter begins. This is not a planet-surface boss fight.
Defeat Lord Draahg the FIRST time
Fight Draahg in the airlock when the mission changes to Defeat Lord Draahg. He is scripted to survive, so remain in the encounter space.
Speak to Draahg after the first defeat
Interact with the defeated Sith when the tracker says Talk to Lord Draahg. Do not leave or wait for combat to restart without the dialogue trigger.
Defeat Lord Draahg a SECOND time
Fight him again when he revives. The second health-bar battle is a mandatory story phase, not a bug or an optional hidden challenge.
Speak to Draahg after the second defeat
Complete the second post-fight conversation in the airlock. The quest requires this step before the final battle becomes available.
Defeat Lord Draahg a THIRD time
Finish the third fight in the same airlock. If the tracker does not change, check whether he remains hostile and whether the previous dialogue fully completed.
Speak to Draahg after the third fight
Interact with Lord Draahg for the final conversation, and wait for the mission to advance to the ship holoterminal step.
Enter the Fury and report to Servant One
Board the Fury from the Adamas Space Station airlock and activate the SHIP holoterminal. The next Sith Warrior mission is Request An Audience, taking you to Voss.
Cannot find the objective?
Three fights with Lord Draahg are intentional, each followed by TALK TO LORD DRAAHG. The fight is in YOUR SHIP'S AIRLOCK on Adamas Space Station, not in Icefall Plains. Finish by entering the Fury and using the ship holoterminal.
Other activities: Hoth planetary missions and bonus kill objectives are unrelated. No extra open-world enemy clearing is needed between Draahg's repeated airlock battles.
The quest order and named objectives come from the linked original SWTOR quest databases. Follow the actual local map and class-phase marker for any interior turn or coordinate that those records do not verify.
After Reallocation, the Fury holoterminal assigns Request An Audience on Voss. That begins the next Chapter 3 investigation into the Voice of the Emperor. You have finished the Belsavis prison expedition and Draahg's Hoth ambush; do not revisit Pod J-P9 for the next story.