Chapter 1 · A Padawan's Fall · Practical directions
Sith Warrior: Vengeance — Nar Shaddaa
SWTOR Sith Warrior Vengeance Chapter 1 on Nar Shaddaa: find Halidrell in the Corellian Sector, Girik in the Duros Sector, Republic Outpost Shylon in Upper Industrial, and Rathari in Network Access.
Choose the active story mission.Press L to open the mission log and track the named Sith Warrior objective. A purple mission symbol marks important story content, but not necessarily YOUR class mission. Follow the exact title and task shown in this walkthrough.
Open the full map.Default M opens the main map. Alt + M toggles the overlay map and minimap. If your shortcuts differ, check your assigned keybinds. Start with the WORLD region, then switch to the current AREA or interior floor map.
A marker behind a wall is not a doorway.On the world map find the correct district or zone; on the local map look for the named cave, station, building entrance, lift, security door or staircase. When the target is on another floor, find a connecting passage before heading toward its map symbol.
Know which travel option is available.Quick Travel opens a world map with available travel-point filters. Choose an unlocked destination on your current planet and pay attention to any restrictions or costs shown in-game. For a new planet, use your Fury's Galaxy Map and the orbital station surface shuttle instead.
If the marker does not advance, check the VERB.Talk, use, loot, disable, exit and return to your ship are separate mandatory interactions. Read the mission's “If you are stuck” note below before fighting more unrelated enemies.
Go to the correct sector before looking for the room
Nar Shaddaa is not a single walkable city map. The Imperial
Mezenti Spaceport, Corellian Sector, Duros Sector, Upper Industrial
Sector and Network Access have different map areas and taxi stops.
The objective may look directly ahead while actually requiring
a taxi and a phase entrance in another district.
The numbered steps below identify the correct district and
building, the fight or interaction, and the route back. You may
play Balmorra before or after this Chapter 1 section. Neither
planetary side missions nor bonus kill counts are required.
These are travel-hub routes, not a claim that every taxi
screen will offer a direct connection. Use the unlocked route
displayed in your game. Do not mistake the Network Security
District or datacron drop routes for Network Access.
Real game maps and sourced images
Nar Shaddaa: Imperial sectors and the actual map locations
These images are published player or forum references, not newly generated maps. Use them to recognize the area names and relative locations. An external world map cannot replace the mission-specific floor map once inside a building.
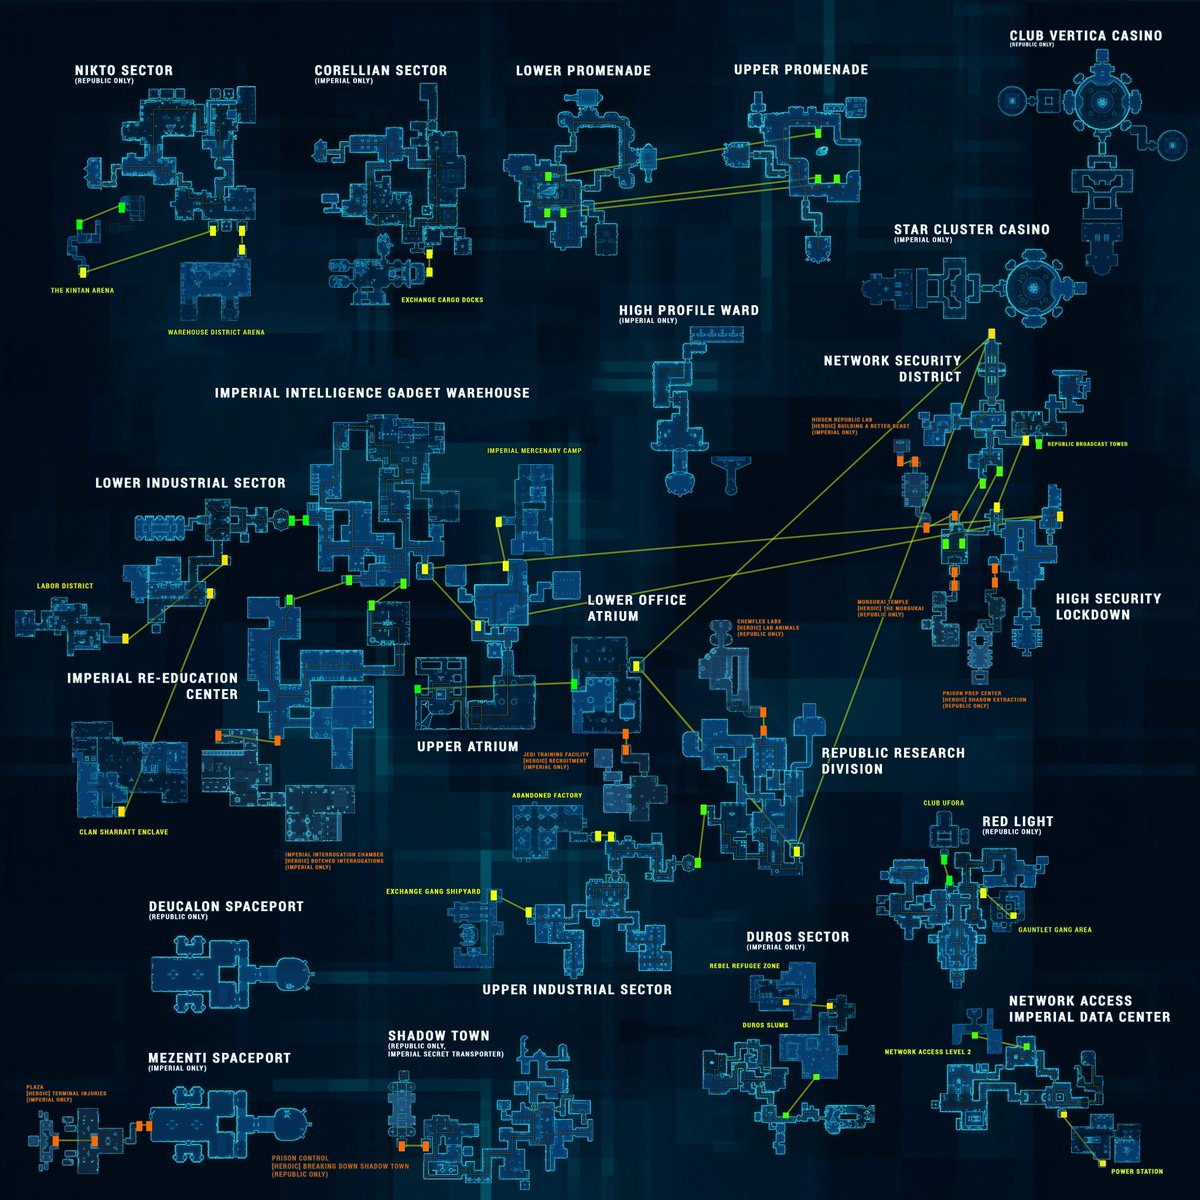
Nar Shaddaa sector-by-sector annotated overview
An authentic in-game-map collage showing the separate taxi-linked zones. This is a broad zone reference, not a mission-specific route. The Corellian, Duros, Upper Industrial, Network Access, and Mezenti Spaceport sectors are all on different maps.
Map image unavailable. Use the linked original source and the landmark list below.
Locations to recognize
Mezenti Spaceport — Imperial starting/return point
Upper Promenade — main interchange for Imperial sector taxis
Corellian Sector — Setsyn Commodities, contact and return
Duros Sector — Hutt Cartel Safe House
Upper Industrial Sector — Republic Outpost Shylon
Network Access — Lord Rathari's Satellite Platform
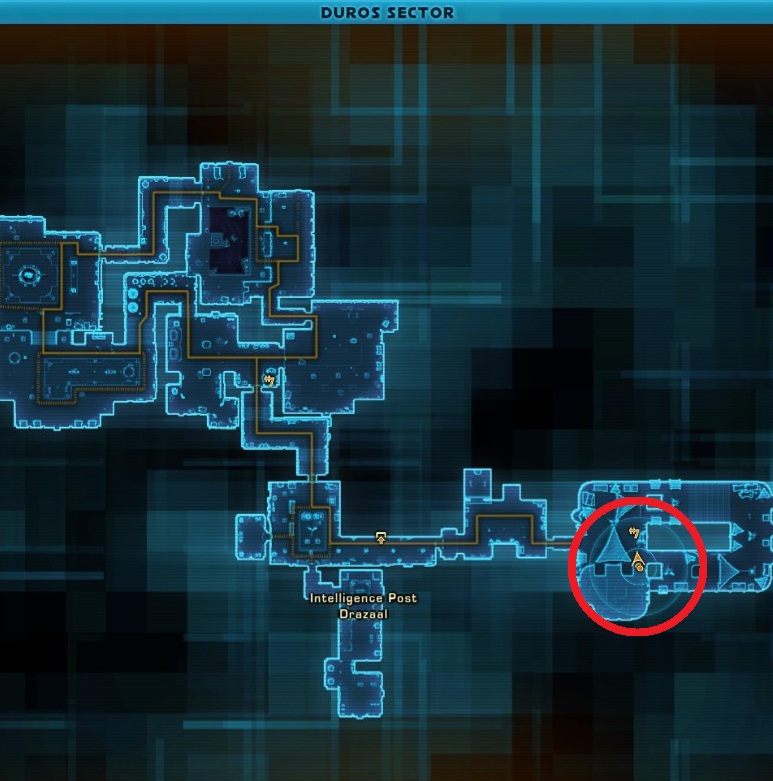
Duros Sector corridor map
Older Duros Sector region map. The highlighted path and red circle are for a reconnaissance droid, NOT Apprentice Girik. Use the sector's corridors and live mission marker to find the Hutt Cartel Safe House, which is a separate story phase.
Map image unavailable. Use the linked original source and the landmark list below.
Locations to recognize
Duros Sector taxi — use the Upper Promenade hub
Intelligence Post Drazaal — local orientation, NOT Girik
Hutt Cartel Safe House — story interior in Duros Sector
Map arrows may lead through other passages before entering the phase
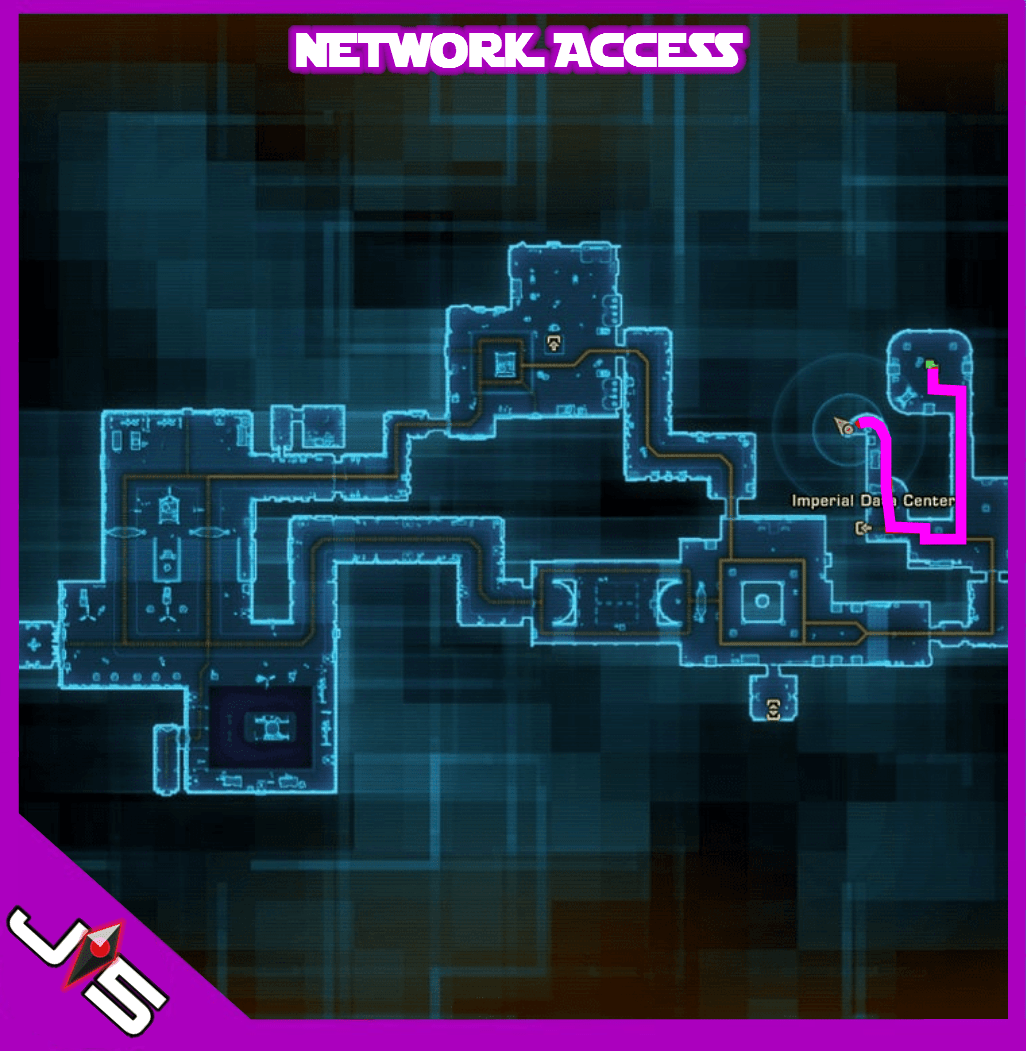
Network Access interior region map
Original Network Access local map. The highlighted magenta route is a DATACRON route, not the Rathari mission. For the class story, use the normal accessible corridor and find Lord Rathari's Satellite Platform phase entrance without jumping from the pipes.
Use a healing companion for the Exchange enforcers,
Imperial soldiers at Outpost Shylon and Rathari's final
encounter. Use whatever defensives and crowd-management
abilities are unlocked at your character's current level.
Force Charge is not a route shortcut
Vengeance is Juggernaut damage specialization. Build
Rage and use currently unlocked damage abilities, but do
not rely on Force Charge to reach enemies behind a phase
door, on a separated map floor or across an urban gap.
Follow the correct doorway first.
MISSION 01 / 05 · Chapter 1 · Main story
Seek Your Contact
Start with the ship's holoterminal, then use the correct Imperial city taxi to reach Halidrell Setsyn. She works inside Setsyn Commodities in the Corellian Sector—not at the Promenade where you first arrive.
Start
Fury-class interceptor after receiving Nar Shaddaa assignment
Finish
Halidrell Setsyn at Setsyn Commodities, Corellian Sector
The route to follow
Fury Galaxy Map→Nar Shaddaa: Mezenti Spaceport→Use ship holoterminal→Upper Promenade taxi→Corellian Sector taxi→Setsyn Commodities phase→Exchange captain and thugs→Speak with Halidrell
Select Nar Shaddaa on your Fury's Galaxy Map
Return to your ship, choose Nar Shaddaa, and arrive at the Imperial Mezenti Spaceport. The Warrior can undertake Balmorra first or Nar Shaddaa first, but both belong to Chapter 1.
Contact Darth Baras on your ship holoterminal before leaving
The mission specifically tells you to use the ship's holoterminal on arriving. Complete this contact to receive Agent Dellocon's location context and Halidrell Setsyn's contact details.
Leave Mezenti Spaceport and find transport to the Upper Promenade
Exit your private hangar into the spaceport and locate the Imperial taxi/shuttle access. Travel toward the Upper Promenade if you have not unlocked a direct Corellian Sector route. Nar Shaddaa sectors do not form one continuous walking street.
From the Upper Promenade, take the taxi to Corellian Sector
Use the taxi terminal and select Corellian Sector. If that stop is unavailable, inspect nearby travel access or the mission's exit breadcrumb and complete the necessary transport unlock. Do not take a taxi to Duros Sector yet.
In the Corellian Sector, find Setsyn Commodities
Open the Corellian Sector local map after the taxi landing. Find the phase/entrance labeled Setsyn Commodities. The mission's marker can point through an interior wall until you enter the actual business premises.
Speak to Halidrell and defeat the Exchange enforcers
You interrupt an Exchange captain and enforcers threatening her. Speak with Halidrell, defeat the thugs when combat begins and complete her follow-up dialogue. This opens the mission Disrupt Negotiations.
Cannot find the objective?
A marker for Halidrell means Corellian Sector → Setsyn Commodities, not the Upper Promenade. If it points outside your current map, use the Upper Promenade TAXI to Corellian Sector and then locate the named phase entrance.
Other activities: Halidrell may stand in a phase room shared by your group. Yellow Corellian Sector quests and datacron hunts are unrelated to this Warrior main objective.
TORCommunity confirms the ship holoterminal, Setsyn Commodities, Corellian Sector, Exchange captain and final dialogue. Planet transit hubs are documented in the Nar Shaddaa location wiki; exact corridor turns are not invented.
Rathari's apprentice Girik is negotiating inside the Hutt Cartel Safe House in the Duros Sector. You must taxi to a DIFFERENT Nar Shaddaa district from Halidrell's Corellian Sector office.
Start
Halidrell Setsyn, Setsyn Commodities in Corellian Sector
Leave Setsyn Commodities and return to the Corellian Sector taxi
Once Halidrell gives the objective, leave her phase and head to the local taxi terminal. You are leaving Corellian Sector entirely, so don't chase the mission direction through any Corellian Sector walls.
Travel via the Upper Promenade to Duros Sector
Choose the Upper Promenade travel hub, then select Duros Sector on the taxi map. This sector has its own taxi and streets. If the Duros taxi is already unlocked as a direct destination, use the route your transport menu offers.
Find Hutt Cartel Safe House on the Duros Sector map
After arriving, open the local Duros Sector map and identify the mission-phase entrance for Hutt Cartel Safe House. It is an interior in this district, not the Imperial Intelligence Post Drazaal or the nearby residential slums.
Enter the safe house and speak to Apprentice Girik
Approach the negotiation and initiate the dialogue. Girik represents Lord Rathari and is accompanied by Hutt Cartel bodyguards.
Complete the fight branch and speak to Girik again
Depending on your responses, the objectives list defeating Apprentice Girik and possibly the bodyguards, followed by talking to him. Watch for the updated Speak to Apprentice Girik task rather than leaving immediately when enemies fall.
Return across the taxi network to Halidrell in Corellian Sector
Leave the Hutt Cartel safe house; take the Duros taxi back to the Upper Promenade, then travel to Corellian Sector. Return to Setsyn Commodities and speak with Halidrell to turn in the mission and receive An Army of One.
Cannot find the objective?
The Hutt Cartel Safe House is in DUROS SECTOR, not the Corellian Sector, and the larger Network Access zone is also unrelated. Use two sector taxi legs if needed. A marker pointing to another district should be followed through the taxi hub rather than by running toward it.
Other activities: Girik dialogue offers different defeat conditions. Complete your active objectives; do not assume every dialogue branch requires killing the Hutt Cartel bodyguards.
Duros Sector, Hutt Cartel Safe House, Apprentice Girik, Hutt bodyguards and Halidrell return are documented mission tasks. Nar Shaddaa imperial taxi links are independently documented.
Outpost Shylon is in the Upper Industrial Sector, NOT in the same Duros Sector where Girik negotiated. This mission includes distinct Imperial and Republic fights, a destructible barricade, and dialogue-driven branches.
Travel from Halidrell to the Upper Industrial Sector
Leave Setsyn Commodities and take the Corellian Sector taxi to Upper Promenade. From its travel hub choose Upper Industrial Sector. The world map destination sits in an entirely separate Nar Shaddaa industrial neighborhood.
Find the route to Republic Outpost Shylon
Once in the Upper Industrial Sector, open that area's map and follow the Republic Outpost Shylon story marker to the correct compound/phase boundary. Do not mistake other Upper Industrial Sector quests, a droid recon objective, or the Network Security District for this main story.
Speak to General Kligton at the outpost and confront him
At Outpost Shylon, initiate the conversation with General Kligton. The mission then calls for defeating Kligton and Imperial soldiers as the engagement unfolds.
Destroy the barricade that blocks access to the garrison
After dealing with Kligton's force, locate the mission objective Destroy the Barricade. Interact with or attack the indicated obstruction so the force-field path into the Republic position becomes accessible.
Enter the garrison and deal with its Republic command
Inside the breached outpost, complete the active Deal with the Republic Forces objective. One branch involves speaking to Commander Naughlen. Alternative dialogue can result in fighting Lieutenant Weggland and Republic soldiers; follow the specific enemies shown in your Mission Log.
Use your PERSONAL holocom after the outpost outcome
When the outpost encounter is complete, activate the flashing personal holocom. It triggers Halidrell's urgent update; do not waste time trying to return to her office before you take the call.
Cannot find the objective?
If the mission marker points into Outpost Shylon behind a barrier, the missing action is often Destroy the Barricade after the first fight. If you have completed the Republic outcome but cannot move on, use your PERSONAL holocom before traveling to another sector.
Other activities: Bringing Up the Rear (Bonus) asks you to defeat six Imperial rear guards. It is not mandatory for the main story and does not determine how you finish Outpost Shylon.
The TORCommunity task list confirms Upper Industrial Sector, Outpost Shylon, Kligton, barricade, Commander Naughlen or Weggland branches, and personal holocom. Unverified corridor turns are omitted.
Halidrell's distress call sends you back to her headquarters in the Corellian Sector. The mission specifically says to take a speeder back; you should not walk sector-by-sector through unrelated city areas.
Start
Personal holocom after the Outpost Shylon conflict
Finish
Halidrell's body at Setsyn Commodities
The route to follow
Answer personal holocom→Upper Industrial Sector taxi→Upper Promenade taxi hub→Corellian Sector taxi→Setsyn Commodities→Defeat blocking Imperials→Investigate Halidrell's body
Accept the distress call immediately after An Army of One
Complete the personal holocom conversation that starts Distress Call. Halidrell is under attack at Setsyn Commodities and her life is in danger.
Use the Upper Industrial Sector taxi back toward the Upper Promenade
Leave the Outpost Shylon region by the accessible exit and locate your Imperial taxi point. Use the speeder network to return to the Upper Promenade interchange, rather than trying to run across Nar Shaddaa's separated maps.
Take the taxi to Corellian Sector and return to Setsyn Commodities
From Upper Promenade, travel to Corellian Sector. Open its local map and head to the same business/phase entrance used during Seek Your Contact.
Defeat or get past Rathari's soldiers blocking access
Rathari has sent Imperial attackers. Clear the enemies preventing your progress into the headquarters and locate Halidrell inside.
Inspect Halidrell Setsyn's body to finish the mission
The objective is Investigate Halidrell Setsyn's Corpse, not merely reach the room. Interact with her body and complete the aftermath conversation/mission advancement. This sets up the duel with Lord Rathari.
Cannot find the objective?
Returning to the Upper Promenade does not complete this mission: take the taxi to CORELLIAN SECTOR, enter Setsyn Commodities and inspect Halidrell's body. If the next quest will not appear, check whether the interaction on the corpse has completed.
Other activities: Operation Rescue (Bonus) involves defeating six Imperial attackers. Do not confuse that count with the required task of reaching and investigating Halidrell.
TORCommunity confirms the speeder trip back to Setsyn Commodities and the body interaction, with optional six-soldier bonus identified separately.
The final duel takes place at Lord Rathari's Satellite Platform in NETWORK ACCESS. Network Access is its own Imperial travel district; do not follow the old datacron platforming route, jump down from balconies, or mistake Network Security District for the class-story phase entrance.
Start
Halidrell's body in Setsyn Commodities
Finish
Ship holoterminal aboard the Fury at Mezenti Spaceport
Leave the Corellian Sector and travel toward the Network Access district
Finish investigating Halidrell, then return to the Corellian Sector taxi. Travel via Upper Promenade to the Imperial Network Access taxi stop. It is not the similarly named Network Security District and is not a waypoint inside the Duros Sector.
Locate Lord Rathari's Satellite Platform entrance
From the Network Access landing, open the local area map and locate the phase entrance explicitly named Lord Rathari's Satellite Platform. Follow the accessible corridors or elevators marked by the story breadcrumb. Ignore datacron routes that tell you to fall onto pipes.
Enter the platform and initiate the confrontation
Approach Rathari and Agent Dellocon. The mission dialogue reveals that Rathari has assembled extra Imperial troops for an ambush; your objective advances to the combat sequence.
Defeat the Elite Imperial Soldiers first
Clear the elite soldiers as indicated. Use your companion's Healing role and current Juggernaut defensive skills if the group is difficult. The following duel occurs in the same story location.
Defeat Lord Rathari and Agent Dellocon
Fight both Sith Lord Rathari and Agent Dellocon as required. Check the Mission Log to confirm that each boss objective registers; defeating ordinary guards alone does not advance to the last conversation.
Speak to the defeated Rathari and decide his fate
After combat, speak with Rathari again. Your choices affect the outcome, but the story's next required task is a return to the ship.
Travel back to Mezenti Spaceport and use the Fury holoterminal
Exit the satellite platform, use the Network Access taxi via Upper Promenade to Mezenti Spaceport, board your Fury-class interceptor and interact with its BRIDGE holoterminal. The mission record explicitly ends with this ship contact.
Cannot find the objective?
There are TWO confusing names: Network Access (where Rathari's satellite platform is) and Network Security District (a different region). Choose NETWORK ACCESS on the taxi map, find the class-story phase door, and DO NOT attempt the datacron pipe-jumping path. After the fight, completing the ship HOLOTERMINAL conversation is required.
Other activities: Rathari's Entourage (Bonus) asks you to defeat five Rathari guards/apprentices. It is separate from the required elite soldiers, Lord Rathari and Agent Dellocon.
TORCommunity verifies the Network Access platform, elite soldiers, Rathari/Dellocon, final dialogue and Mezenti Spaceport ship holoterminal. The Wiki confirms the dedicated phase name; quest-specific room turns need a current game screenshot.
Finish the ship holoterminal sequence, then follow your current Chapter 1 objectives. Balmorra and Nar Shaddaa can be completed in either order. The wider Sith Warrior campaign continues to other assignments, including Tatooine and Alderaan.