Step-by-step Sith Warrior Vengeance Chapter 1 Tatooine guide: find Sharack Breev in Mos Ila, take the speeder to Outpost Varath, track the Sand Demon and chieftain's cave, reach the Jundland oasis from Mos Anek, then confront Yonlach from Outpost Zaroshe.
4 Tatooine story missions30 numbered stepsEntrances and return routesJuggernaut · Vengeance
LOST OR STUCK? · MAP AND FLOOR CHECK
Before chasing the quest marker, check the route
Choose the active story mission.Press L to open the mission log and track the named Sith Warrior objective. A purple mission symbol marks important story content, but not necessarily YOUR class mission. Follow the exact title and task shown in this walkthrough.
Open the full map.Default M opens the main map. Alt + M toggles the overlay map and minimap. If your shortcuts differ, check your assigned keybinds. Start with the WORLD region, then switch to the current AREA or interior floor map.
A marker behind a wall is not a doorway.On the world map find the correct district or zone; on the local map look for the named cave, station, building entrance, lift, security door or staircase. When the target is on another floor, find a connecting passage before heading toward its map symbol.
Know which travel option is available.Quick Travel opens a world map with available travel-point filters. Choose an unlocked destination on your current planet and pay attention to any restrictions or costs shown in-game. For a new planet, use your Fury's Galaxy Map and the orbital station surface shuttle instead.
If the marker does not advance, check the VERB.Talk, use, loot, disable, exit and return to your ship are separate mandatory interactions. Read the mission's “If you are stuck” note below before fighting more unrelated enemies.
Find the correct entrance and complete each objective
Empire taxi route: Mos Ila → Outpost Varath → Mos Anek → Outpost Zaroshe. Varath and Mos Anek are in Jundland. Zaroshe is in the Dune Sea. The game will show only taxi links you have unlocked, so use the available transfers instead of walking across the whole planet.
The real map references show regional outposts and general roads, not invented mission-specific route lines. Find your currently active story objective below to identify the right cave, hut or story phase.
Real game maps and sourced images
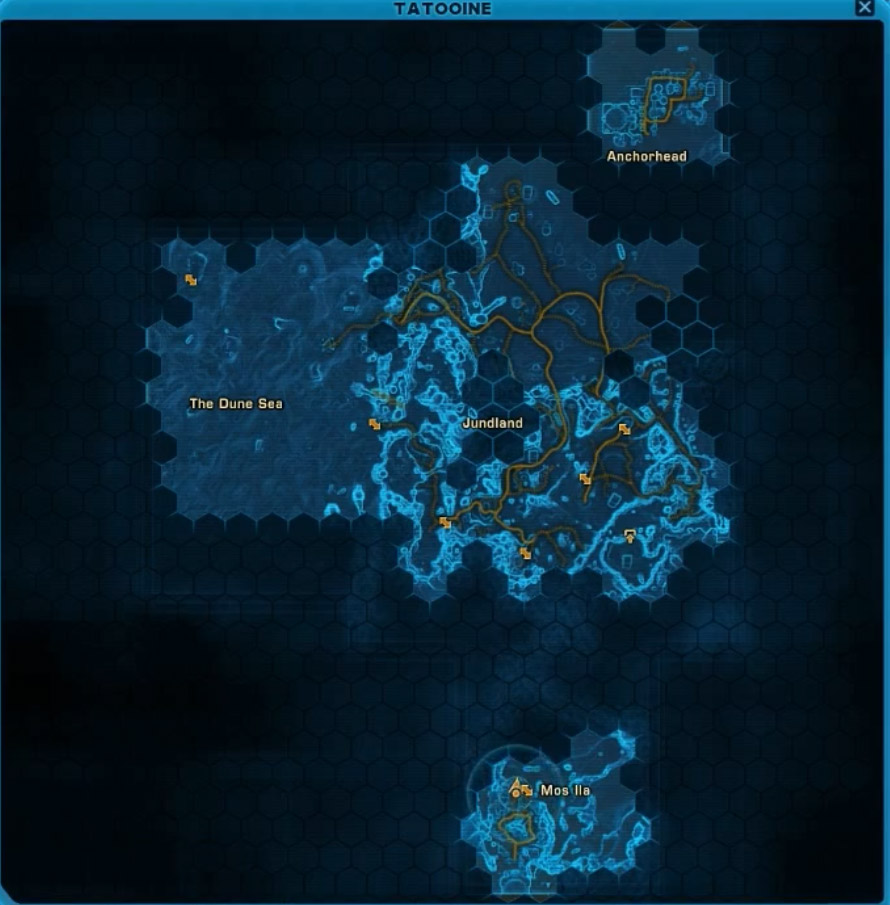
Tatooine: in-game world map and Jundland taxi outposts
These images are published player or forum references, not newly generated maps. Use them to recognize the area names and relative locations. An external world map cannot replace the mission-specific floor map once inside a building.
Tatooine in-game regional map: Mos Ila, Jundland and Dune Sea
Use the blue in-game terrain map to distinguish southern Mos Ila from central Jundland and the western Dune Sea. The original guide concerns Matrix Cubes, not the Warrior missions; vendor marks must NOT be interpreted as our quest route.
Map image unavailable. Use the linked original source and the landmark list below.
Locations to recognize
Mos Ila: Empire arrival, Sharack Breev and Fury return
Jundland: Outpost Varath, Shattered Basin and Mos Anek
Dune Sea: Outpost Zaroshe and Master Yonlach's compound
Anchorhead: Republic city; not a stop on this Warrior route
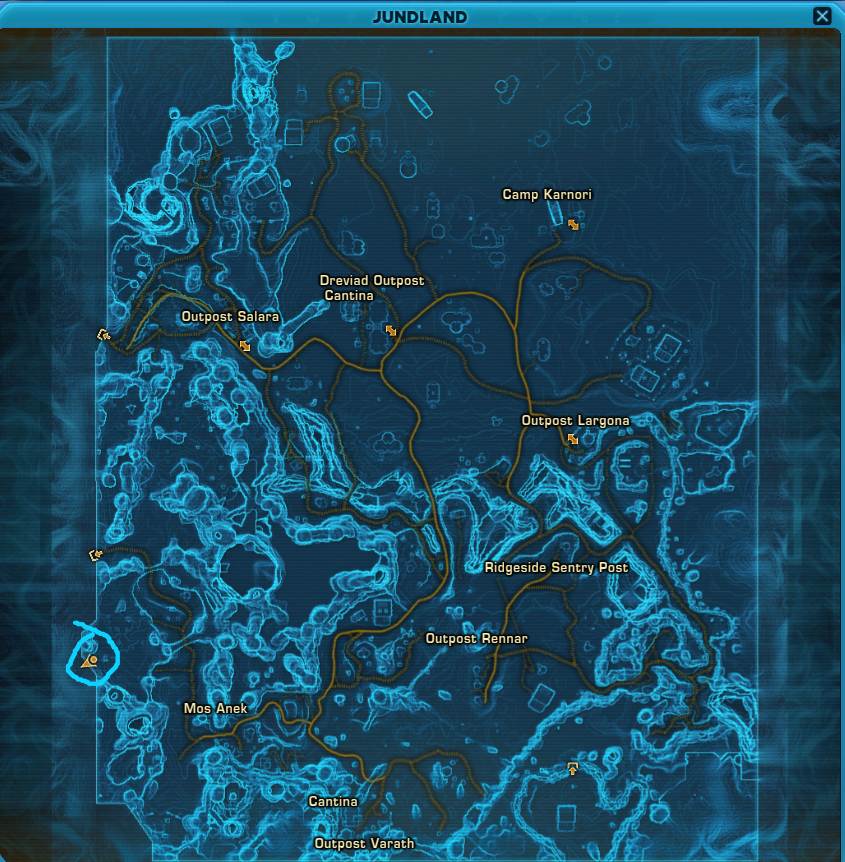
Jundland regional map with Mos Anek and Outpost Varath
Shows Mos Anek and Outpost Varath at the southern end of Jundland. This player image was published for a Republic datacron and does NOT identify the Sand Demon cave or oasis. Never follow its highlighted datacron objective as the Sith Warrior route.
These quest steps are the same for every Sith Warrior discipline. Vengeance is a damage specialization. Take an available companion in Healing role for normal travel and combat, and keep defensive abilities and medpacks ready. Do not use Force Charge to try to jump inaccessible cliffs or closed story doors.
Yonlach and Yul-li: fight the apprentice first
The Yonlach confrontation can disable your active story companion. Players report that Yonlach may remain passive until he is damaged. Target Yul-li first with single-target attacks and avoid area damage that catches Yonlach. After Yul-li falls, focus on Yonlach; if the fight permits, back outside the hut to recover, but crossing the doorway may reset an unfinished fight. Check gear condition and bring medpacks rather than relying on a healer being available throughout this encounter. These combat observations are community-tested rather than a guaranteed mechanic for every update.
By Imperial Dark Sector
MISSION 01 / 04 · Chapter 1 · Main story
Seek Answers
On Tatooine, the class contact is in Mos Ila Spaceport. Do not leave for Jundland immediately: Baras and Sharack Breev send you first to Izzeebowe Jeef in the Ugarra Dunes.
Start
Fury holoterminal after A Threat Leveled
Finish
Izzeebowe Jeef's hut with Sharack Breev
The route to follow
Fury Galaxy Map: Tatooine→Ship holoterminal→Mos Ila Spaceport→Talk to Sharack Breev→Ugarra Dunes outside Mos Ila→Jeef's hut→Speak to Izzeebowe Jeef
Fly to Tatooine
Select Tatooine on the Fury's Galaxy Map after completing A Threat Leveled. You will dock at the Empire's Mos Ila spaceport, not at the Republic city of Anchorhead.
Call Darth Baras before exiting the Fury
Use your Fury holoterminal immediately after arrival. The in-game mission records require this conversation to identify Master Yonlach and send you to Sharack Breev.
Find Sharack Breev in the Mos Ila Spaceport
Leave the Fury private hangar and follow the class-story marker within the Mos Ila Spaceport to Sharack Breev. Speak with her before following any taxi marker deeper into Jundland.
Travel to the Ugarra Dunes farm settlement
Follow the open-world path out of Mos Ila toward the Ugarra Dunes and the farmstead Jeef occupies. Exchange opponents guard the approaches; they are not the mission-giver.
Find Izzeebowe Jeef's hut
Once you reach the settlement, locate Jeef's hut using the quest marker and speak to him. Sharack Breev meets you at that hut; if you are searching for her on the spaceport again, you are in the wrong stage.
Complete the dialogue and check the next objective
Continue Jeef's dialogue until the class quest switches to Demon's Blood. You should now be traveling to Outpost Varath in Jundland rather than roaming the Mos Ila farmstead.
Cannot find the objective?
If Sharack Breev does not appear at the farm, confirm you spoke to her at Mos Ila Spaceport first. If the mission stays on Seek Answers, complete BOTH Izzeebowe Jeef conversation stages recorded in the mission database.
Other activities: Deal with the Exchange (defeat ten Exchange forces) is a bonus objective on the way to Jeef. It is not required for story progression.
The ship, Mos Ila Spaceport, Sharack Breev and Ugarra Dunes hut are documented. Individual street-by-street turns from Mos Ila are not verified.
The quest requires two different caves in Jundland: the Shattered Basin contains the Sand Demon, while the chieftain's cave contains the evidence for the next journey.
Start
Izzeebowe Jeef's hut in the Ugarra Dunes
Finish
Sand People chieftain's hut and recovered map
The route to follow
Mos Ila taxi→Outpost Varath→Shattered Basin→Sand Demon's cave→Confront / defeat Sand Demon→Examine body→Chieftain's cave→Search hut for clues
Use the Mos Ila speeder to Outpost Varath
Return to Mos Ila's Imperial taxi terminal and travel to Outpost Varath, the outpost in southern Jundland named explicitly in the mission instructions. You do not need to ride to Mos Anek for the demon cave.
Follow the Shattered Basin objective, not the Dune Sea
From Outpost Varath, travel overland through Jundland toward the Shattered Basin using the current mission marker. The basin and demon cave belong to Jundland; the Dune Sea is a later story destination.
Enter the Sand Demon's cave
Approach the cave entrance inside the Shattered Basin and follow the cave passage to the marked encounter. Bonus wraids may be present; killing every cave creature is not required to advance.
Approach and confront the Sand Demon
Use the objective at the cave's far end to trigger the Sand Demon sequence. The journal may first tell you to approach or examine the beast before combat begins.
Defeat the beast and examine its remains
Defeat the Sand Demon and interact with the marked body or evidence object as instructed. Do not leave the cave immediately after the combat; examining the demon is a separate mandatory step.
Track the Padawan to the chieftain's cave
Exit the Sand Demon's cave, follow the new Jundland objective marker to the Sand People chieftain's cave, and enter that distinct location. This is not a return to Izzeebowe Jeef's hut.
Explore the cave and search the hut for clues
Move inside the chieftain's cave to the hut, then interact with the clues specified by the mission. The story explains why the Sand Demon blood makes the Sand People retreat.
Obtain the map that points toward Oasis
Finish the chieftain encounter and obtain the map or story information that advances the next mission. The new destination is an oasis reached from Mos Anek, not the earlier Shattered Basin.
Cannot find the objective?
Two similarly described cave stages appear back-to-back. If the journal says Search the Sand Demon's Cave, go to the Shattered Basin from Outpost Varath. If it says Explore the Chieftain's Cave or Search the Hut for Clues, follow the NEW Jundland marker after examining the demon.
Other activities: Clean out Sand Demon's Cave (five Bitterscale wraids) is optional. You may ignore it while following the mandatory class-story interactions.
Verified area and interaction order; exact canyon turns and the cave entrance's map coordinates are not supplied by the cited quest records.
Do not confuse this with the Dune Sea. The oasis for this Warrior mission is in Jundland and is best approached using the Mos Anek speeder stop.
Start
Chieftain's map after Demon's Blood
Finish
Reflection dialogue at the oasis
The route to follow
Imperial taxi to Mos Anek→Jundland oasis marker→Trek to Oasis→Examine Strange Light→Defeat Reflection→Speak with Reflection→Next mission: Guru in the Dunes
Return to a usable Imperial taxi
After leaving the Sand People chieftain's cave, make your way to the nearest unlocked Imperial speeder terminal. The mission instructions specifically call for travel to Mos Anek in Jundland.
Choose Mos Anek, not Outpost Zaroshe
From Outpost Varath take the speeder to Mos Anek. Outpost Zaroshe is for the NEXT mission, Guru in the Dunes, after the reflection encounter.
Ride out of Mos Anek toward the oasis marker
Use the large Jundland map and follow the current class mission marker to the oasis. The surrounding canyon approaches can make the marker appear across a wall; stay on traversable roads until you reach the oasis entrance.
Examine the Strange Light
At the oasis interact with the Strange Light objective. This interaction triggers the story encounter, so do not search for a separate Jedi Master here.
Defeat the Reflection
Fight the summoned reflection of your Warrior. Use Vengeance damage skills currently unlocked and activate a defensive or companion heal if the encounter becomes difficult.
Talk to the Reflection after combat
Interact with the Reflection again after it is defeated. The quest requires dialogue after the fight before the next Sith Warrior mission begins.
Finish the vision and identify the next route
Complete the Reflection conversation. Your story now directs you beyond the Forbidden Pass toward Master Yonlach, reached from Outpost Zaroshe in the Dune Sea.
Cannot find the objective?
The Oasis objective is in JUNDLAND. If the marker seems to point all the way across the west of the planet, verify that the active mission is Oasis and take the speeder to Mos Anek; the Dune Sea is the later Yonlach mission.
Other activities: Bleed the Wound is an optional bonus for defeating Sand People and is not required to finish Oasis.
Jundland and Mos Anek are verified. No claim is made that an old datacron map shows the actual oasis encounter.
This is the Yonlach confrontation. The game explicitly instructs players to take a speeder to Outpost Zaroshe, then proceed into the Dune Sea to Yonlach's compound.
Start
Oasis Reflection dialogue
Finish
Ship holoterminal after reporting to Sharack Breev
The route to follow
Mos Anek Imperial taxi→Outpost Zaroshe (Dune Sea)→Yonlach's compound→Talk to Yonlach→Defeat Yonlach and Yul-li→Speak to Yonlach→Report to Sharack Breev→Return to Mos Ila Spaceport→Fury holoterminal
Take the Imperial speeder to Outpost Zaroshe
After the Oasis reflection, return to Mos Anek's taxi and choose Outpost Zaroshe. If unavailable, unlock the intermediate Imperial taxi stops; on Tatooine the documented route is Mos Ila → Varath → Mos Anek → Zaroshe.
Confirm you are in the Dune Sea
Outpost Zaroshe is an Imperial outpost in the southern Dune Sea. Open your full map and follow the Guru in the Dunes class marker toward Yonlach's compound, rather than taking the Republic Anchorhead route.
Locate the compound entrance
Look for the accessible opening into Master Yonlach's domain beyond the Forbidden Pass. The mission sends you to his compound near Outpost Zaroshe; a line passing over cliffs on the map does not mean you can ride through rock.
Speak to Master Yonlach
Enter the class-story area and approach Yonlach for the required opening dialogue. The interaction leads to the confrontation involving both Yonlach and his Jedi associate Yul-li.
Defeat Yonlach and Yul-li
The encounter can disable your active story companion during its opening cutscene. Start by targeting Yul-li with SINGLE-TARGET attacks. Avoid area-of-effect abilities that might also damage Yonlach: players report that Yonlach stays passive longer if you do not hit him. Defeat Yul-li first, then focus on Yonlach using Vengeance abilities and defensive cooldowns. Bring a medpack and check your gear beforehand.
Speak to Yonlach again
After the combat objective completes, interact with Yonlach for the required post-fight conversation. The quest does not finish at the instant both Jedi health bars reach zero.
Find Sharack Breev for the follow-up
Follow the newly updated quest marker and speak to Sharack Breev. This follow-up dialogue is part of the mission progression before you are sent to report back to Baras.
Return to Mos Ila and board the Fury
Use unlocked Imperial taxis to retrace the route from Outpost Zaroshe through Mos Anek and Outpost Varath to Mos Ila. Go through the spaceport to your private Fury hangar.
Contact Baras from the Fury holoterminal
Once aboard the Fury, use the ship holoterminal to report the result of the Yonlach encounter to Darth Baras. Follow the ship story mission for the remaining Alderaan objectives.
Cannot find the objective?
Outpost ZAROSHE in the DUNE SEA is your starting point, beyond Forbidden Pass toward Yonlach's compound. During the fight, take down YUL-LI FIRST with SINGLE-TARGET attacks and avoid damaging Yonlach with area effects. The story can disable a companion. Player reports suggest stepping just outside the hut to recover between opponents, but retreat can reset combat. Finish BOTH Jedi, then TALK TO YONLACH and report to Sharack Breev before the Fury.
Other activities: The Yonlach combat advice is based on player experiences and may change with game patches. If defeated repeatedly, check that your gear is repaired and approximately matches your level, and use available medpacks. Other Dune Sea quests and Jawa balloon or datacron routes are not class-story prerequisites.
Quest tasks and Outpost Zaroshe are verified. No precise floor turns inside Yonlach's compound are asserted.
After the Fury holoterminal conversation, continue the Alderaan class storyline beginning with Shake Down. Do not confuse the planet story with an optional Tatooine bonus series.